Nomadness Console Devices
Last updated: February 13, 2014
This page is a current list of all the objects on (or in) the various control surfaces around Nomadness.
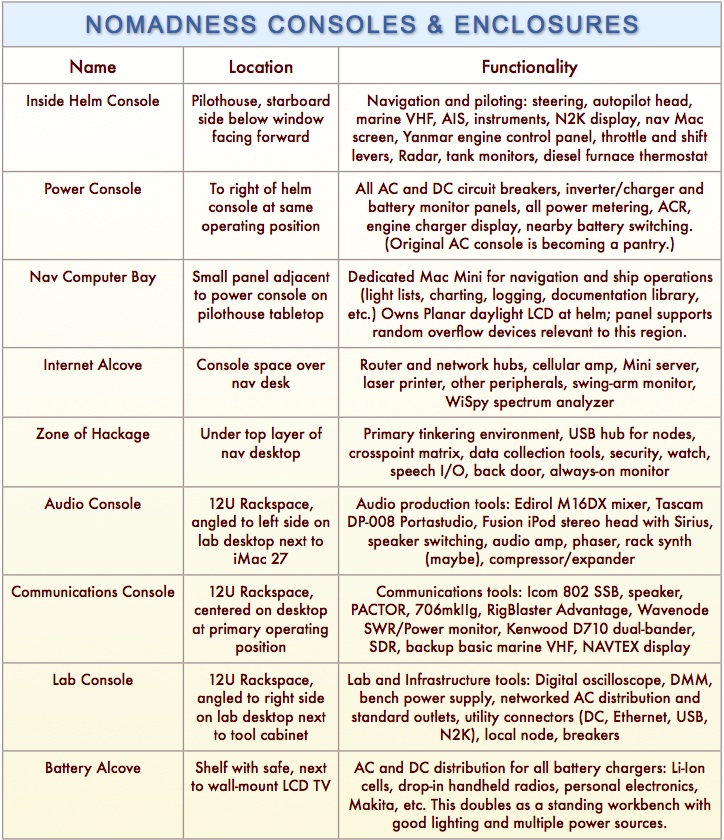
Let’s establish context with a table listing the consoles (from Nomadness Report, Issue #21) and then reference those names in the sections that follow.
1. Inside Helm Console
This is the primary aggregation of navigation and piloting tools, located at the seat below the starboard window of the pilothouse. It’s a rather cramped space, and the forward-oriented console flows into the power-control panel along the side. The intent of all this was to bring widely scattered controls and displays into a single useful region, allowing much better focus underway and less distraction. There is also a Mac screen that provides charting, communications, and easy access to PDF documents about on-board systems.
The piloting region actually consists of three surfaces and a few stray objects, starting with the upper helm panel. This is hinged on its bottom edge, is made of .5″ King Starboard material, and carries five control/display units as well as a few LEDs (see photo above):
- Maretron DSM250 multifunction color display f0r the NMEA2000 network
- Vesper WatchMate 850 AIS transponder and display
- Two old B&G h1000 displays (upgrade needed, but that’s a whole system)
- Simrad AP24 Autopilot control head
- Kestrel 4000 weather datalogger (temperature, pressure, humidity)
To the right of this hinged panel are three surface-mounted items:
- Icom M504A Marine VHF with CommandMic to outside helm and hailer
- Wireless remote for Golight Stryker steerable HID bow spotlight with camera
- MFJ digital clock with WWV-synchronizing receiver and two zones
Below the panel is a much larger hinged surface that originally contained a large Robertson autopilot as well as engine controls. This has been brought into the current century with a large LCD for a nav Mac:
- Planar sunlight-readable LX1201PTI touchscreen display for Nav Mac
- Power-on button for Nav Mac
- Engine throttle and gearbox mechanical control levers
- Joystick and interlock switch for auxiliary hydraulic steering system
- Analog joystick for video camera selection/steering or other mapped X-Y apps
- Yanmar D-type instrument panel for 4JH-DTE turbo-diesel engine (77 hp)
- Connector for local VHF radio microphone to left of Yanmar
- Utility NMEA2000 connector for device testing local to helm
- Utility 12V connector (cig style) for worklight, etc
- Data ports: Ethernet to router, USB to local Mac, DB9 to AIS GPS feed
To the right of all this is an angled surface that flows from the piloting console into the power region. This carries three built-in items and one surface-mounted unit:
- Furuno 1932 mkII 4kw open-array 48-mile radar
- Charging dock for Simrad WR20 wireless autopilot control
- Tank tender panel for 2 water and 2 oil tanks
- Webasto Airtop 5000 thermostat (little better than a “switch” – to be replaced)
Inevitably, this region will get busier as piloting-related objects are added, but the items listed above make for a reasonably thorough operating console… especially given what’s right next door:
2. Power Console
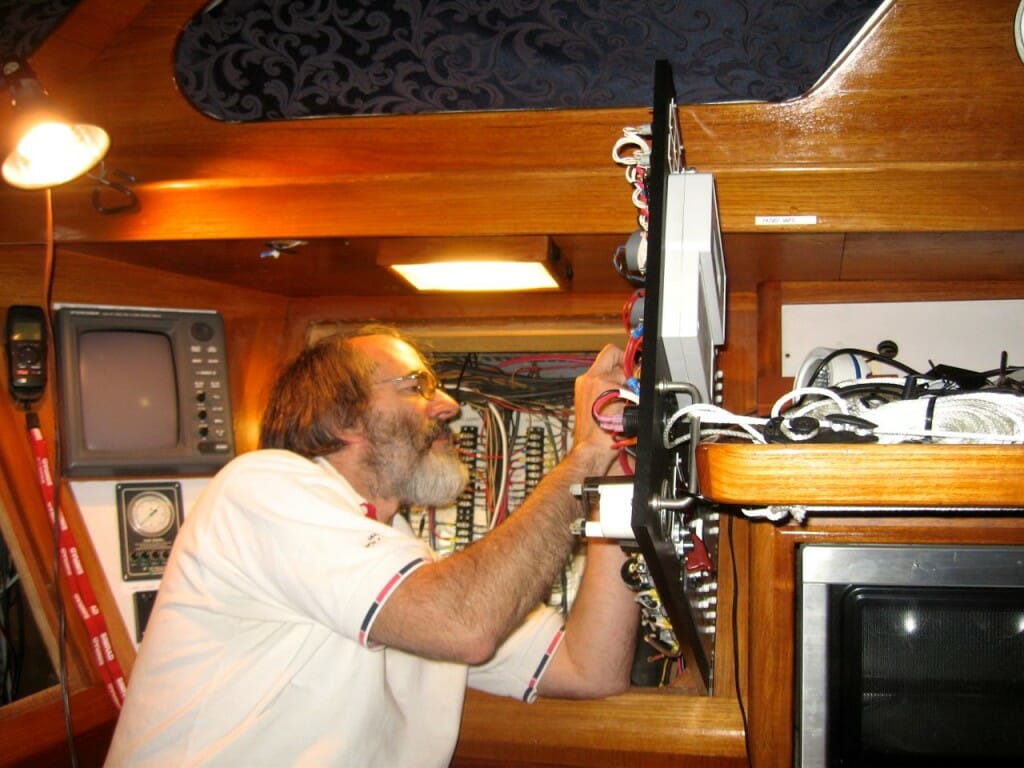
This is a large panel that, in its new incarnation, hinges to the right… allowing me to lock it in a serviceable location against the Pilothouse table and still have access to the distribution terminal strips against the outer hull wall. This originally hinged UP, which was physically very awkward, and this space now incorporates AC distribution as well (an area that was even worse, unserviceable except by willowy contortionists). A thin panel mounted to the original piano hinge at the top carries a temperature monitor as well as a vent to allow convective or forced-air cooling (the latter when commanded by the Outback inverter auxiliary output, which drives a quiet pair of fans in a grille down at foot level).
The hinged power panel carries the following devices and subassemblies:
- DC breaker panel (Bluesea 8382) with DMM, 100A main, and 35 positions
- AC breaker panel (Bluesea 8459) source-select breakers and 9 positions
- AC digital multimeter (Bluesea 8247)
- MATE3 control/display unit for Outback power system
- Yanmar 3GM generator control panel (homebrew)
- Bluesea ACR status LED and override button to disconnect
- Ring LED/pushbutton for Node P status; another for power fault
- 12V utility outlet
- AC utility outlet
- Handle and bumper for desk edge to provide support when open
- Row of latching buttons off common fuse with 8 ring LEDs and legend plates for breaker panel backlights and LED lighting: pilothouse table, power console interior, helm console interior, pantry interior, under-table, battery bay, engine compartment.
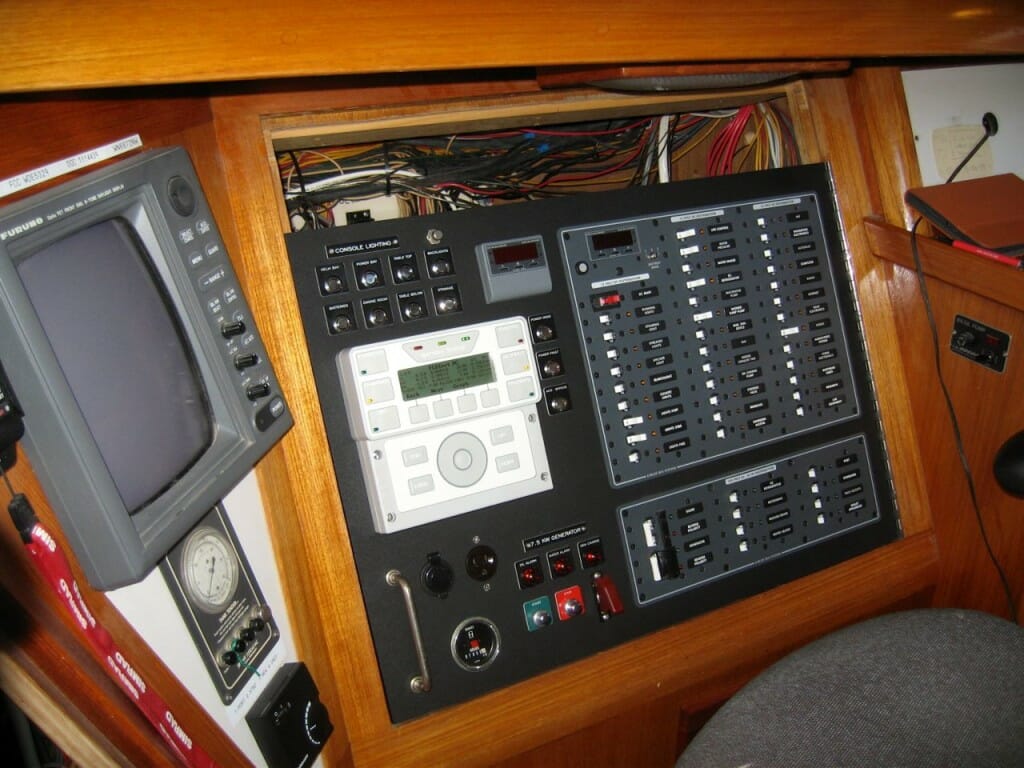
Behind this panel may be found the Outback FX2012 inverter/charger, along with the network hub to interface that with the MATE3 display, FLEXnet DC shunt-monitor, and the FLEXmax solar charge controller located on the pilothouse aft wall. There is also a massive distribution panel, much of the fat power cabling related to the nearby battery bank, Charles ISO-G2 isolation transformer, and various other things in the power domain that are continued in the battery bays under the pilothouse table. This entire system is the subject of the first of the Design Packages in the Boat Hacking series (which will be linked here when complete).
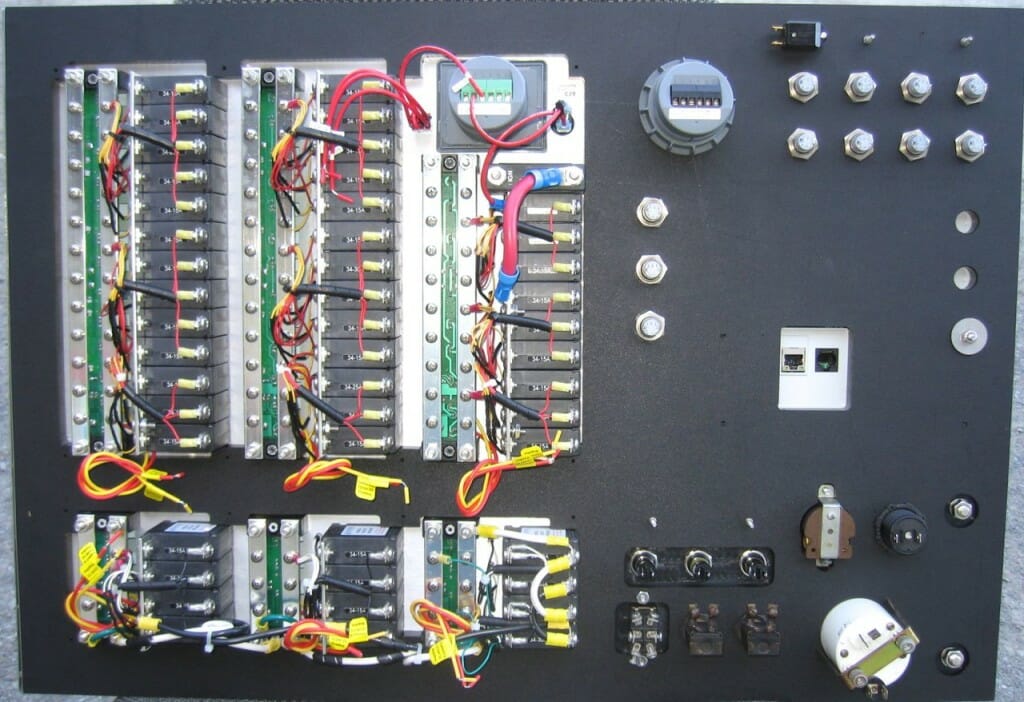
Here are a few shots of work-in-progress (May, 2013). I machined the substrate and added spot-faces and other detail where needed for items that can’t handle the half-inch thickness of the panel. Not yet shown in the rear-view photo are two sub-panels… one over that large open area to support the local network node with its I/O breakouts, and the other over the AC breaker group at the bottom (for safety).
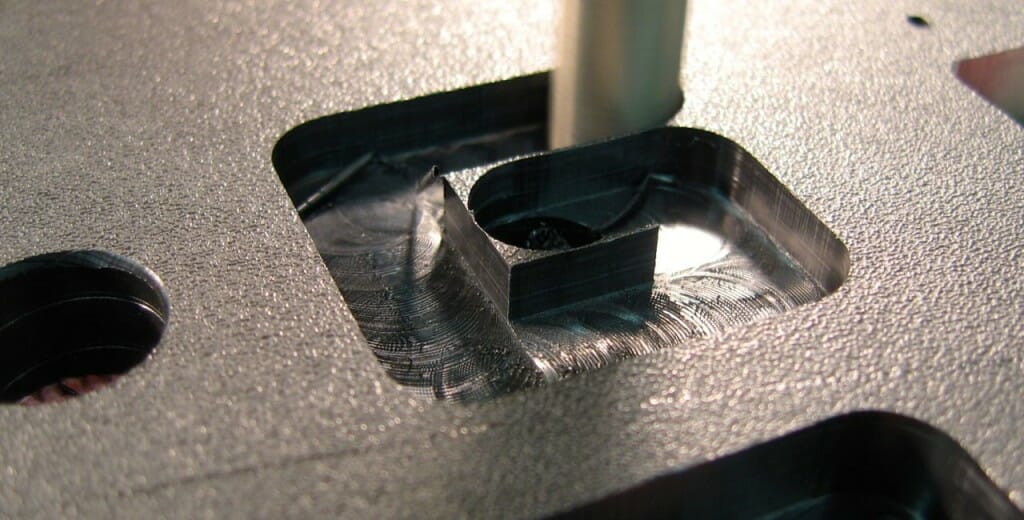
This is now installed with all AC and DC wiring done, described in much more detail in a separate post (with schematics). I fabricated the substrate with my Bridgeport milling machine… this is one of those situations where other methods would have been adequate, but having the tool to be obsessive about precision meant that I had no choice!
3. Pilothouse Table Panel
This is a somewhat cramped little spot, conveniently over the pilothouse table but inconveniently recessed so far back that it is not easily line-of-sight from my normal seated position, and serviceability is poor. For a long time, the stereo has been here, but that is moving to the audio console in the lab/studio region.
This panel is a catch-all for things that are convenient to this central table, as well as generally relevant to ship operations:
- Utility AC outlets
- Utility 12V cig-style outlet
- Utility ethernet outlet (to router)
- Utility USB outlets (local Mac and Server)
- USB charger port for various devices
- Headphone jack with source select switch (local comms, central audio, etc)
- Remote display for propane sensor
- Remote indicator (not via network) for bilge water
- Bilge pump switch
- Fusion NRX200 remote for IP700 stereo
- Security keypad
- LCD and status LED for Pilothouse network node
- Furuno NAVTEX receiver
The three zones described so far comprise the ship operation station… all piloting, power control, security, and general day-to-day “cruising” functions are concentrated in this space that wraps around the captain’s chair and small pilothouse table on the starboard side (across from the galley). Now let’s step over to the port side…
4. Internet Alcove
This region is located above the original charting table, in a nacelle that originally held nav instruments and VHF. Since the sloped desktop is becoming the “Zone of Hackage” and the lab/studio space is immediately forward, this ends up being a perfect spot for the server and all networking hardware. (Thanks to Steve Mitchell for the great “Internet Alcove” name, as used on his boat.)
A lot of this is behind the scenes and not packaged as console devices… including blinkie things like the router that I want to be able to see to assess connectivity and network activity at a glance. I’m assuming this will be accomplished with a sheet of smoked acrylic (it’s very bright) rather than tedious repackaging that would require major surgery on the next device upgrade.
This region conveniently has a barrier strip with five switched 12V power circuits from the breaker panel and is adjacent to the primary antenna-cabling nexus. While not yet well-defined, this is the stuff I expect to be resident there:
- Mac Mini Server (always on, in charge of shipnet and data collection)
- Cradlepoint MBR1200 router, with Millenicom cellular and WiFi upstream
- Cyfre cellular amplifier
- USB hub
- 2.4GHz WiSpy gadget
- Maretron USB100 or other N2K gateway device (that one is not Mac-friendly)
- Hinged local minimal monitor, though machine usually headless
- Brother laser printer tucked into left end of nacelle
- Other networking tools to be defined
- DC-DC converters for Zone of Hackage (better airflow up here)
- Fan temperature control module similar to the one in the nav Mac region
Just in front of this, under a lifting tabletop and over the drop-in freezer, is the geek playground…
5. Zone of Hackage
Technically, this doesn’t belong on this page, since there are no “console devices” here at all… it is basically invisible. However, I briefly include it since it is a major nexus of hardware.
This shallow space (about 3″) is about 6 square feet of protected breadboard area, which is perfect for all the circuit boards, distribution panels, crossbar networks, and other gizmology related to data collection and control. Ease of access is a huge issue with this class of stuff, and I would not want to have to pull out 19″ rack panels to access deeply embedded circuit boards every time I want to add a bit to an Arduino. Inside this region, we will find:
- Network-savvy data collection hub (TS-7800, Rapberry Pi, or something)
- Backdoor-access node with reboot skilz, power-control, other hooks
- USB tiered star for all nodes, serial interfaces for long-lines, and XBee
- USB switch between local hub and dev Mac
- Internal environmental sensor
- Node X (crossbar matrix) and interconnects
OK, there will be a lot more on this in a future page. Let’s get back to actual front-panel devices…
6. Audio Console
Now we step forward to Geek Central, a wrap-around console integrated with the lab/studio desktop that has replaced the original salon dinette. This has 5 facets, though I will only go into detail on the three central ones (the other two are a 27″ iMac on a VESA mount on the left, and a locking 7-drawer tool cabinet on the right).
The three control surfaces in this lab/studio region are based on 12U rack frames (Middle Atlantic CFR series), with the industry-standard 19″ panel width. Obviously this is not really marinized, so in rough conditions a curtain suspended from a track on the “roof” of the region will pull all the way around to protect the equipment… good for flying spray from wet foulies, but useless in a knockdown. I’ll try to avoid the latter, along with lightning strikes.
First, there are a few items associated with this entire region and are not mounted on any of the three console surfaces (Audio, Communications, Lab):
- Pair of enclosed speakers (Klipsch KHO-7)
- Powered Fusion subwoofer below the desktop (probably unnecessary)
- Small oilless compressor in enclosed bin (air tools and hookah-diving)
- Central shop-vac in enclosed bin
- 88-key digital piano in drawer below desktop (PX-5S)
- Dynamic microphone (Shure SM-58) on retractable boom mounted on mast for voice as well as standing flute use
- Flexible work lights mounted on top of the console roof
- Pull-out stainless tray under the tool cabinet, devoted to soldering stuff
Since this will be the place to play the piano as well as edit podcasts and other productions, one of the primary needs is for a decent set of audio tools. Much can be done in software these days, but for things with long duty cycles (stereo, general recording, piano noodling at anchor) in a power-sensitive environment, I prefer to have hardware alternatives with tangible control surfaces. This audio-oriented rackspace has these front-panel devices:
- Edirol M-16DX mixer panel
- Tascam DP-008 porta-studio with SD-card recorder
- Fusion MS-IP700 marine stereo with N2K control and four zones
- Homebrew subpanel for audio routing and integration with network
- Delvcam triple video monitor and related source select
- Local analog camera
At the moment there is 1-3U of free space available in this space depending on whether I keep the Crown (1U is 1.75″ vertical, 19″ wide). Hardware internal to this rack zone includes:
- Sirius/XM receiver associated with Fusion radio (note SCC1 connector issue)
- Interface box for Edirol mixer
- Dedicated amp for phaser system
All three of these 19″ rack zones are mounted on low-friction runners and are thru-bolted to the desktop, pulling out for service.
7. Communications Console
The most dense packaging job is this one, with a variety of comm and audio tools sharing space on a tightly packed panel. The list of console devices will be followed, as above, by a list of items that are “behind the scenes,” and the comm toolset also includes some power-hungry black boxes that are mounted under the desktop (in a third list below). First, the front panel:
- Icom IC-M802 marine SSB HF transceiver
- Icom IC-706mkiiG multimode transceiver (HF, 2m, 70cm)
- Kenwood TR-D710A digital dual-band transceiver
- Uniden BCD-996XT scanning receiver (or something)
- PACTOR modem – SCS PTC-II with upgrade
- FM transmitter and routing
- RIGblaster Advantage computer/radio interface (for 706)
- WaveNode WN-2 SWR and transmit power meter (multiple probes)
- CLRspkr DSP unit to improve received audio (SSB and CW)
- Icom SP-24 speaker associated with 802 (reroutable)
- Rotary switch cluster for speaker selection and xfer to mixer/crossbar
- Pop-out CW paddle
- Connector cluster for headset, microphones, external key
- iPad dock for local browser without powering big iron
Inside the box are a few related items:
- Back-door Yaesu twins (290 and 790) for remote access (low standby current)
- UDR56K-4 universal digital radio, maybe. Possibly some SDR also.
- Antenna patch panel (on rear) to allow experimentation and analyzer hookup
And as noted above, there are some large “black boxes” associated with comms that need better airflow than they would have inside the cabinet… along with a few related items. These are as protected as they can be, under the desktop close to the cabling nexus:
- Icom 802
- Kenwood D710
- Icom 706
- WaveNode sensor modules
- VHF/UHF duplexer
- Dedicated Blue Sea fuse panel for radio loads
This region is in the middle of the lab console, and the panel devices are arranged for maximum ergonomic comfort since they tend to be used for hours at a time. Radio knobs are down low, cables exit low and to the side, and so on.
To the right of this, angled at about 40°, is the console facet devoted to circuit design and debugging:
8. Lab Console
This toolset is not yet well-defined… there are a lot of choices out there ranging from cheesy budget stuff to completely unaffordable professional goodies. Somewhere in between is the sweet spot (Rigol?), and I have spent an unhealthy amount of time reading the eevblog forums and other resources. So for this list, I am not going to specify models unless they are actually known… but the general collection of tools is defined:
- Variable DC bench power supply, multiple outputs
- Digital multimeter in addition to hand-held Fluke
- Digital sampling oscilloscope
- Function generator (at least a basic signal source)
- Soldering/hot-air station & fume extractor; drawer under desk for tools
- Utility power and node I/O, along with network ports (USB, RJ-45, N2K, etc)
- Lab Node serial LCD and status LED
- AC distribution panel
As specific models are identified and acquired, this list will be updated.
9. Battery Alcove
Finally, although this is not exactly a “console” as such, I might as well include it since it is an aggregation of gadgets… in this case, items devoted to charging all the other gadgets aboard. That is actually kind of a messy problem on a boat, with hand-held radios, tools, computers, phones, flashlights, and just plain batteries.
In the area above the standing workbench across from the lab, above the safe, is a cluster of power-things… along with an AC power strip with individually switched outlets, USB charging ports, and DC. The intent is to avoid as many specialized wall-warts as possible (hateful, inefficient things), and where they are necessary, at least shut them off when not in use. Also, this puts the sloppy tangle of charging cables in one place that is mostly out of sight… not at the pilothouse table where they otherwise tend to gather into knots.
The devices here include:
- Maha MH-C9000 charger for Eneloop AA and AAA cells
- Charging base for Makita Li-Ion LXT series tools
- Charging base for Icom hand-held marine VHF
- Charging base for Yeasu VX-6 handheld (amateur radio)
- Charge cables for iDevices, Kindle, VX-2, and USB thingwhats
- Switched AC outlets
- 12V outlet (cig style)
- Flat-screen TV mounted on door to parts closet
- TV antenna gain/attenuator control, wall-mounted
And that’s it for this list! Conspicuously absent are other regions where there are tech aggregations (waterworks, galley, engine room, hydroponics bay, etc), but those will be detailed separately as they unfold.
Detailed schematics and system designs will be available as hard-copy publications in our Boat Hacking series.

