
Nomadness Report – Issue 7
by Steven K. Roberts
June 8, 2011
In this issue, we take our first look at the boat’s interior… classic wood joinery and a beautiful, almost austere layout that is a natural backdrop for gonzo engineering projects. She’s not cushy at all, and although that is sometimes annoying, it lends itself well to gizmology (while quietly enforcing a sense of quality, since slapdash packaging would clash).
We stroll slowly through the pilothouse, looking at the overall view, wood stove, galley, and piloting console… then step below into what is about to become the lab and sketch some of what lies ahead. There’s more, but we’ll get to it another time.
We also devote some space to reverse engineering, which will be an ongoing background task for a while, and pay homage to the Microship, which occupied a decade of my life before I turned my attention to boats big enough to live aboard.
Finally, we close on a personal note… with some words of appreciation for my engineer/sailor dad who left us six years ago.
Reverse Engineering
In Issue #4, I spoke of my new Brother 11×17 printer, which is turning out to be excellent. Along with a suitable binder and a batch of paper, I now have the tools in place for a proper documentation library. This will not only keep me sane when trying to debug problems, but will make life easier for whomever sails away in this ship long after I’m gone.
It’s not easy, though. With the exception of some quarter-century-old drawings that came with the boat (still marginally relevant here and there), I have nothing to go on but what is physically in place. Typical of most boats, this was not done with any thought for future comprehension, so there is no labeling… and lots of nigh-inaccessible jumbles of inscrutable tangles.
Of course, this is unacceptable, so an ongoing background project here is the decoding and documentation of existing systems. This involves not only drawings, but adding corresponding labels so the next time I’m crawling around in there it will make sense.
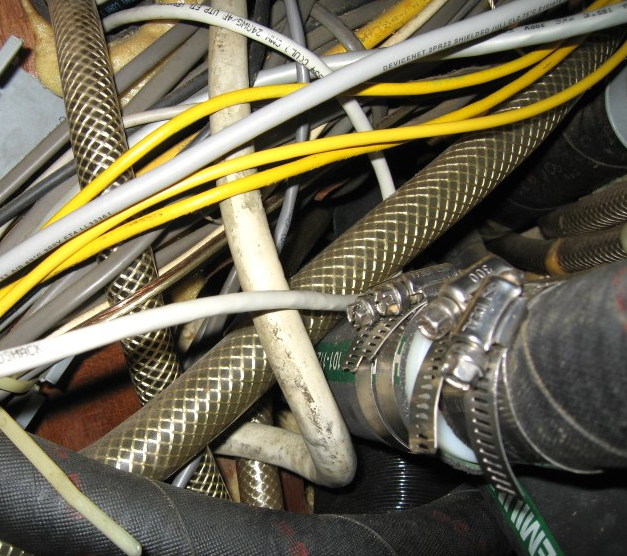
The most basic technique is simply starting at one known object and physically following cables and hoses to see where they go. The other night, Kirsten and I did this with the raw-water system, following every hose from the two Groco strainers to their destinations… capturing it all in a hand-drawn sketch that has since become a proper schematic in the new binder.
That one was relatively easy. Ahead loom the nightmares of abandoned wire runs, convoluted circuits, repurposed cabling, mystery splices, and more… all of which must be clear before I start adding my own bundles of USB, coax, power, and network cabling! In future issues, I’ll share some techniques for wire-chasing and reverse engineering…
Bizarre Plumbing
I’d like to sit down and have a long chat with the guy who designed the sewage system that came with Nomadness… it is arcane and bizarre. That tank is only good for about 6 flushes, and if you think through those four Y-valves, you can see that the system can be configured to:
- flush either head directly overboard
- flush either head through LectraSan
- route LectraSan output to tank or overboard
- use forward head pump to empty tank
This all sounds logical, but practicality is hobbled by the long hose runs, 16 non-intuitive combinatorial possibilities of Y-valves, tiny tank, and failure-prone LectraSan processing system (40 amps to sterilize poo in saltwater, making it legal to discharge in many areas).
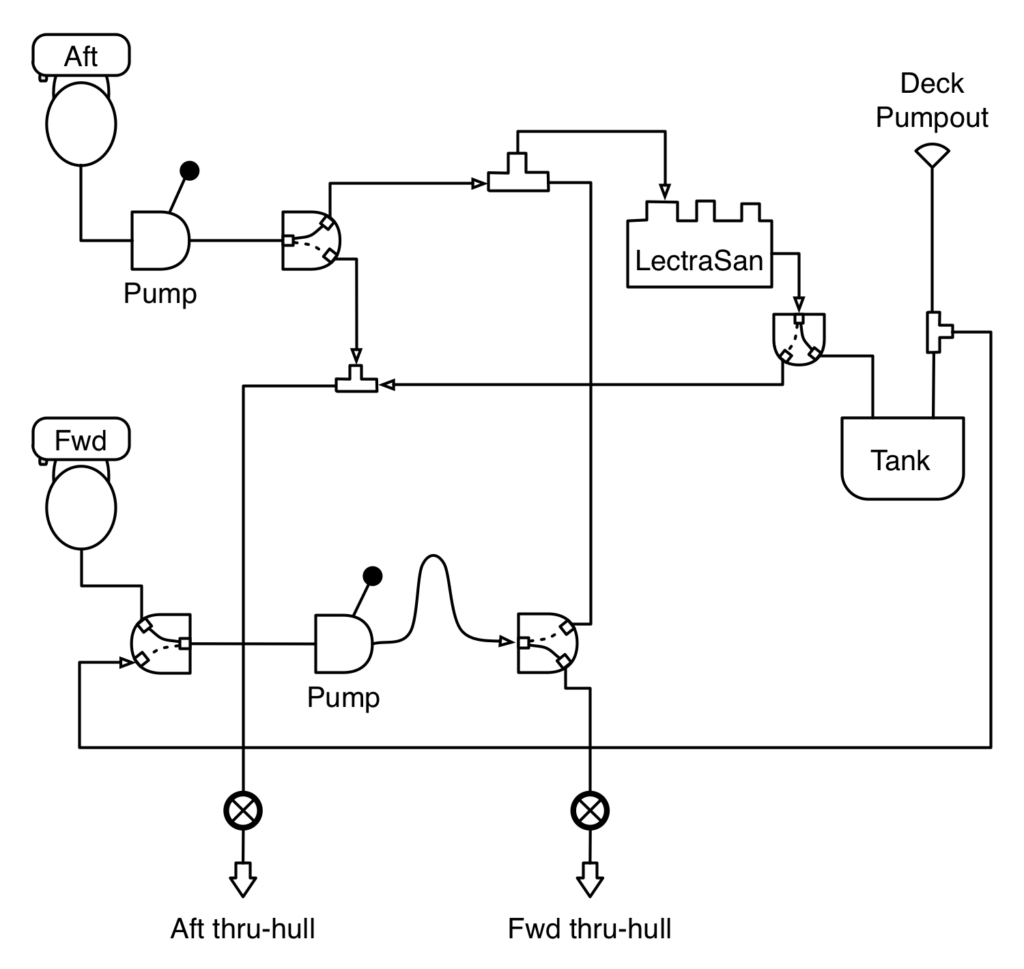
In 2008, I paid too much to a sloppy contractor to break this system in half and create a basic system forward (then I chased his leaks for 2 years). The old cruft is still in place, and I’m contemplating tossing it all in favor of a Nature’s Head composting toilet. That would be ironic, since the adjacent wall will carry the Waterworks system, an extravaganza of complex plumbing.
I just hope that in 30 years, some future owner is not publicly chastising “that crazy guy” who built weird stuff back in 2011! Hence the careful documentation…
Microship Memories
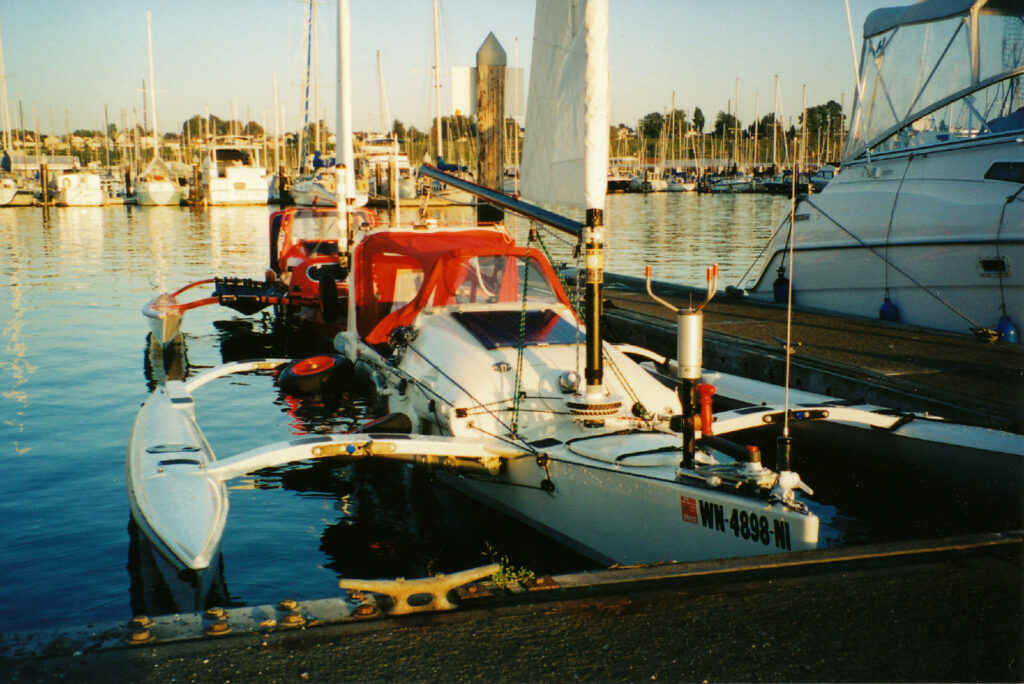
There is considerable history behind this Nomadness project; it did not just spring fully-formed into existence. For 8 years beginning in 1983, I pedaled a computerized recumbent bicycle around the US, then fell in love with multihulls and launched a ten-year project to build the Microship. This migrated through three labs: 2 years in the electrical engineering department at UCSD (San Diego) as a context for student projects, 2 years in a building sponsored by Apple in Silicon Valley, and 6 years in a dedicated 3000 square-foot building in the woods of Camano Island.
Typical of many homebuilt boat projects (the average completion time of which is 137 years), by the time it was “done,” my needs and desires had changed. This amphibian pedal/solar/sail micro-trimaran is a very athletic machine, first conceived as the aquatic equivalent of my BEHEMOTH bicycle… and with involvement from some of the best marine architects in the business as well as a massive injection of hands-on engineering talent, it’s a serious tool for exploration of coastal and inland waterways. But I had to admit that in my increasingly creaky 50’s, the planned 14,000-mile Microship expedition was becoming ever less likely.
I moved on to bigger boats, first with the Corsair 36 “Microship-on-steroids,” and now with its polar opposite: an 18-ton steel monohull. I hope a trawler isn’t next, but I see how that happens!
The Microship is still in the Camano Island lab, and is looking for a new skipper. This is not easy to find, since if all someone wants is a little beach tri, there are many cheaper and simpler alternatives. There is a limited market for expensive one-person trimarans that fold for land transport, especially with yacht-scale engineering that prices it up with decent family cruisers.
There’s a ton of information about this boat online, so I won’t consume space here with details… basically, it has a 93 sqft roller-furling sail rig, a pedaling system that can sustain 3-4 knots, electric auxiliary propulsion with a 480-watt solar array, deployable landing gear with hydraulic steering, retractable mesh recumbent seat to allow sleeping aboard, hydraulic rudder controls, sealed compartments for unsinkability, and more.
Internal Substrate
Last week, we took a look at the external substrate, a moniker that elicited a few chuckles (most people call these things “boats,” apparently). In this issue, I want to show you the interior, with particular attention to the region that is going to be devoted to geekery.
Nomadness (a steel Amazon 44) is rather unusual in that she has a sort of classic wooden austerity… rather hard-edged as opposed to soft and cushy inside. I find myself annoyed by this sometimes, even though it is one of the things that initially appealed to me: a motif that already felt like a “substrate” instead of something cozy that would have to be ripped out in order to add such geek niceties as lab benches and communication consoles. On the other hand, it’s not particularly inviting to guests, or even a couple; the one big bed (more than king size, which is a lot of bunk!) is underneath the aft cockpit, translating into head-banging low overhead and an oppressive sense of crowding. I’ve moved to the Vee-berth in the bow, just for nicer feng shui… even though it is much smaller.
I don’t actually know anything about all that, but there is a feel to such things, and it profoundly affects the human psyche, from relaxation to productivity. One of the huge contextual aspects of this project, therefore, is to remain aware of this and integrate it into design decisions now (while it is still possible).
Unfortunately, it’s rather hard to quantify, and I’m also constrained by what is already in place.
So as with most of my projects, the guiding principle is intuition… how it feels as opposed to how it fits together in a CAD system. Actually, I do use CAD extensively, but in my case it has a different meaning: Cardboard-Aided Design. Before doing surgery in the new lab region (forward and to port in the photo below), I’ll hot-glue a big life-size model and play with it for a while. Ideas that I think are well-refined now will give way to issues of comfort, serviceability, and vibe.
We might as well start with this photo, a wide-angle view from the companionway… just as one steps inside from the cockpit. This was taken by the Swiftsure broker before I acquired the boat, and is thus missing my wood stove, new electronics, and pervasive surface clutter.
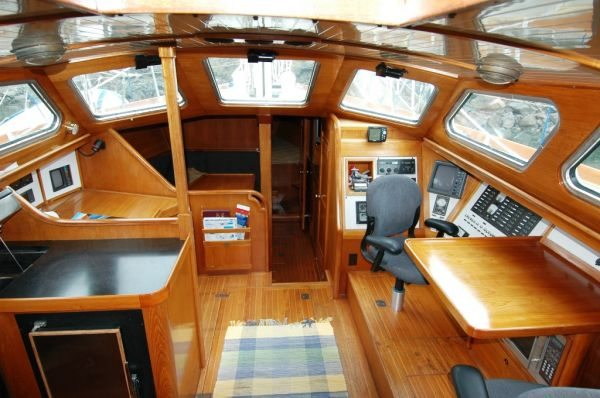
More detailed photos of individual regions will follow in the next few pages along with discussion of impending changes, but let’s take a quick look around from here. When you come down the companionway steps, you land in a big open space that combines piloting, engine room access, power management, nav station, and galley to port. Behind you through a door to starboard is that large but low sleeping cabin called the Cave… now becoming split into Cargo Bay and Crew Berth. Forward and down is a hallway with dinette and entertainment area (along with a shower cabin and washer/dryer); further forward still is the V-berth cabin with head compartment.
The galley is immediately out of frame to the left, and in addition to that marginally adequate power hog of a DC refrigerator, there is a powerful AC cold-plate system with a top-loading fridge under the counter and a top-loading deep freeze under the chart table. It works so well that in the 2.5-month 2008 shakedown cruise, we had no trouble keeping staples like Häagen-Dazs, bagged ice, and frozen fish in stock.
The “nav station” forward of the galley came with vintage electronics, but is going lower-tech, devoted to nautical bookshelf, office, and sextant stowage. All major geekery is moving to the piloting station to starboard, or into the lab/console area forward.
The open central floor in the photo consists of two large hatches, one each for the main engine (Yanmar 4JH-DTE 77-horse turbo diesel) and the 7.5-kilowatt generator (driven by a Yanmar 3GM). Serviceability is not great, and I’ve made it worse with the addition of a wood stove.
Let’s zoom in on some details, starting with that.
Wood Stove
This sleek heater is the Little Cod from Navigator Stove Works, based on Orcas Island in the San Juans. In this photo, we are looking back at the companionway steps, where we were standing in the photo on the previous page.
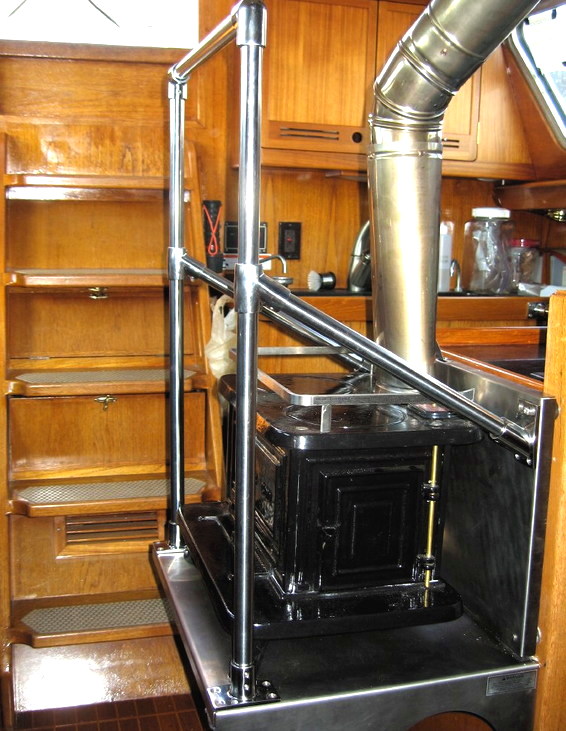
I wrote a rather detailed blog post about its installation, so I won’t spend time on it here… all I’ll add at this point is that it works beautifully (sometimes TOO well!), quickly heating the boat with a small amount of scrap lumber or proper firewood. The platform is laser-cut stainless, a heat shield protects the counter structure, and I added a cage made of standard 7/8” rail hardware to provide safe handholds under sail and keep bodies from hot iron when stoked.
At the dock, I often use an oil-filled electric radiator, and there is also a Webasto diesel heater (which currently needs its fuel line burped). The beauty of the wood stove is that it can work with found fuels… if we’re ever in survival mode, this is in the same category as watermaker, solar panels, fishing gear, and sails.
Galley
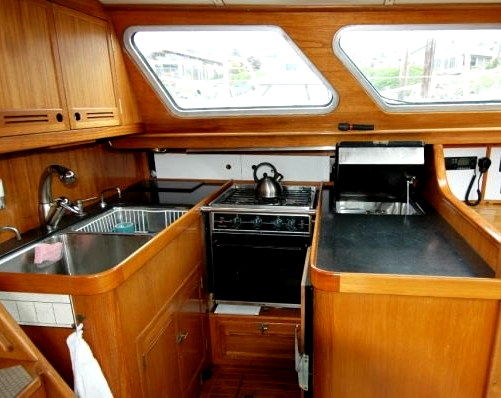
A major center of daily activity, of course, is the galley… mine is adequate, though not generous with either human or counter space. It’s just to port of the companionway steps, and in the photo above (taken before wood stove installation), you can see the double sink, gimbaled propane cookstove, and top-loading AC refrigerator.
There really isn’t adequate stowage in the galley itself for stores and cooking tools, so the former are in a nearby drawer (as well as a future pantry in the area about to be vacated by the old AC panel) and the latter are scattered here and there. One fairly urgent project is a little “demi-wall” at the back of the counter, carrying spices, well-secured knives, and other frequently used tools.
This was built as part of a major refit in 2002, and although beautifully done with first-rate equipment, it has created some major serviceability issues. Things that are known to fail (water pumps and refrigeration) require either wee contortionists or implements of destruction… so when I do the Waterworks project in the aft head compartment on the other side of the sink wall, I’ll open access and relocate a few critical items.
Moaning aside, it’s a capable workspace, and is supported by robust systems. In addition to the refrigeration mentioned on the previous page, an Isotemp water heater (recently installed behind the shower) makes doing dishes tolerable… and there are foot pumps for both salt and fresh water in addition to the pressure system.
My biggest complaint is low overhead over the stove, which feels a lot like the aft cabin, along with the awkward sliding cabinets on the wall behind that tend to be relegated to seldom-used supplies. Boats, being curvy, are rife with trade-offs when it comes to usability and storage space.
Piloting Station
This is an area that is changing as we speak, bringing a lot of tools up to date. The old photo below is the center of operations, with basic nav/piloting, engine control, radar, and power management hardware. Actually, I prefer driving the boat from the outside helm, but having an inside steering station is wonderful in the Pacific Northwest (that big joystick controls a hydraulic pump that parallels the wheel, and there is also a Simrad autopilot with Bluetooth remote that drives the same huge actuator).
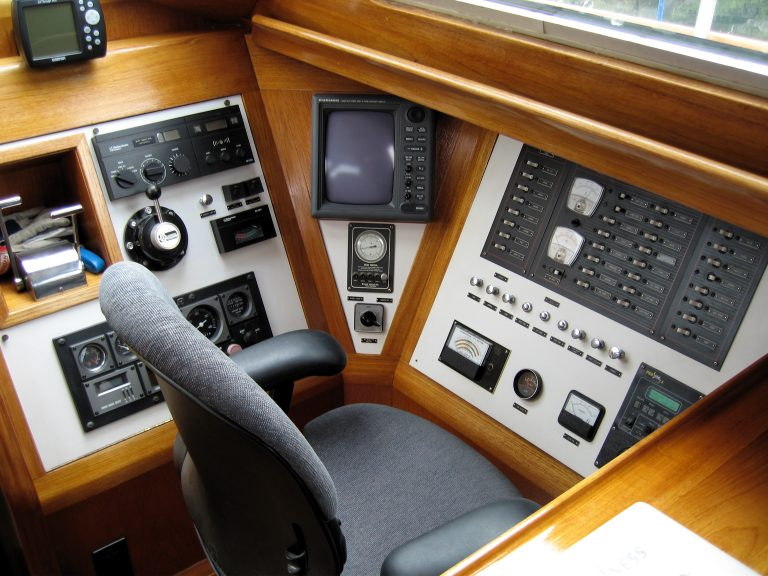
The classic Furuno radar is a 48-mile, open-array unit… a real lifesaver in the fog. There is much newer stuff out there, and maybe someday I’ll upgrade, but the old-fashioned part of me is comforted by minimizing single-point failure potential when it comes to critical nav systems. The old Robertson autopilot in the photo (to the left of the radar) is long-gone, however, and when the joystick moves up to the wood framing, that open space will carry a chartplotter.
The power panel is also undergoing a major revision, with all the little stuff at the bottom already obsoleted, and the Xantrex panel at lower right long since replaced by much better Outback gear. The breaker panel is on the way out in favor of a more densely packed AC and DC control center based on Bluesea products. This is another of those areas where the original installation is a serviceability nightmare… that panel on the right hinges UP, requiring an awkward twist when wiring. The new one will hinge down, matching the design of the piloting panel on the left. Behind both are generous equipment bays with cabling, power distribution, inverter-charger, isolation transformer, and so on.
The original nav station across the pilothouse still carries instrument displays (speed, depth, wind) along with a marine VHF radio, and those are migrating here in order to keep all attention and control in the same general area. It will be very dense by the time it’s done, yielding a focused piloting console functionally distinct from the lab region below.
The Geek Playpen
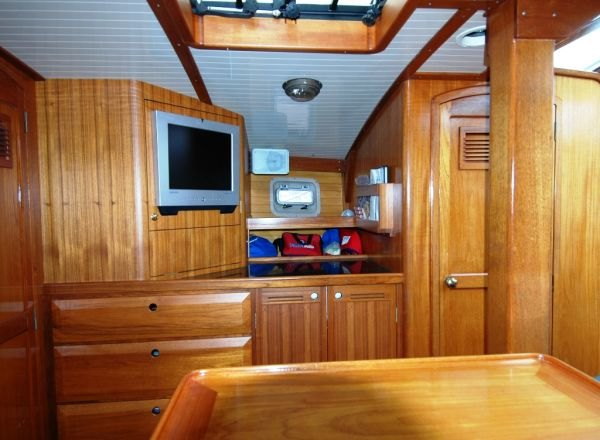
If you step forward from the pilothouse where we’ve been all this time, you pass into what might normally be called the saloon. This came with an attractive but uncomfortable dinette on the port side, with deep drawers underneath the raised platform supporting the table and lots of stowage under those cramped seats.
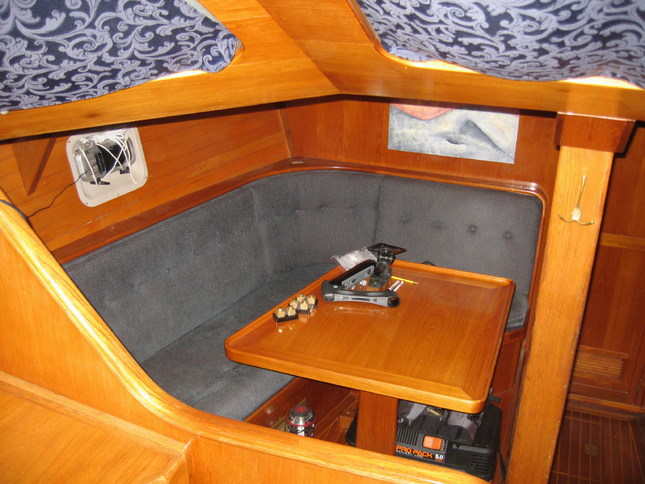
Across the aisle is a TV with related equipment in a cabinet and stowage behind, an excellent set of drawers, a washer-dryer covered by a pair of doors, and a dedicated shower compartment hiding behind the mast partner. In the middle is a catch-all counter with no clear purpose, a bookshelf, and a very deep hole that goes all the way behind the TV to the bulkhead coplanar with the door to the next cabin.
This is my playpen.
I’ve started nibbling around the edges of a SketchUp model… though my kind of immersive CAD will ultimately be the design tool that shapes the final plan. Basically, this 8-foot segment of the boat will consist of a large desk filling that settee space above, with a mounted swivel chair about where the table is located.
The top of the desk will carry four sloping equipment consoles: systems, communications, audio/video, and lab instruments. These have hinge-down front panels and chassis slides for serviceability, and the one closest to us in the photo also carries an LCD monitor on a swing-arm to support piloting operations. At the forward end will be a miniature of the “wall of inventory” that’s in my mobile lab, and possibly a 3D printer along with the tools for toner-transfer printed circuit fabrication.
Embedded in the desktop will be a 56” well with folding lid, containing the digital piano. When the lid is up, it will become a full-length music stand, with the A/V console accessible at the same time (it carries an Edirol M-16DX mixer, chosen because the control surface is separate from the interface box bristling with cables).
The underside of all this is a little tricky, since I still need access to the stuff under the seats (including air compressor and central shop vacuum, not to mention a key thru-hull for pumpout). At the forward end will be a file cabinet, but most of the other gaposis between desktop and seat substrate will be used for movable storage so I don’t create the kind of serviceability problems that already plague the boat.
Across the hall, I’m not changing much other than the use of the bookshelf and stowage spaces. A wood machinists’ toolbox will fill the upper shelf, and the lower one will store power tools (with the deep inaccessible space occupied by infrequently-used items in packs attached to tethered and labeled cords… an old kayak-packing trick). The counter top will be a standing workbench with vise and related resources.
This Zone of Hackage is the key to the boat’s embedded geekery. There is very little overlap or redundancy between all this and the pilothouse consoles, and for the most part this region exists independent of ship operations. Yet it is the core of the project’s mission, integrating the layers of added functionality that have led to friends quipping that this is “Starship Enterprise on a sailboat.”
I must admit, it’s kind of maddening to have all those other projects competing for my attention. Plumbing is entertaining, certainly, as are carpentry and cabling, but what I’m really aching to do is get on with gizmology.
A Note of Thanks
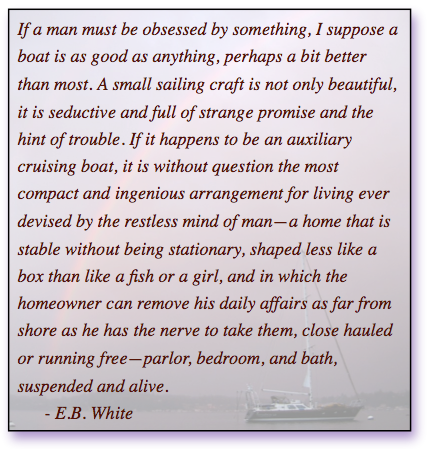
A funny thing happens when I write these Reports… time falls away and I suddenly notice the page count. I still haven’t told you about the PENFA suite, cargo bay, hydraulics cabinet, cable tunnels, or the 4U2PN2 system… not to mention the real ship infrastructure behind the scenes. We’ll get to all that in time, but I mostly wanted to introduce the interior of the ship and help fan those flames of fantasy. This is the reason for the EB White quote above; it is passion that drives all this, and now and then I have to just kick back and sketch my vision of a future starship… ignoring, for the moment, the broken shower seat, mysteriously beeping Yanmar control panel, and the long list of sub-projects related to the new power distribution system.

While finding photos to include in this issue, I came across this one. It prompts me to take a moment to introduce my father, Edward Roberts, who passed away in 2005. He was a lifelong mechanical engineer, and an avid sailor for many years before the demands of a young family led to a reshuffling of priorities. I presented a collection of photos from his Star-racing days back on Lake Erie, along with a few thoughts about getting to know our parents while we still can, in my blog post Son of a Sailor.
He worked for General Electric all his professional life, and for many years was president of the Kentuckiana Section of the Society of Plastics Engineers. I find this mug poignant and fitting, and it holds my daily morning latte aboard Nomadness.

Ed is part of this ship in many ways, not the least of which is the value of our old family home that enabled the purchase. I was raised with constant exposure to tools and quality workmanship, along with a project focus. He would have loved this well-engineered boat, so I’ll close with the line that ends the blog post linked above:
Fair winds, Dad…
and thank you!
–Steve
You must be logged in to post a comment.