
The Datawake Console
by Steven K. Roberts
Nomadic Research Labs
Much of my past year has been spent integrating a wide range of equipment into the 8-foot console aboard Datawake. It has been a huge project, but is already paying off… making everything feel like a single system, simplifying interconnects, and minimizing clutter. It is not yet “complete,” but it’s far enough along for a tour.
This has been considerably refined since I first described it in this blog a year ago. There’s nothing like actually putting a system into daily use to shine a harsh light on design choices, and it didn’t take long to banish the messy electronics lab gear far from the computer, then bring audio and comm panels into close proximity since those are the knobs I most often want to twiddle while in the Big Chair.
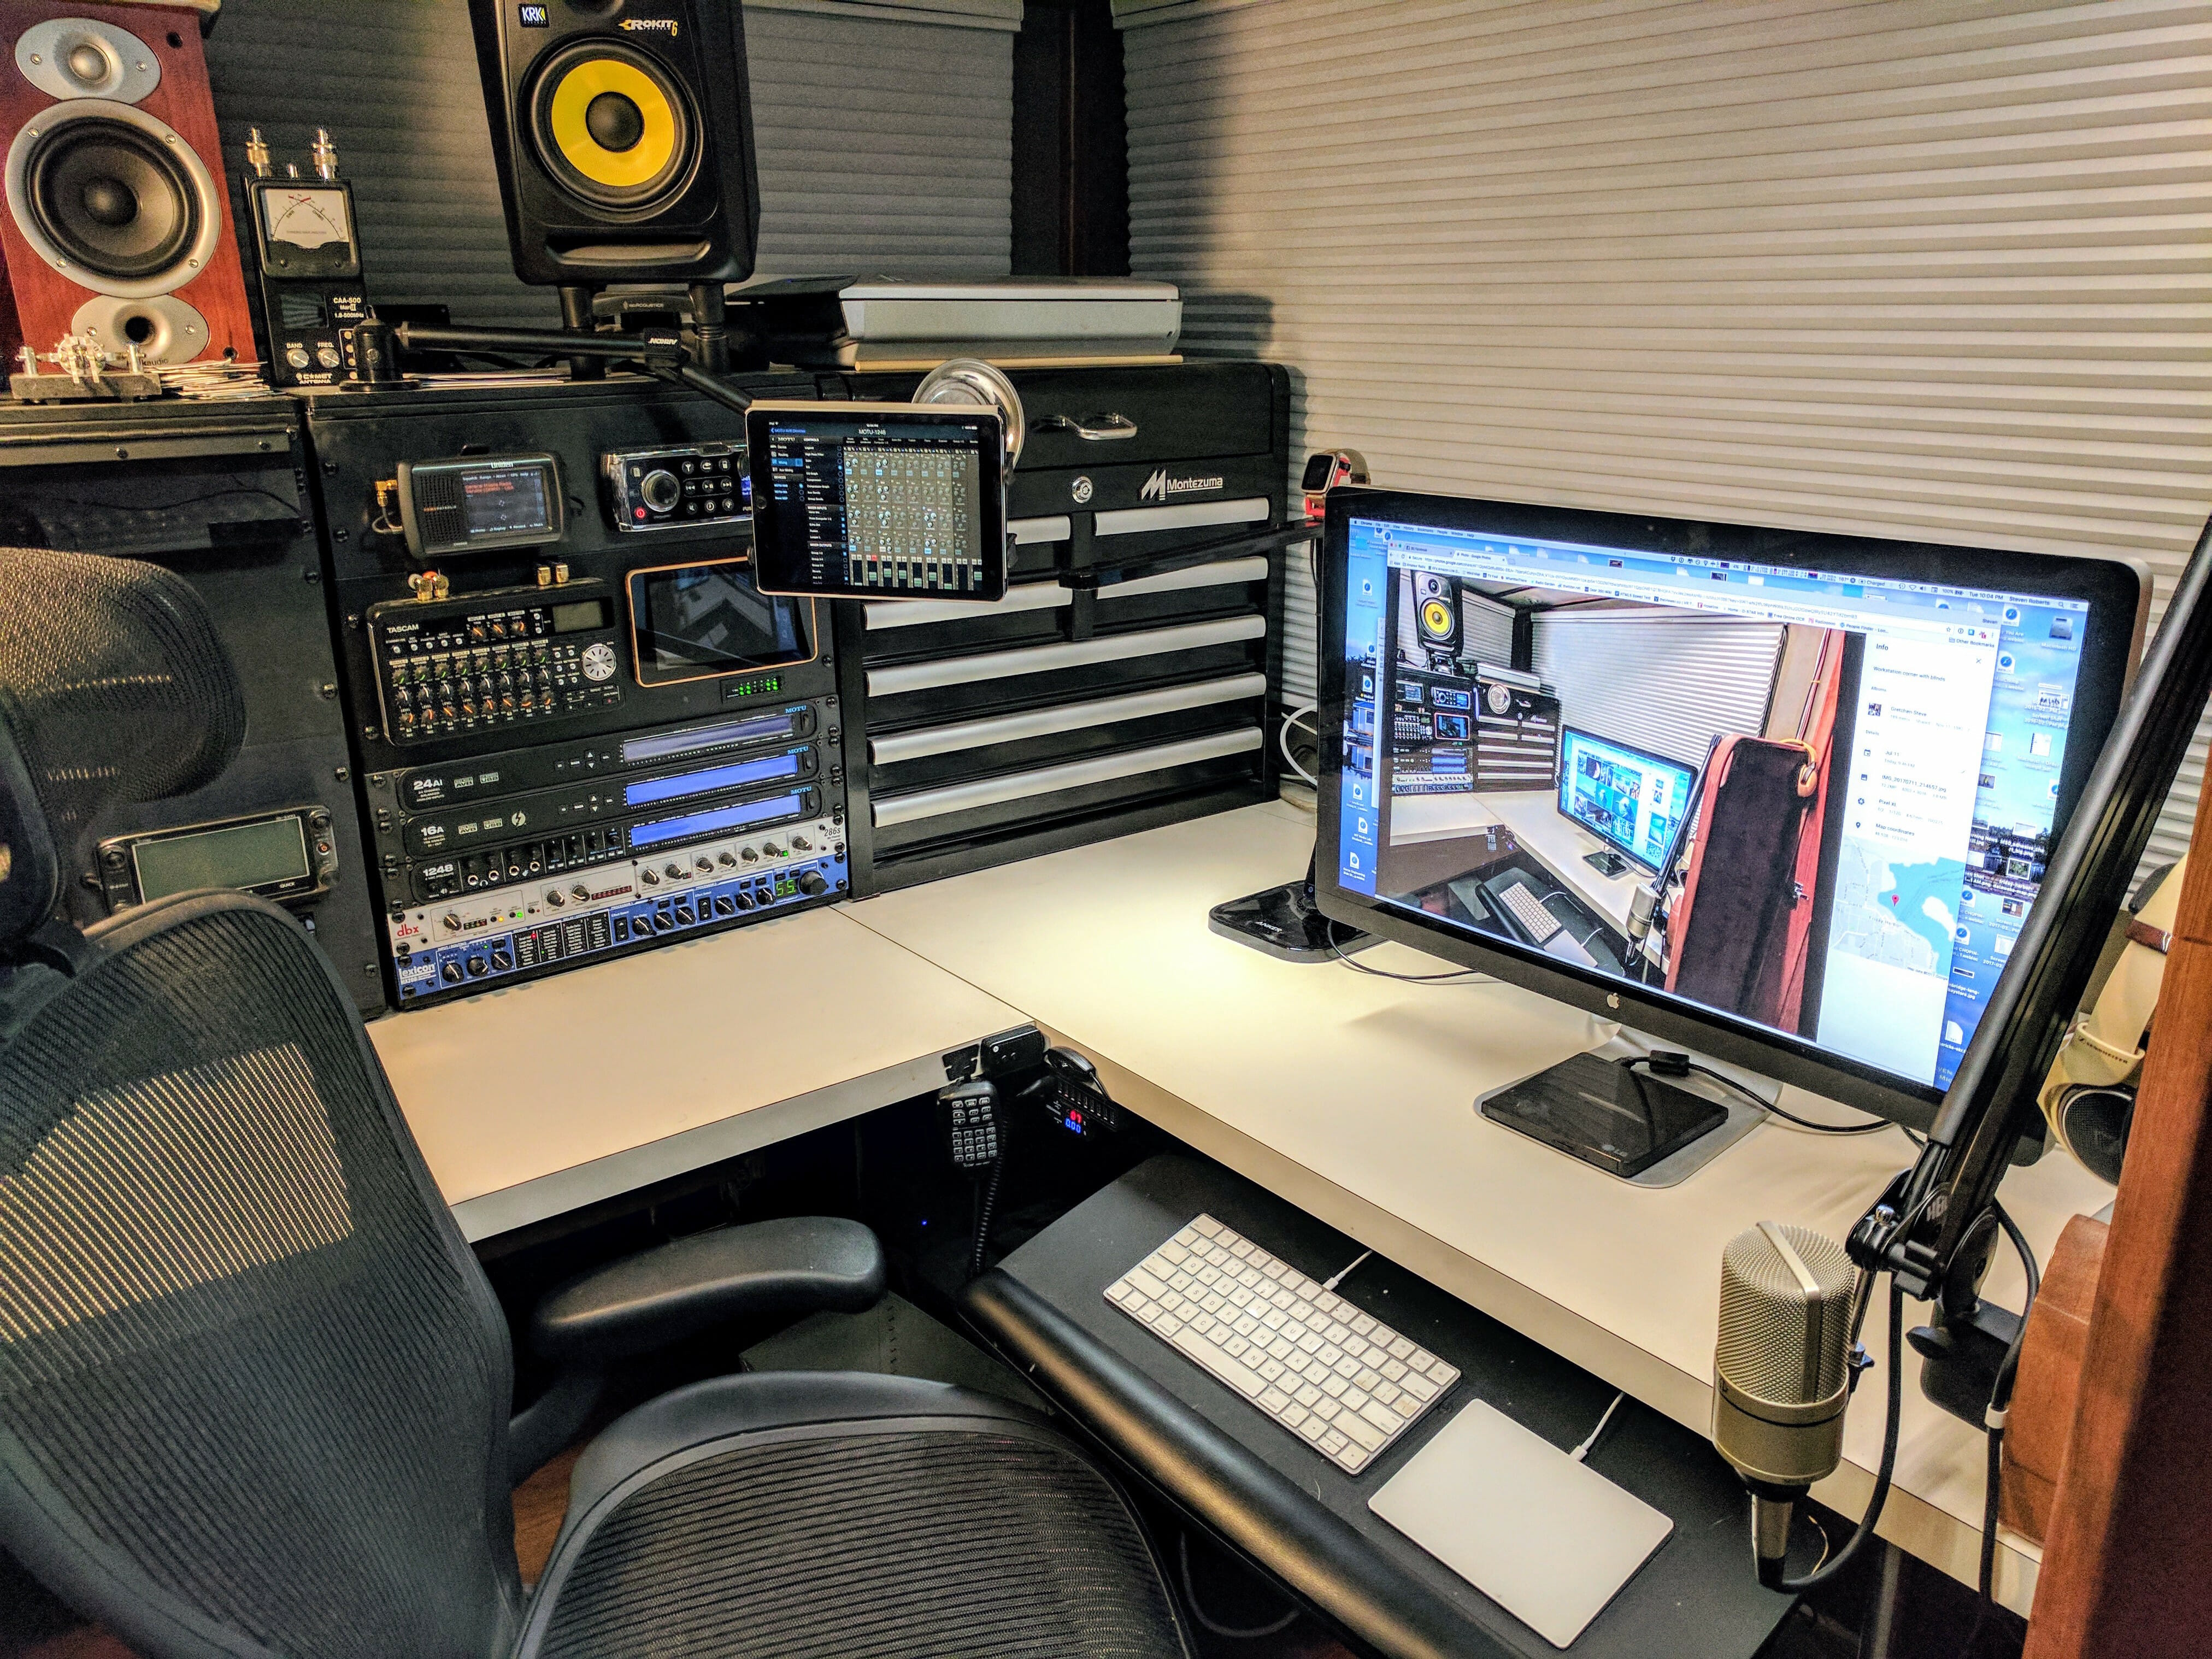
The console photo above is current as of January 2017, with the Mac just out of frame to the right.

Just for a quick background, this began with the footprint of a comfy L-shaped couch, including stowage bins under the cushions for life vests and other nautical gear. Within a month of moving aboard, I had pulled that and built the console substrate… with a laminated desktop 1.5″ thick, 31″ above the floor. This is a little higher than a typical desk, but I needed to accommodate the piano drawer… and besides, I’m a tall guy. The two heavy desktops are supported by eight stainless rail legs with marine fittings, along with three attachments to hard points on the cabin side and rear.
The console is built into five Middle Atlantic CFR1216 cabinets, which I chose for their minimum overhead (hardly any surrounding edges beyond 12U of panel real estate). They are also symmetrical, which makes it possible to flip them around if a 10-32 threaded hole is damaged. It’s good stuff, though the price made me wince. I found a matching tool cabinet to provide a set of locking drawers that would be visually consistent, and added a “trellis” of stainless tubing along the back to help with cable management. The cabinets glide on Delrin runners, but will index onto receivers bolted to the back of the desktop with thumbscrews inserted from below to lock them in place.
The L-shaped extension at the aft end provides a perfect setting for the workstation, with an adjustable keyboard tray that swings side-to-side, raises/lowers, and tilts:
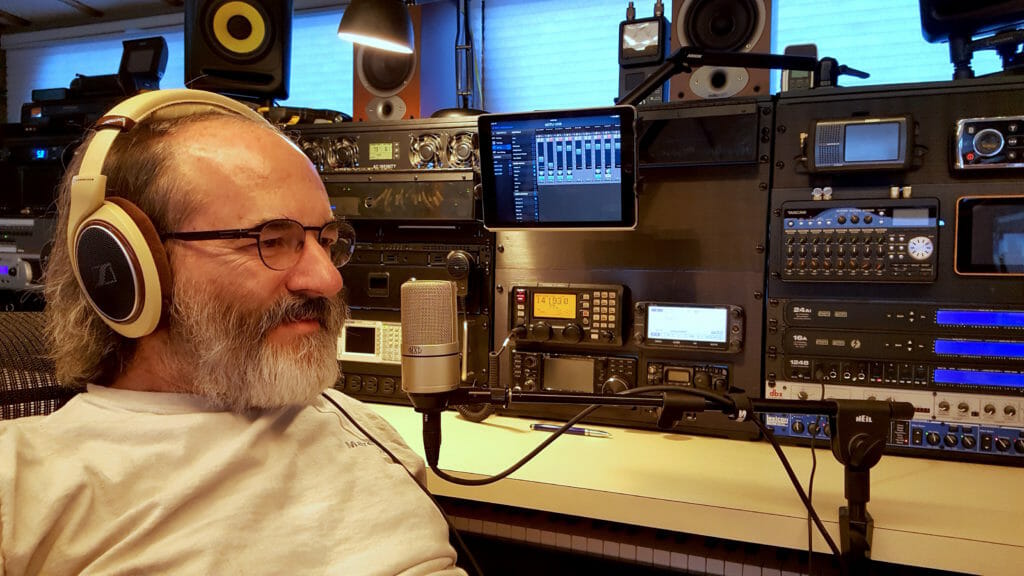
This “wing” of the console is where I spend almost all my time, so it has been getting ongoing refinement. The “demi-wall” at right provides a visual break as well as blocking droplets from wet clothing when someone comes in the aft door, and it has become the spot for studio microphone boom, headphone hanger, a webcam, lighting control, cat scratching post, and other fixtures. A USB charger and dual-bander microphone are in the desk inside corner, and underneath are useful things like trash can, shredder, and foot massager.

The area below the desk is critical, and houses two uninterruptible power supplies — the AC provided by a 675-watt CyberPower UPS that reports to the NAS and Zabbix engine, and the Shacktopus power cart that handles all the 12-volt loads (like radio and marine stereo gear). This architecture isolates the console from ship power, adding an additional layer of security and backup with all distribution local and well-documented. The original sofa structure provides other useful cabinetry below the desk, as well as a platform for the subwoofer…. and the desktop provides mounting support for a heavy-duty piano drawer. That was a huge project, but the Kawai keyboard now tucks completely under the desktop but can deployed in a moment if I get the urge to play.
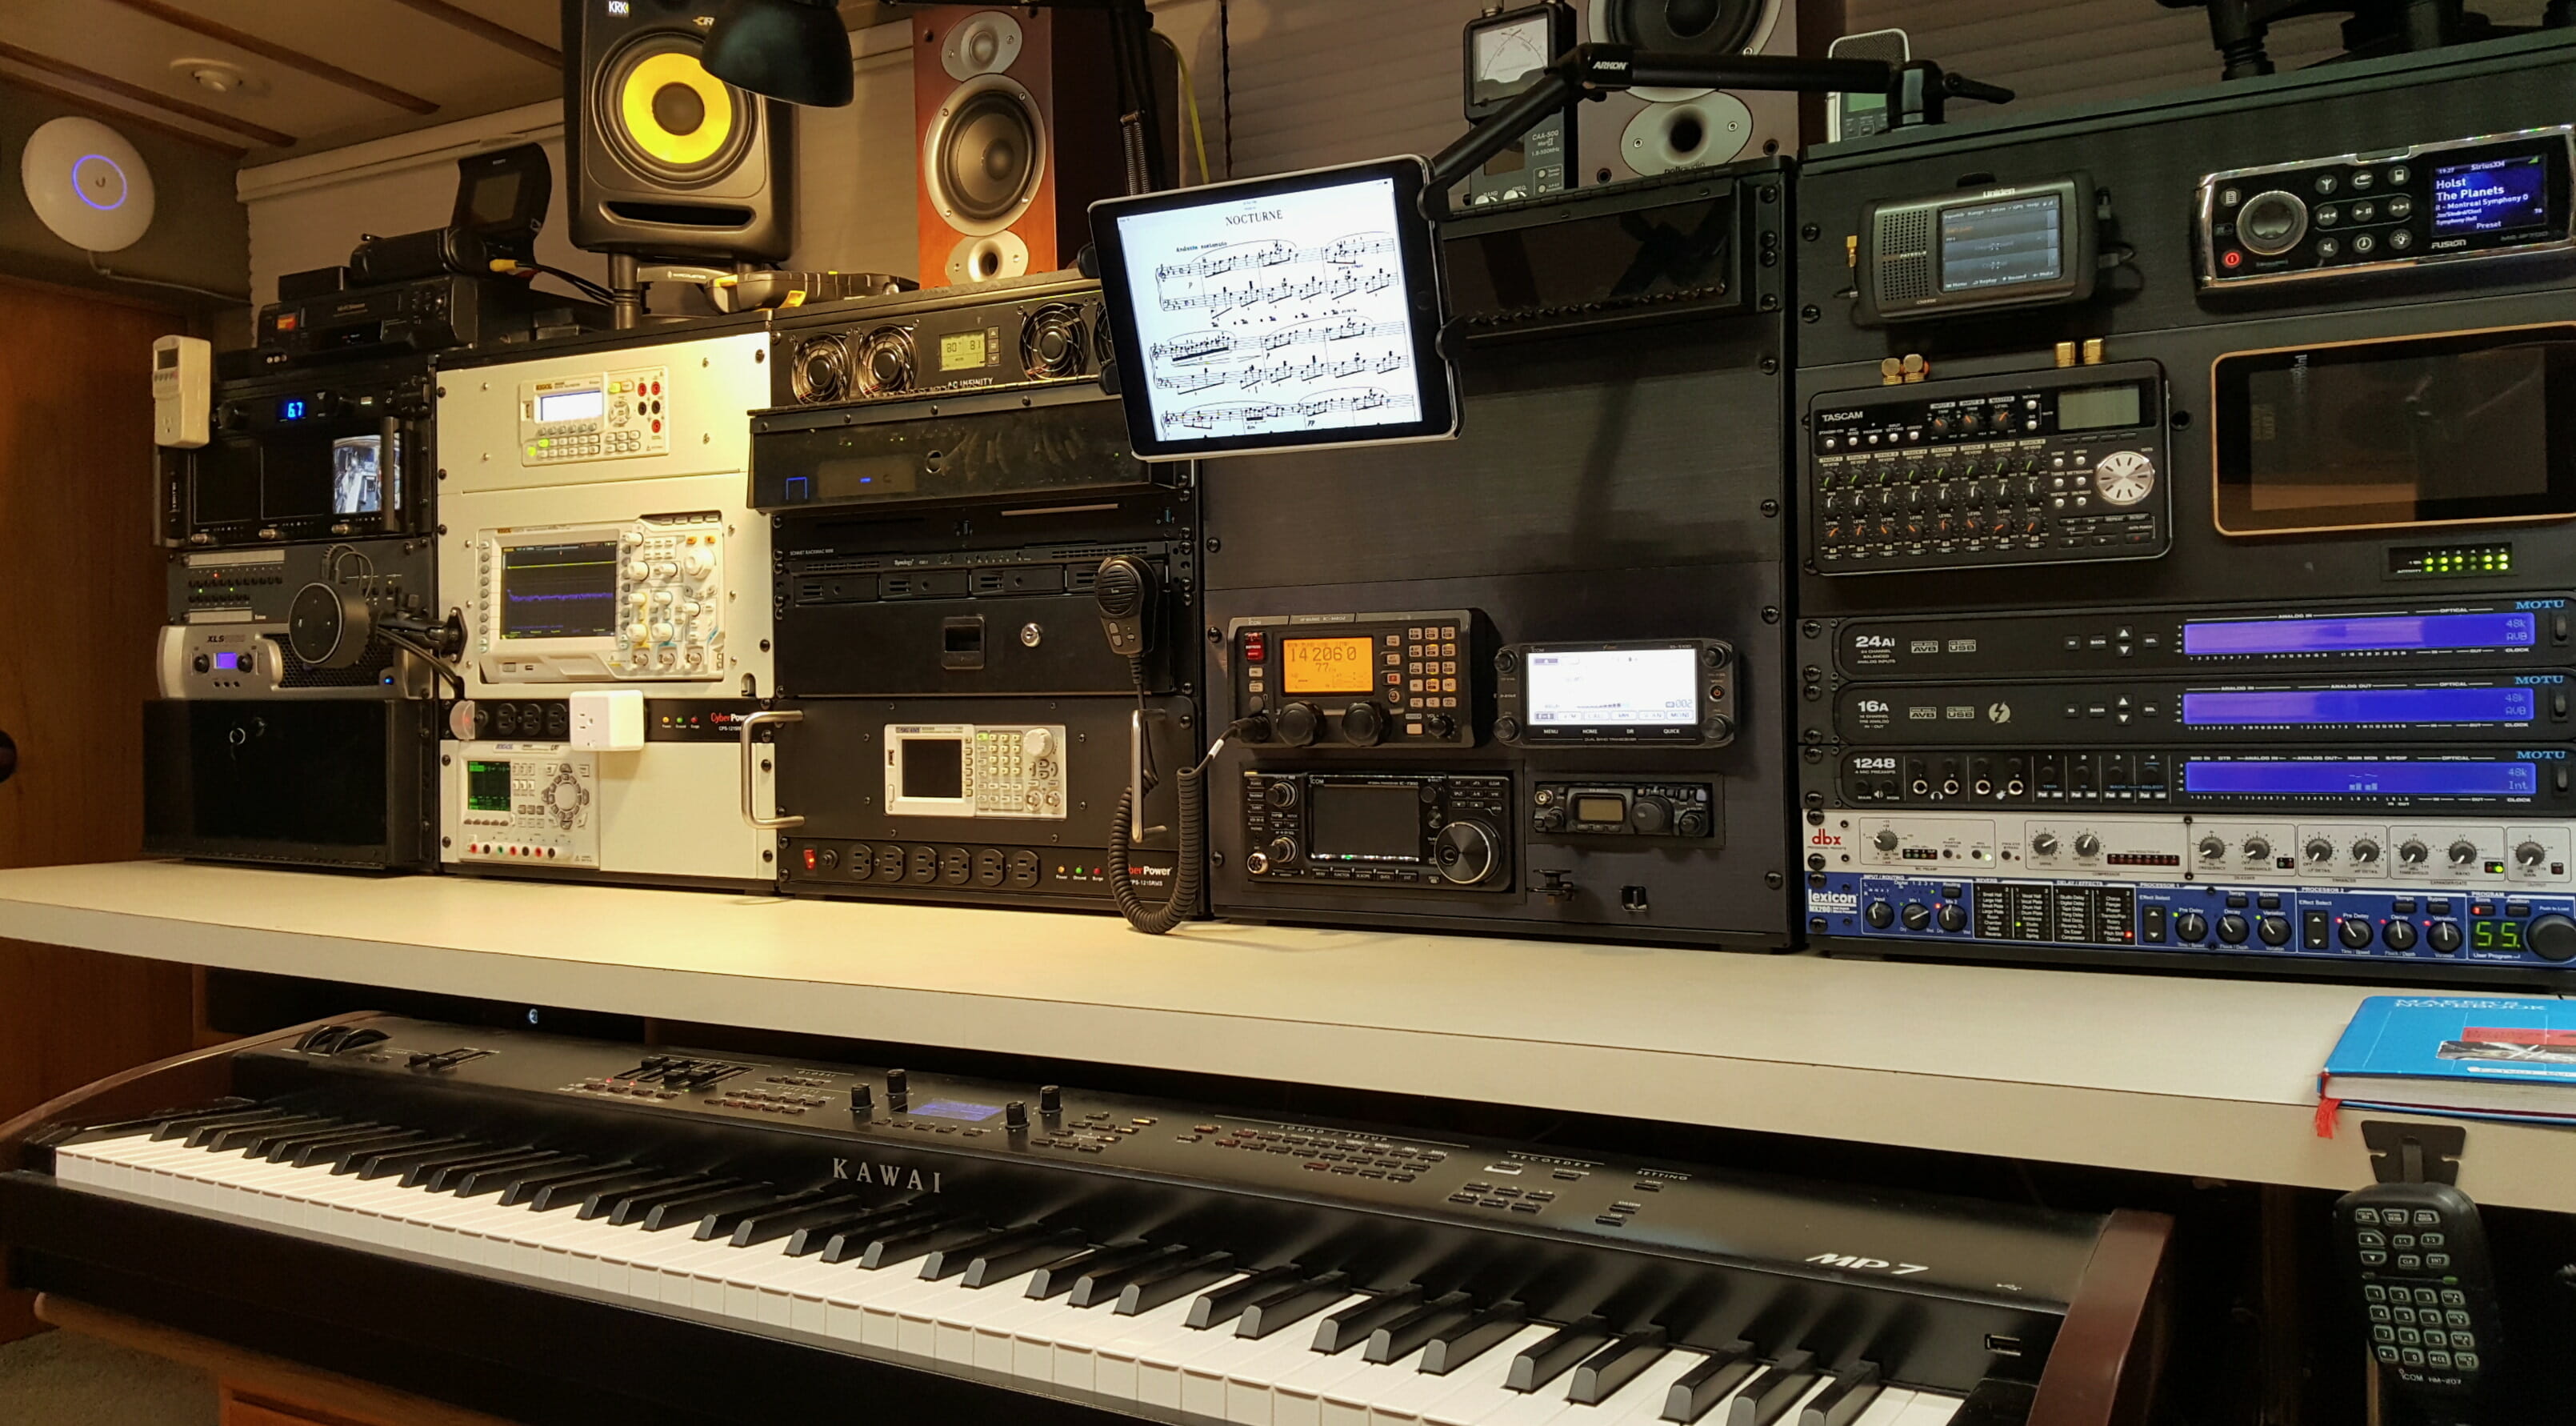
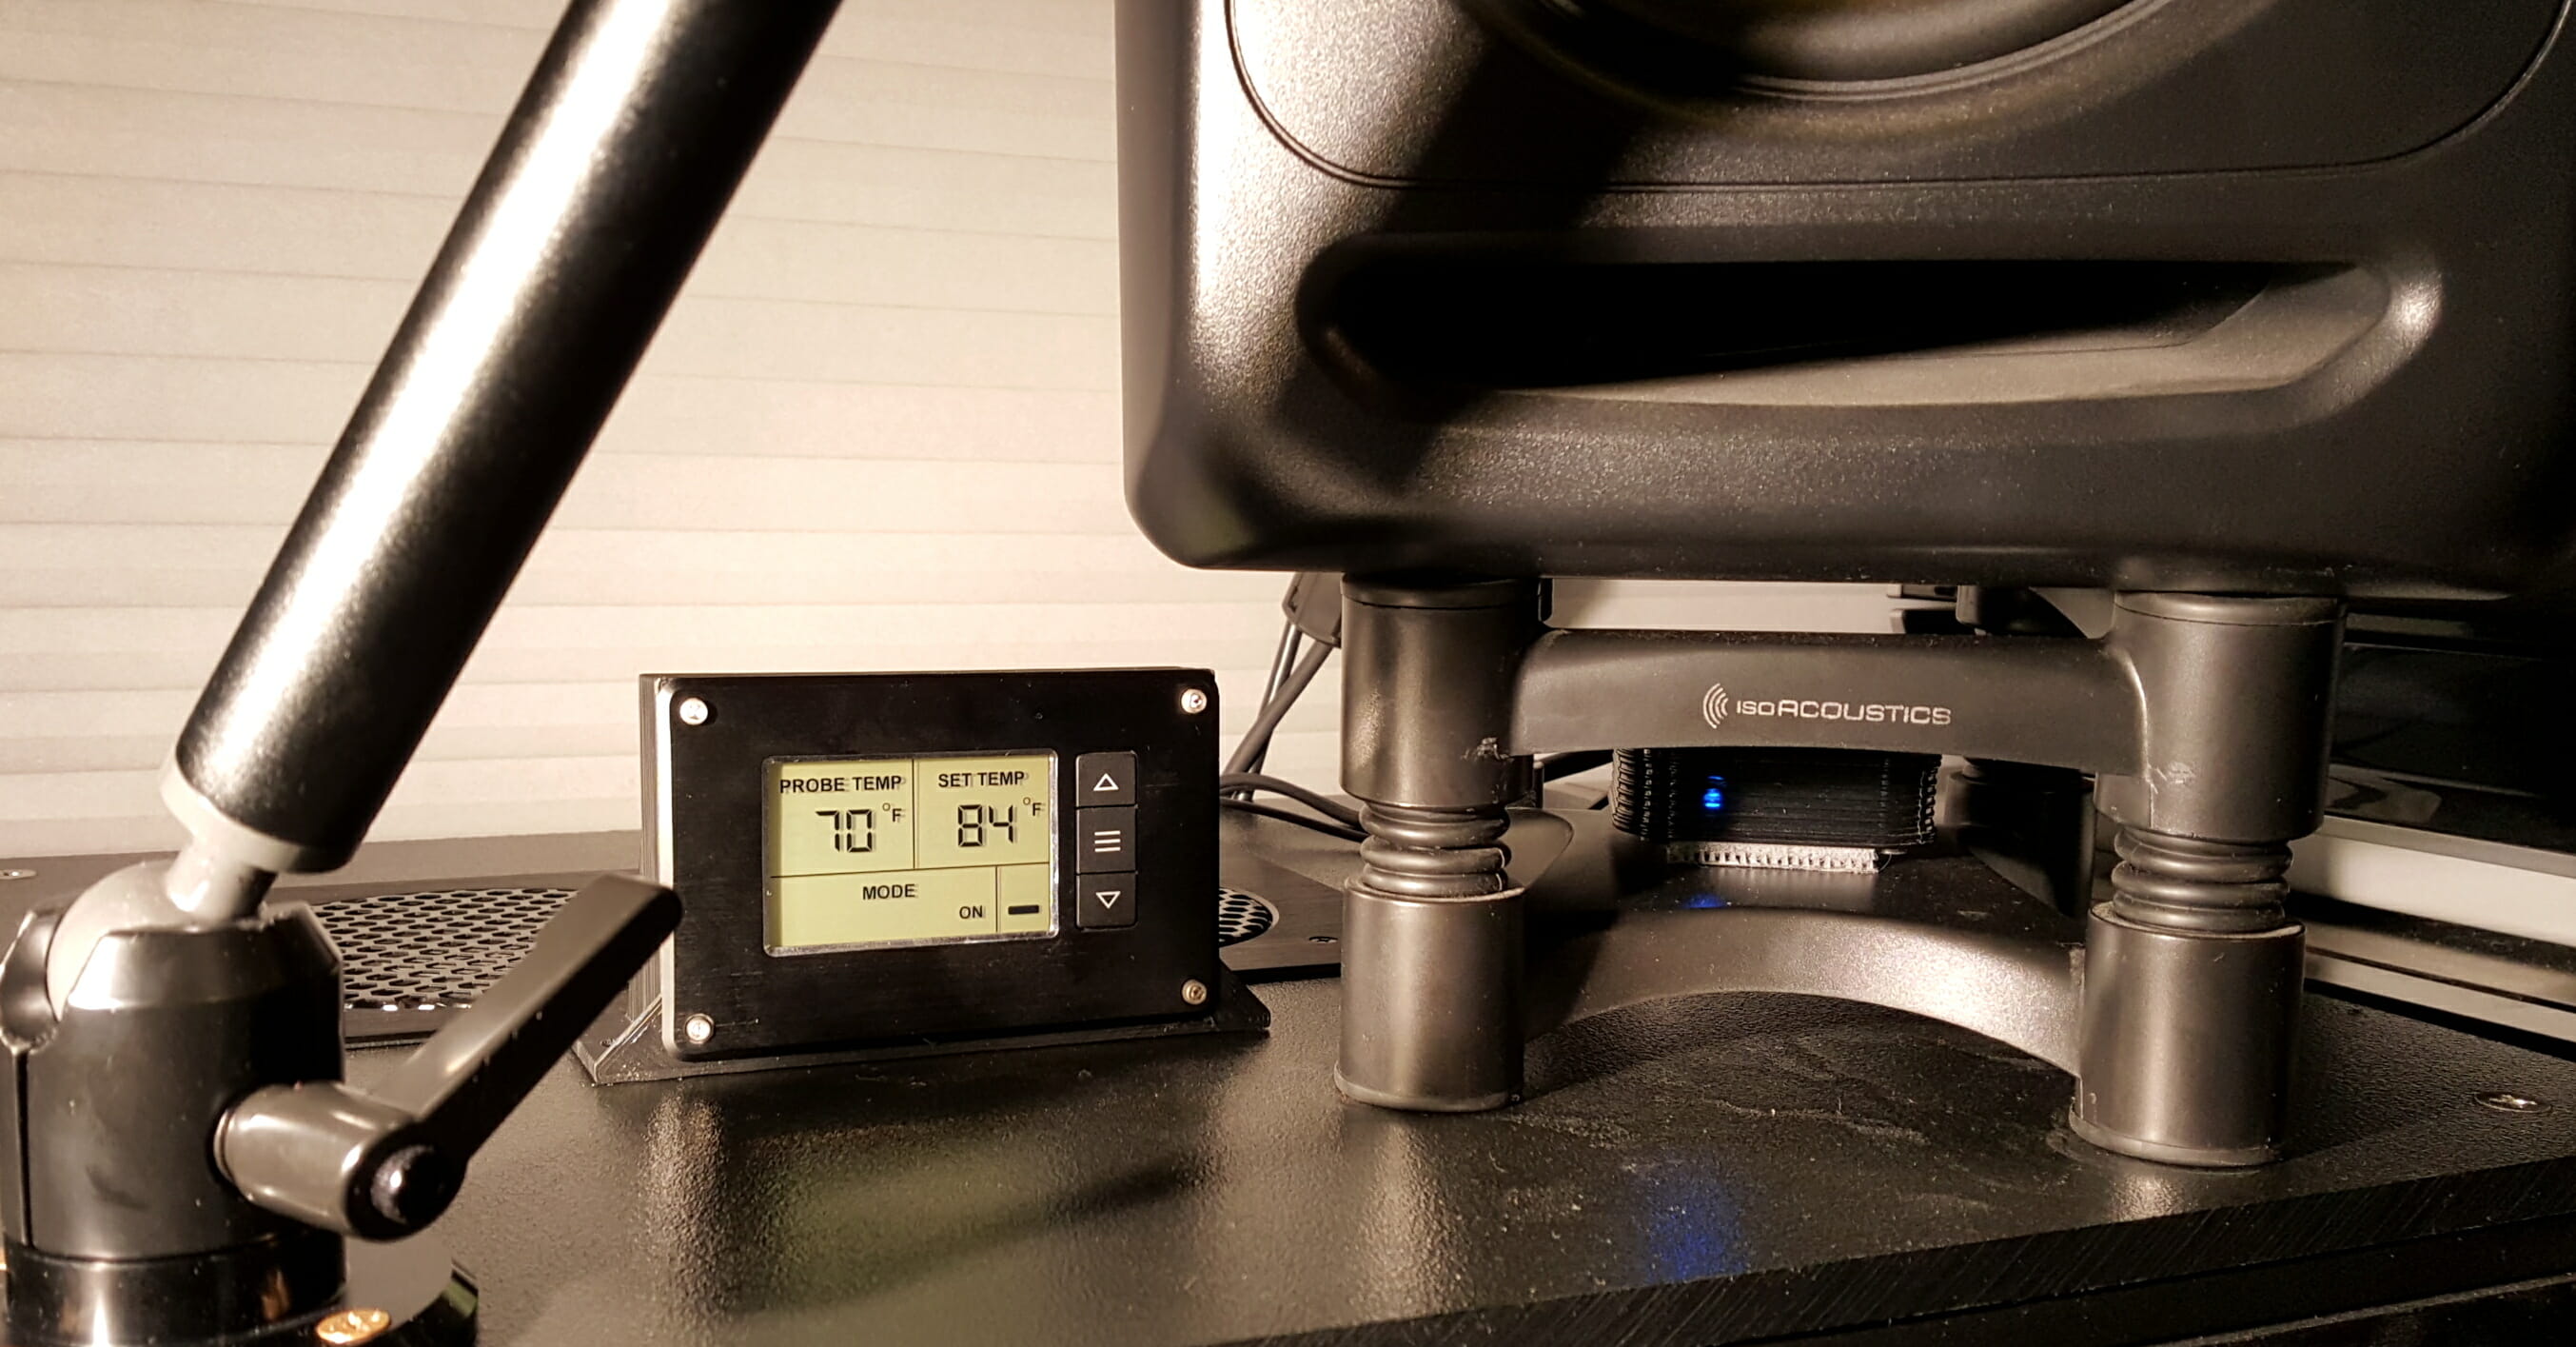
The surface above the console is prime real estate, and has become the repository of a variety of objects that need open space, don’t panel mount well, or are just frequently needed. The dominant features up there are the KRK studio monitors, their angle optimized by IsoAcoustic stands with 3D-printed spacers to direct the rather tiny sweet spot at my head while I’m playing the piano. Much more position-tolerant are the Polk bookshelf speakers, driven by the Crown rack amp along with a pair of Fluance units on the other side of the room. All in all, this sounds pretty decent. (I should note that these toys would all go expensively flying if I were to head out into heavy seas today; on the to-do list are the Southco soft draw latches to hold the monitors down to the HDPE substrate, as well as simple bolts for the passives.)

OK, that takes care of what’s above and below… now let’s cruise through the console itself. The five 12U rack cabinets carry Greek letter designations, left-to-right, to decouple the packaging from functional groupings that have less-precise boundaries.
Console zone α (alpha)

Off at the far left end is the analog video gear, including an 8-by-8 Extron switcher and a Delvcam triple monitor. On top of this cabinet are Sony VHS and Hi-8 VCRs, since I’m converting a ton of old TV appearances and other events to be embedded on this site (linked here). Video is routed via the switcher to local display and Elgato digitizer, with audio passed to the MOTU interface so I can tweak, monitor, cue tapes, send to the TV/soundbar in the cabin, and so on.
This zone also has the Crown XLS-1000 audio amp for the passive speakers, and a somewhat-undefined 4U covered space known as the “hack zone” for data collection, tinkering, and random I/O. And the top slot of alpha contains a Furman power conditioner with monitor, tied into the CyberPower UPS that is under the desk as well as other loads.
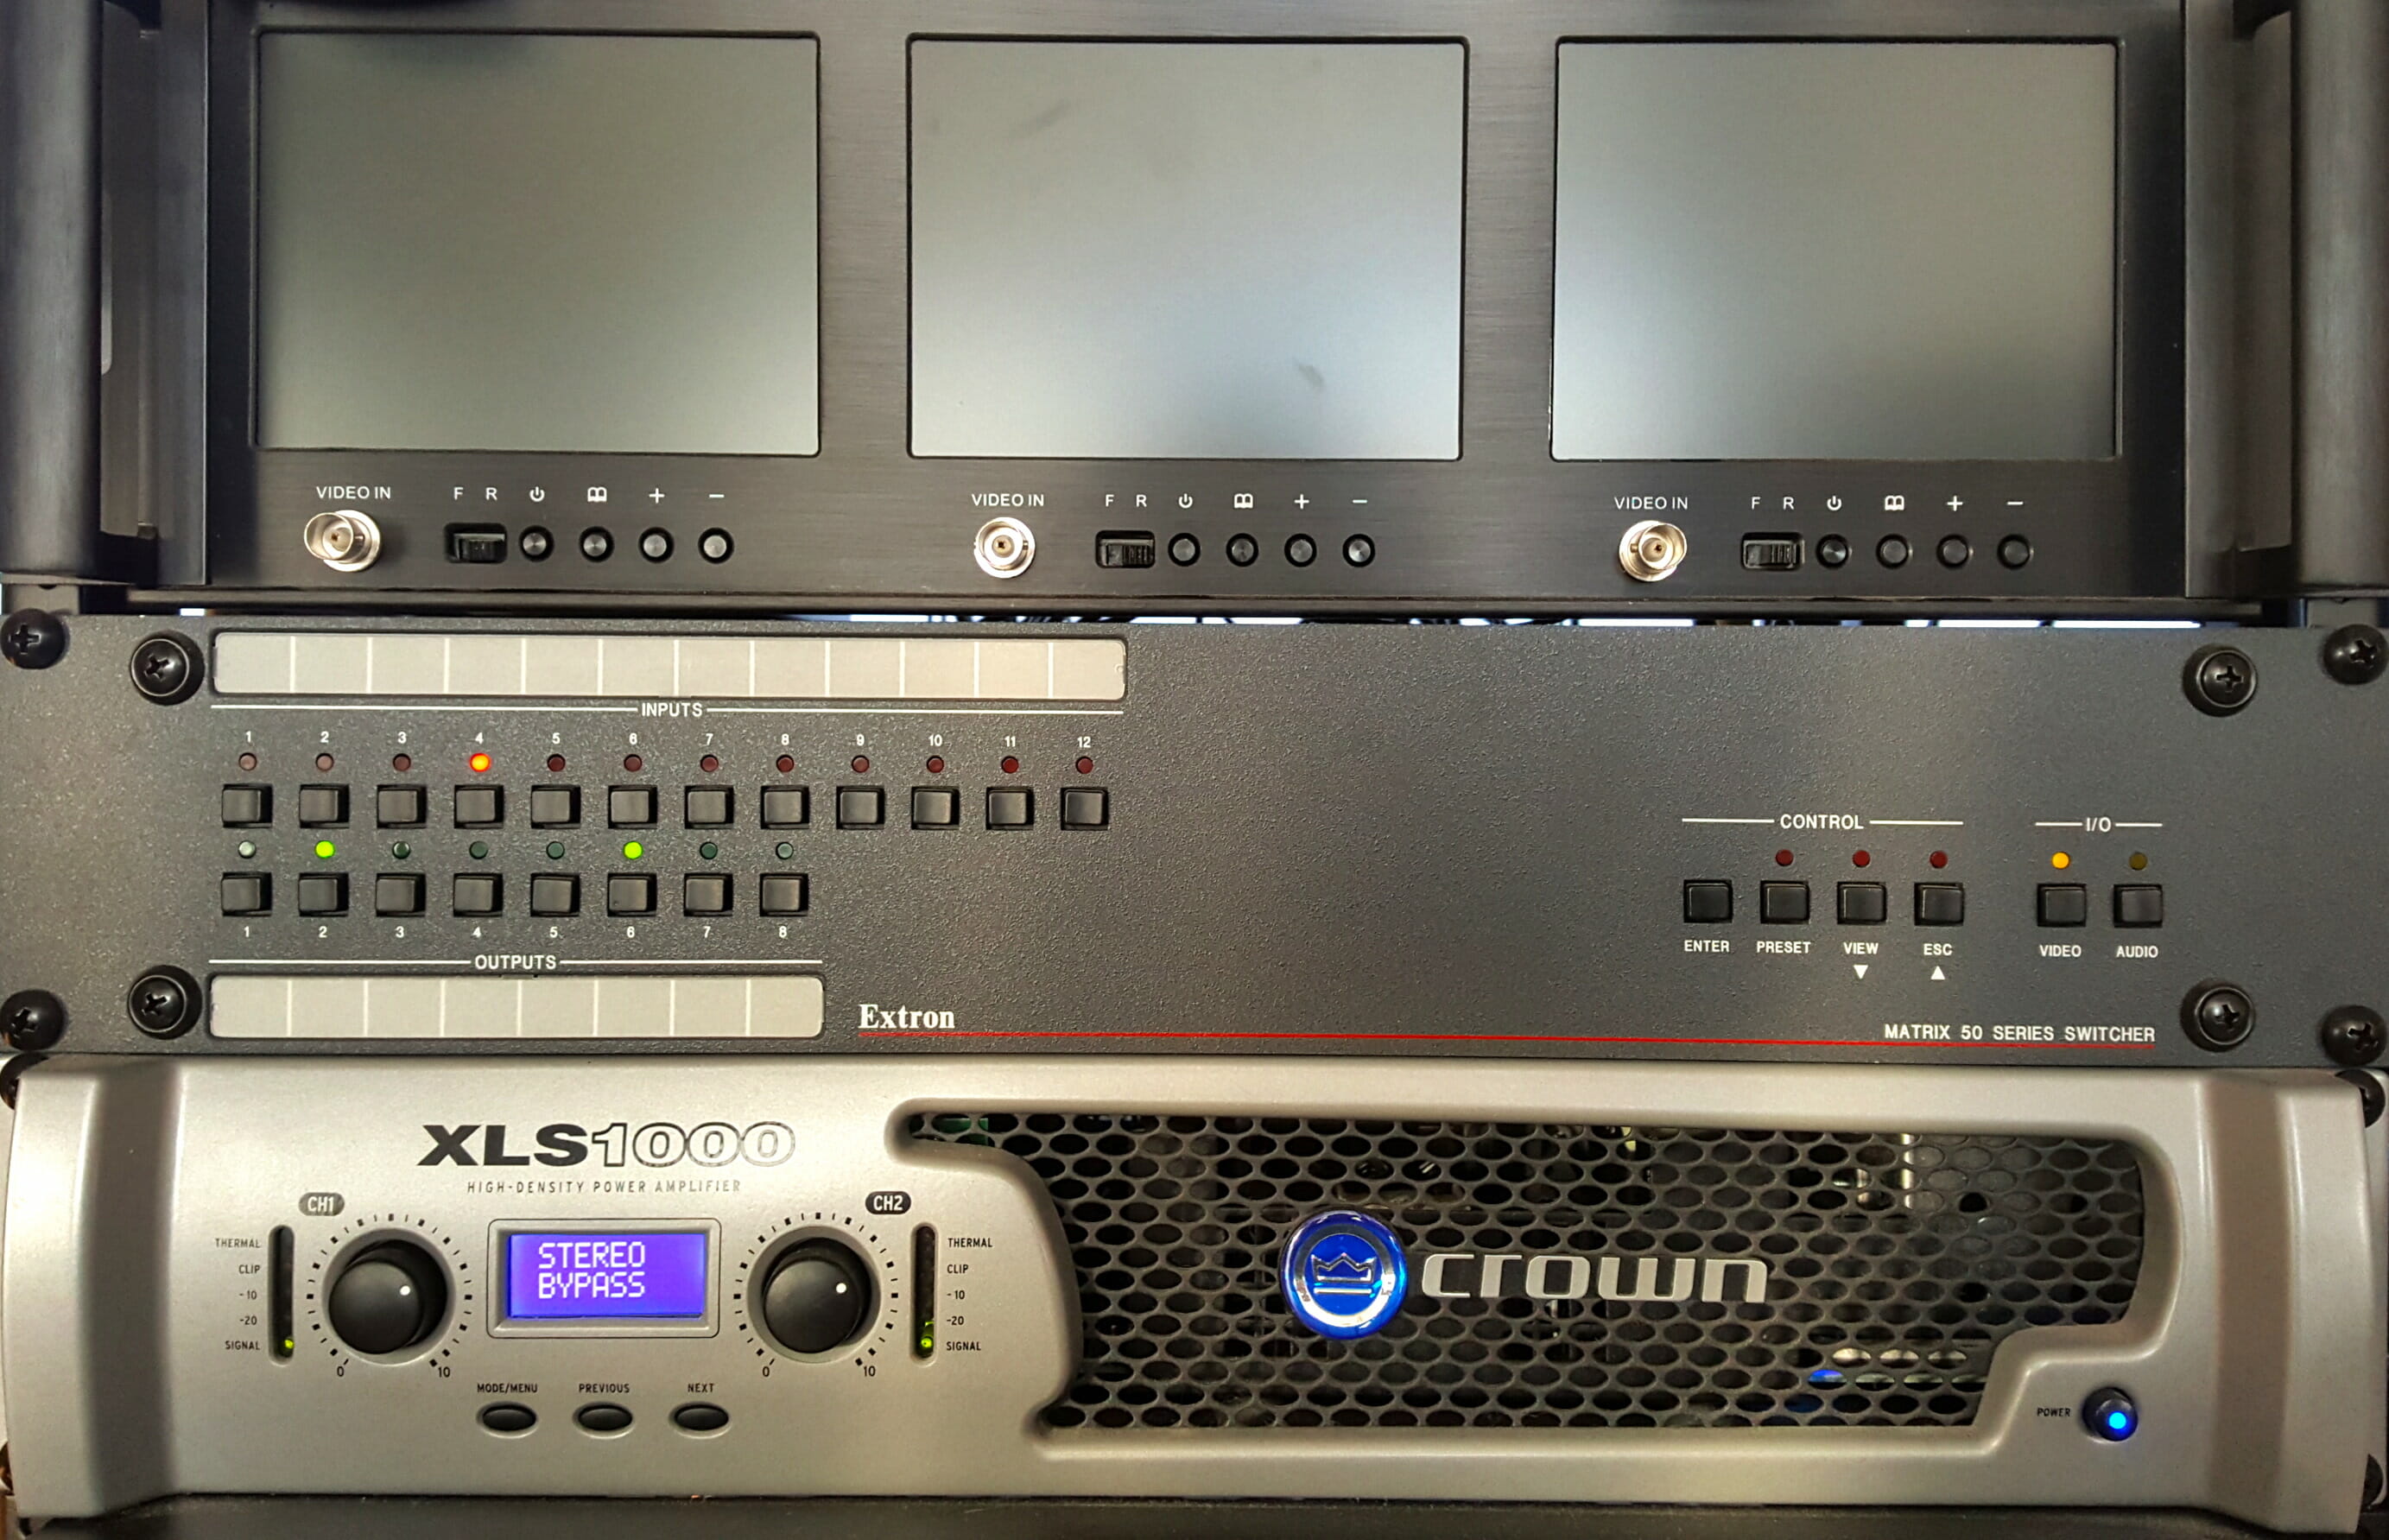
By the way, that Crown is a nice unit. For a long time I considered it overkill and even had it up for sale, but now I appreciate it as a solid driver of the four speakers without a hint of fan noise or other misbehavior. It’s Mode D (digital) and runs cool, with reconfiguration modes (crossover, high-pass, low-pass, bridged) available for more complex setups. Their newer version, with various improvements, is the XLS1002.
Console zone β (beta)
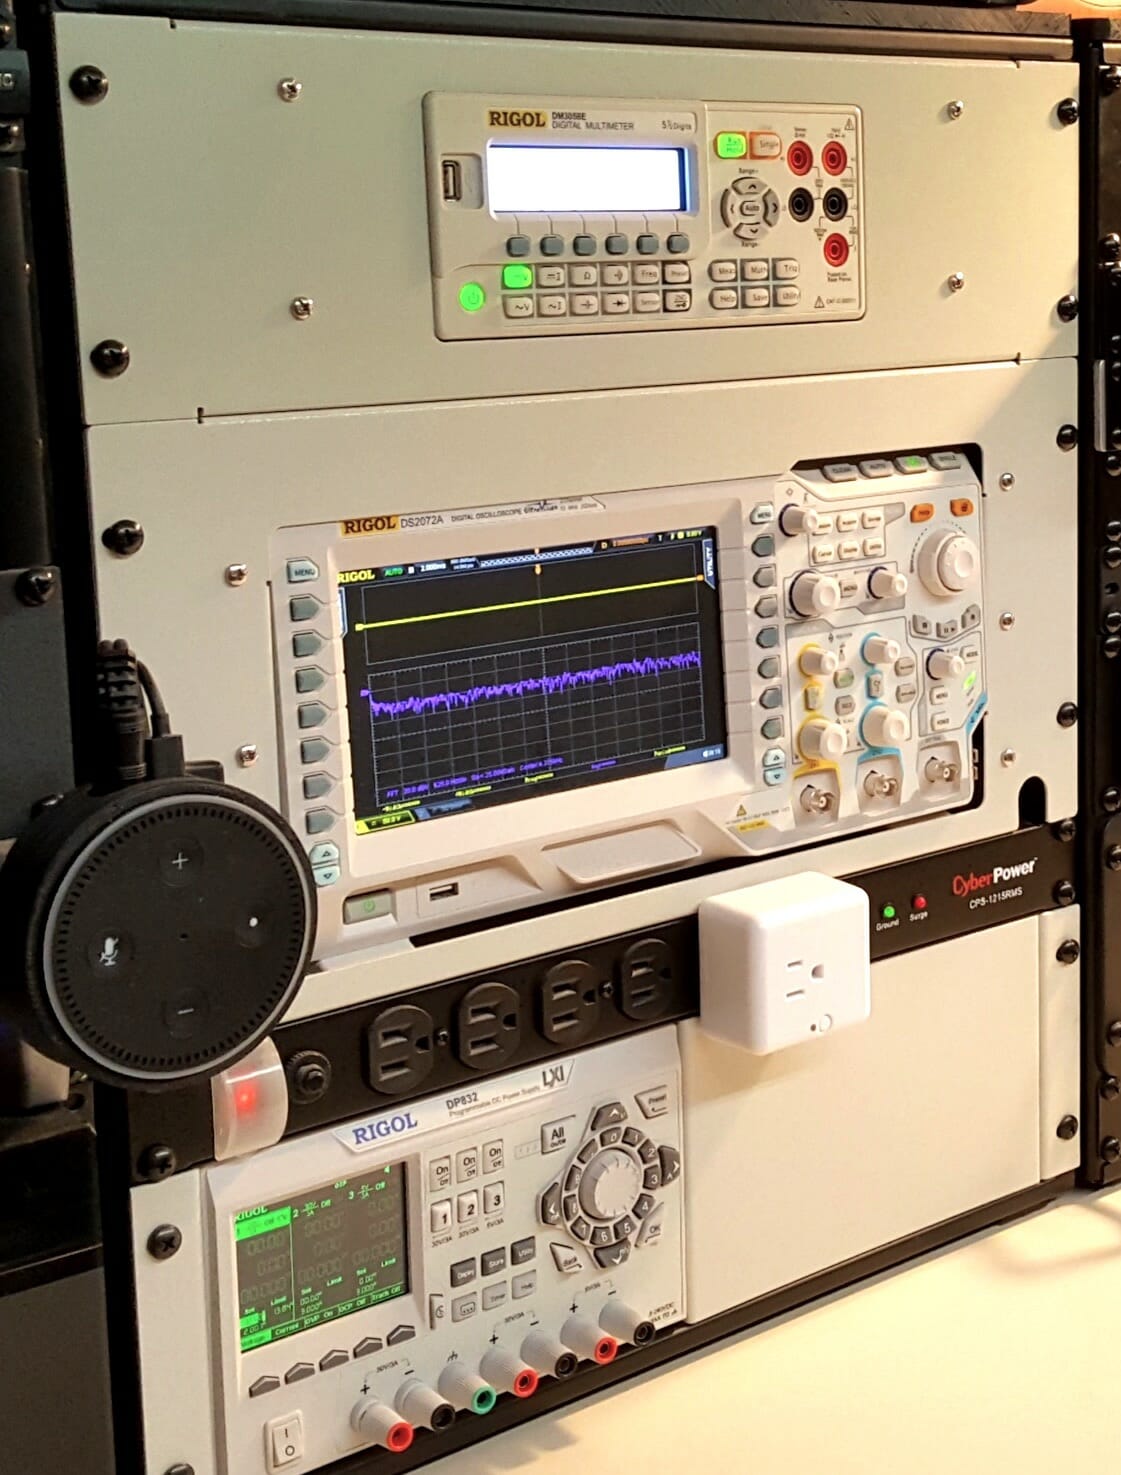
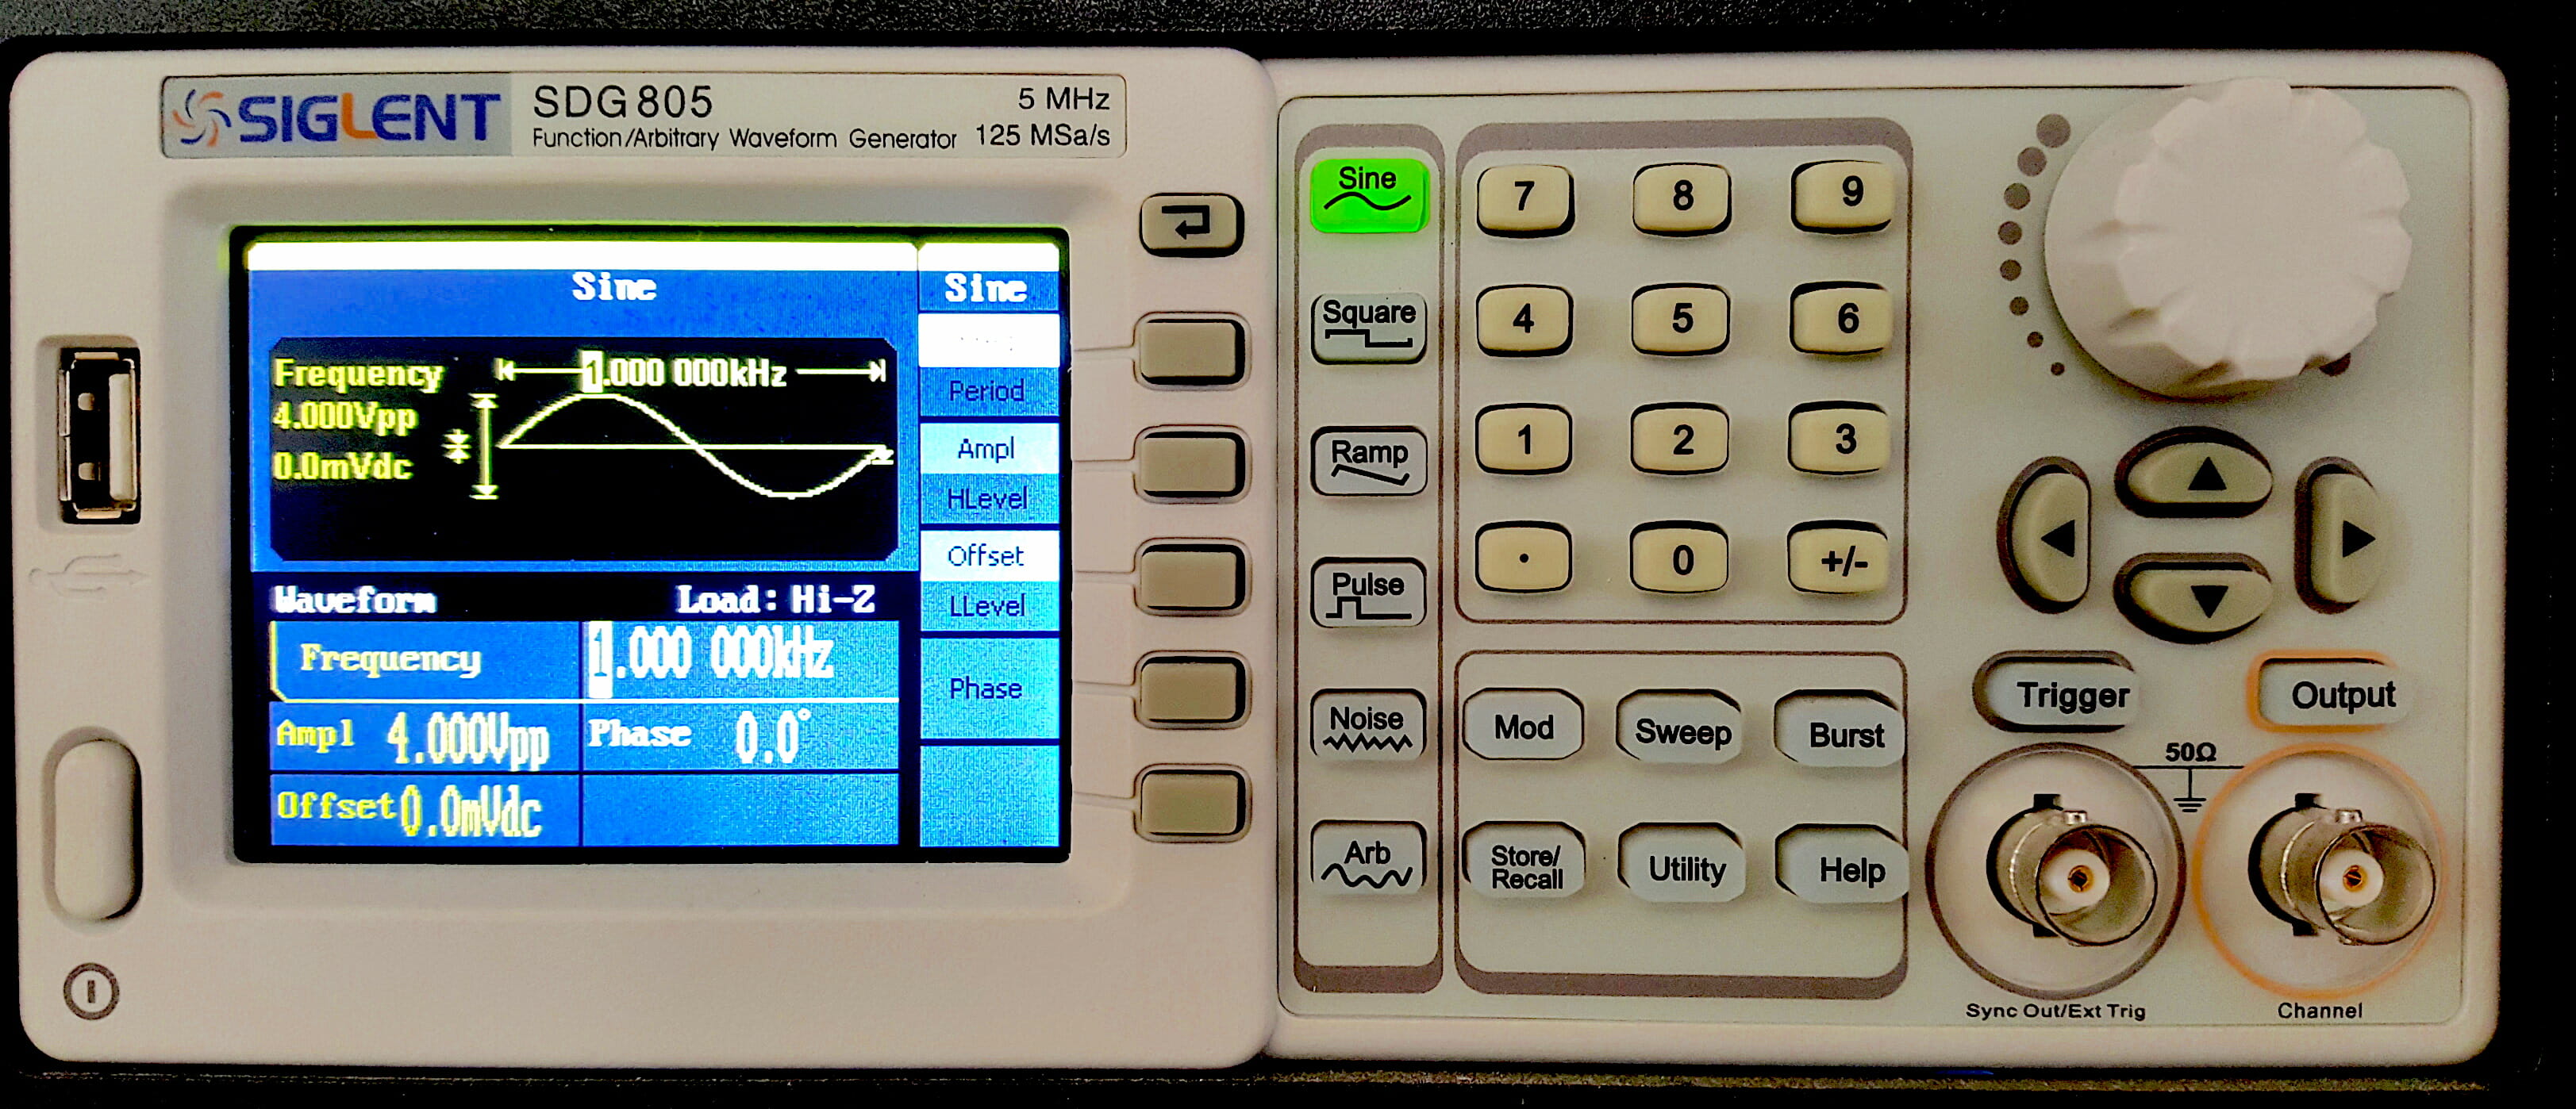
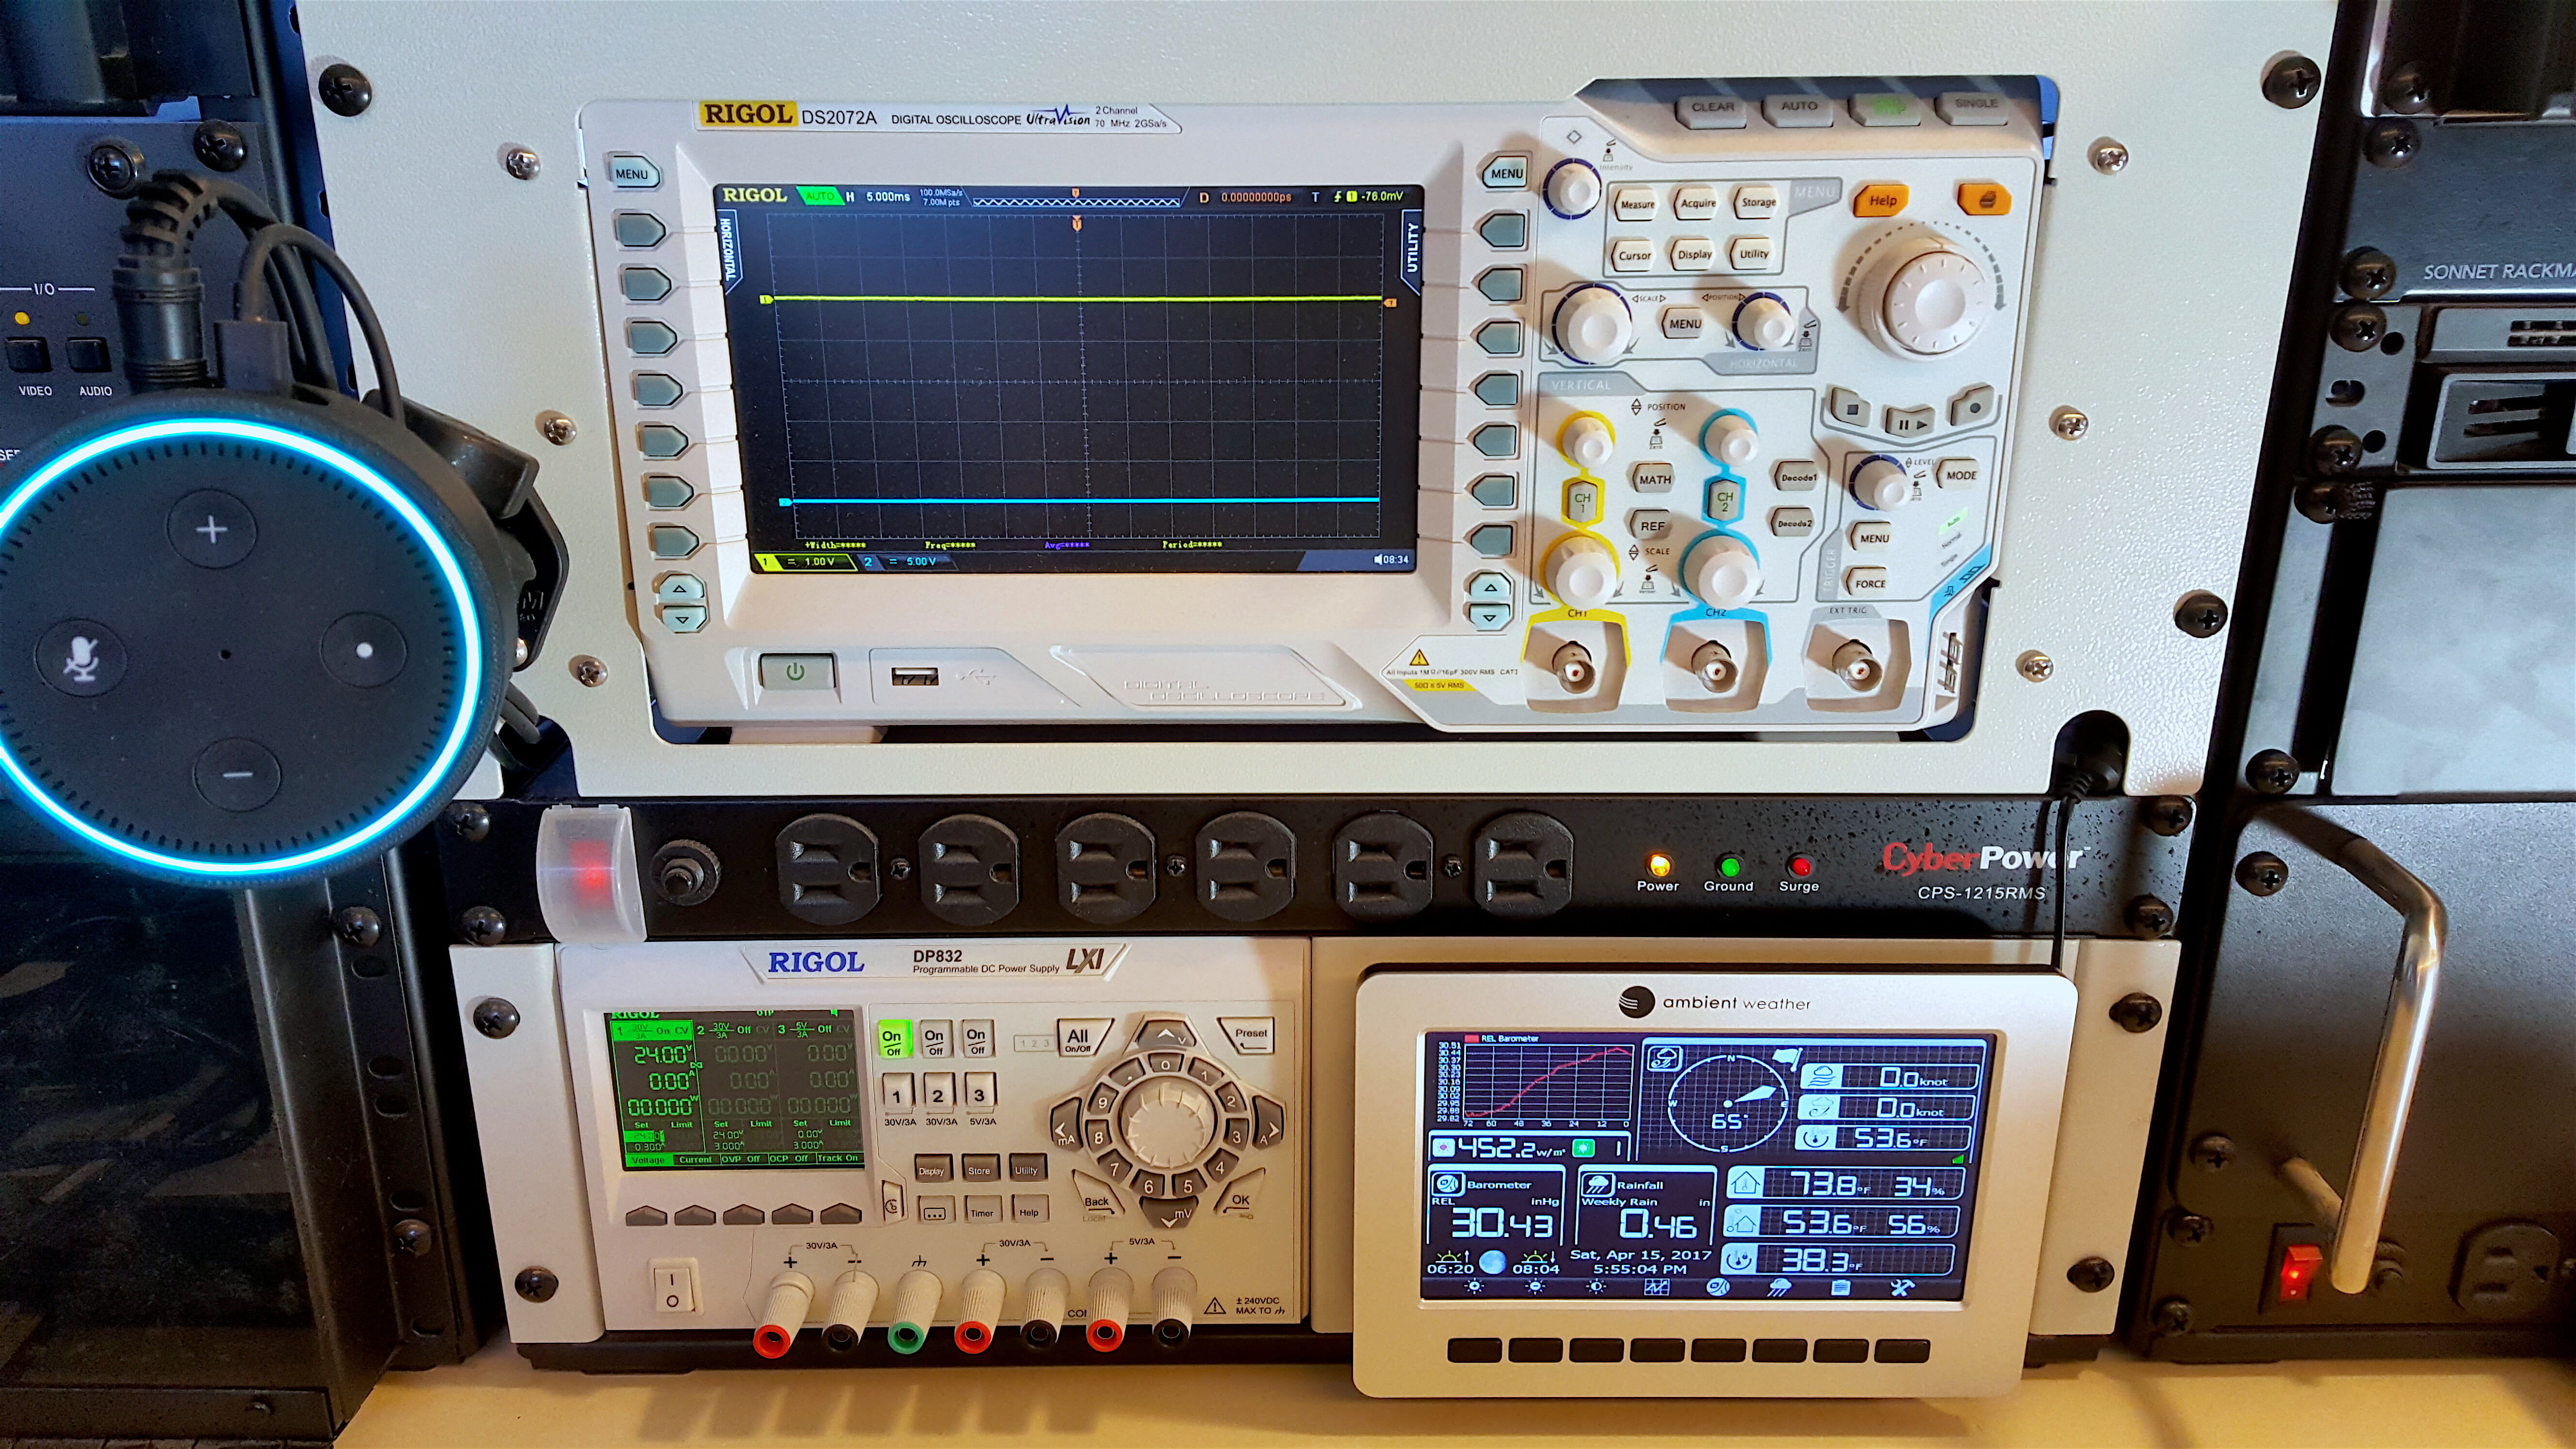
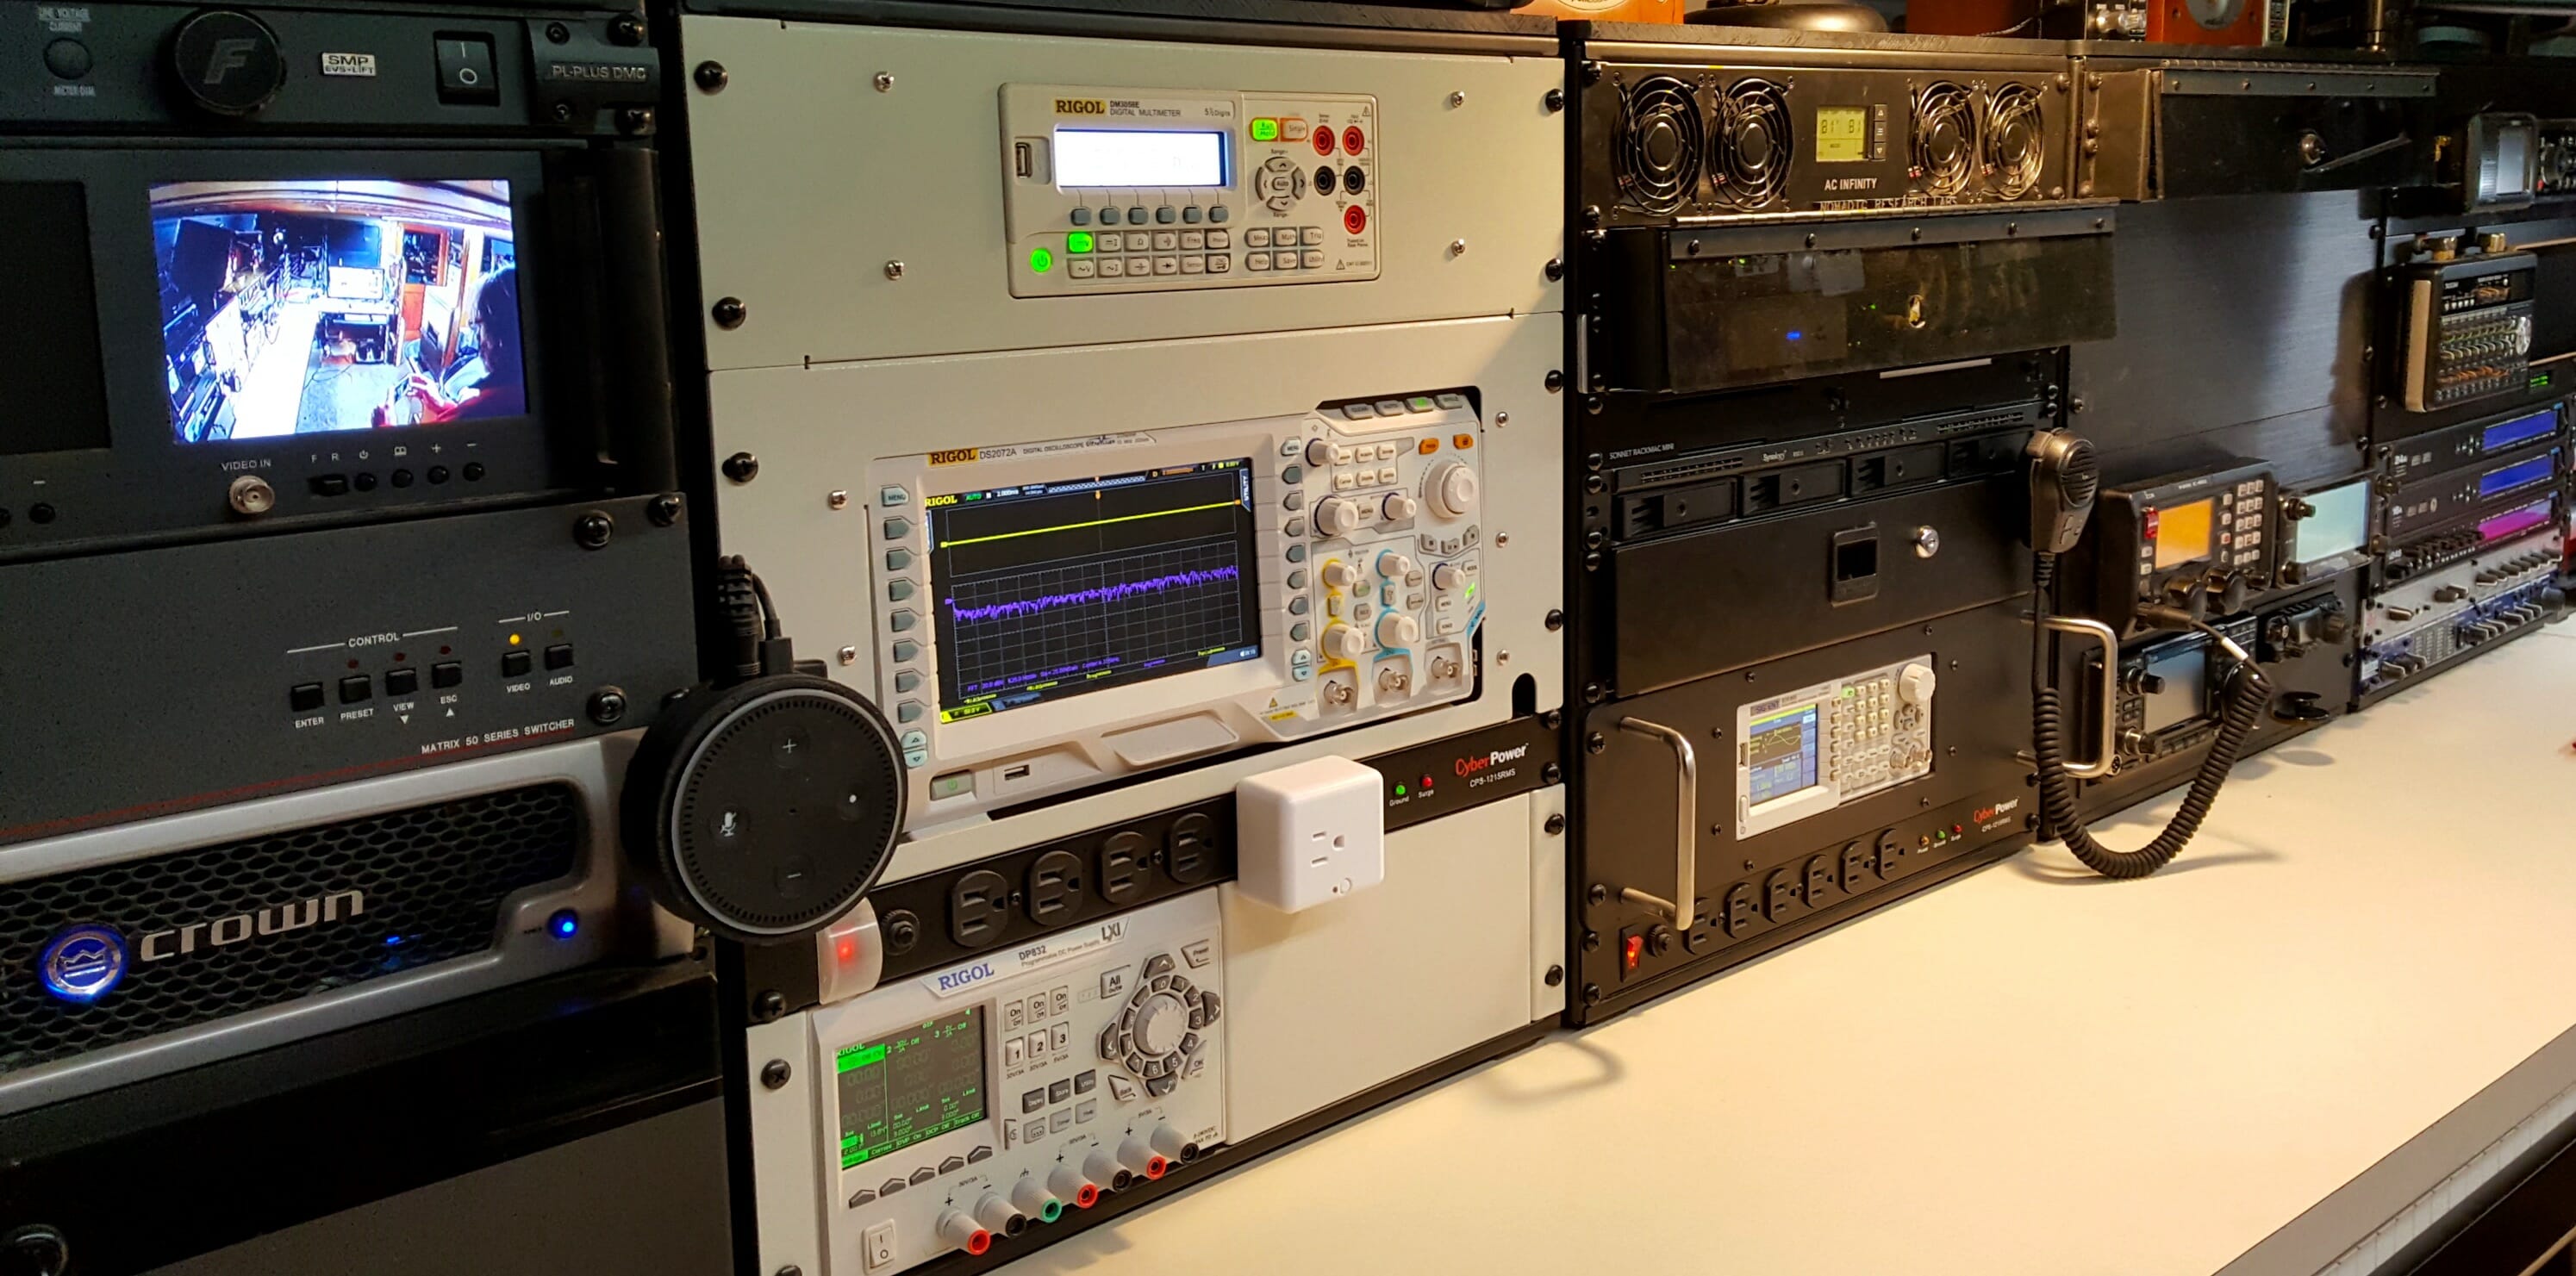
This shiny-tan expanse needs to make its way to the local powder-coating shop for a pigment update, and is the Rigol test equipment suite (DMM, Oscilloscope, and triple-output power supply). There is also a Siglent SDG805 signal generator to the right of this group that I plan to repackage alongside the DMM at the top of this cabinet, better integrating the lab gear and opening up precious space over in gamma… it would be nice to add a spectrum analyzer. (It never ends, does it? At least the 60U rackspace and general constraints of a boat enforce some hard limits on sprawl.) It’s a nice little lab, with an antistatic mat that fits the desktop when is in use.
I used stock Rigol rackmount kits for all this, but would probably not do so again. They were overpriced and inconsistent… expensive kluges made of steel, hard to adapt. The oscilloscope one is particularly annoying… the DS2072A just sits there, captured only by a little lip at the base, and until I zip-tied the expensive instrument in place it could fall out if the cabinet were tilted backward. I do love their test equipment, though. Siglent did a better job with their black aluminum rackmount kit, which is currently parked at the bottom of gamma.
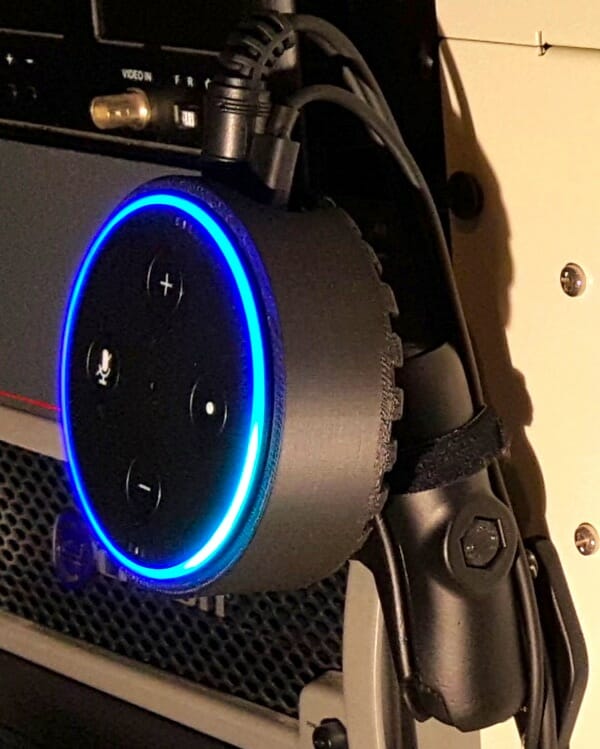
The oddity in this zone is the RAM mount next to the scope, supporting this case that I 3D-printed for the Amazon Echo Dot. In this location, it hears me pretty well when I’m seated at the command center, as well as picking up requests from the Galley for timers or calculations. It has also become my primary lighting control, piped to Philips Hue and SmartThings.
This unit is distinguished from the original Echo (down in the Sleep Lab) by a lack of decent internal speakers… but it has line-level out. This is piped over to the MOTU audio system, given a touch of EQ and reverb, then mixed in with my primary sources.
A quick note about that CyberPower outlet strip in the photo… I use four of those including rear-mount variants, and love them. Heavy long cable and solid construction, though I have never had a chance to knowingly test their surge suppression. The gadget that is plugged in is a SmartThings switched outlet that I use for random loads; it’s nice to just say “Computer, turn on console outlet” and have it comply.
I added the ship’s weather station display next to the Rigol power supply… it was a perfect fit and just too tempting:
Console zone γ (gamma)
This is Grand Central Station for ship networking: Peplink Balance One router, UniFi 24-port switch, Cloud Key, hubs, Synology RS815 NAS, servers, gateways, bridges, and all those other blinky goodies that end up becoming central to our lives. With three external units (outdoor Mikrotik Groove for port WiFi, Jetpack for cellular fail-over, and UniFi AP for internal wireless devices), this is the core of all data services on the ship:
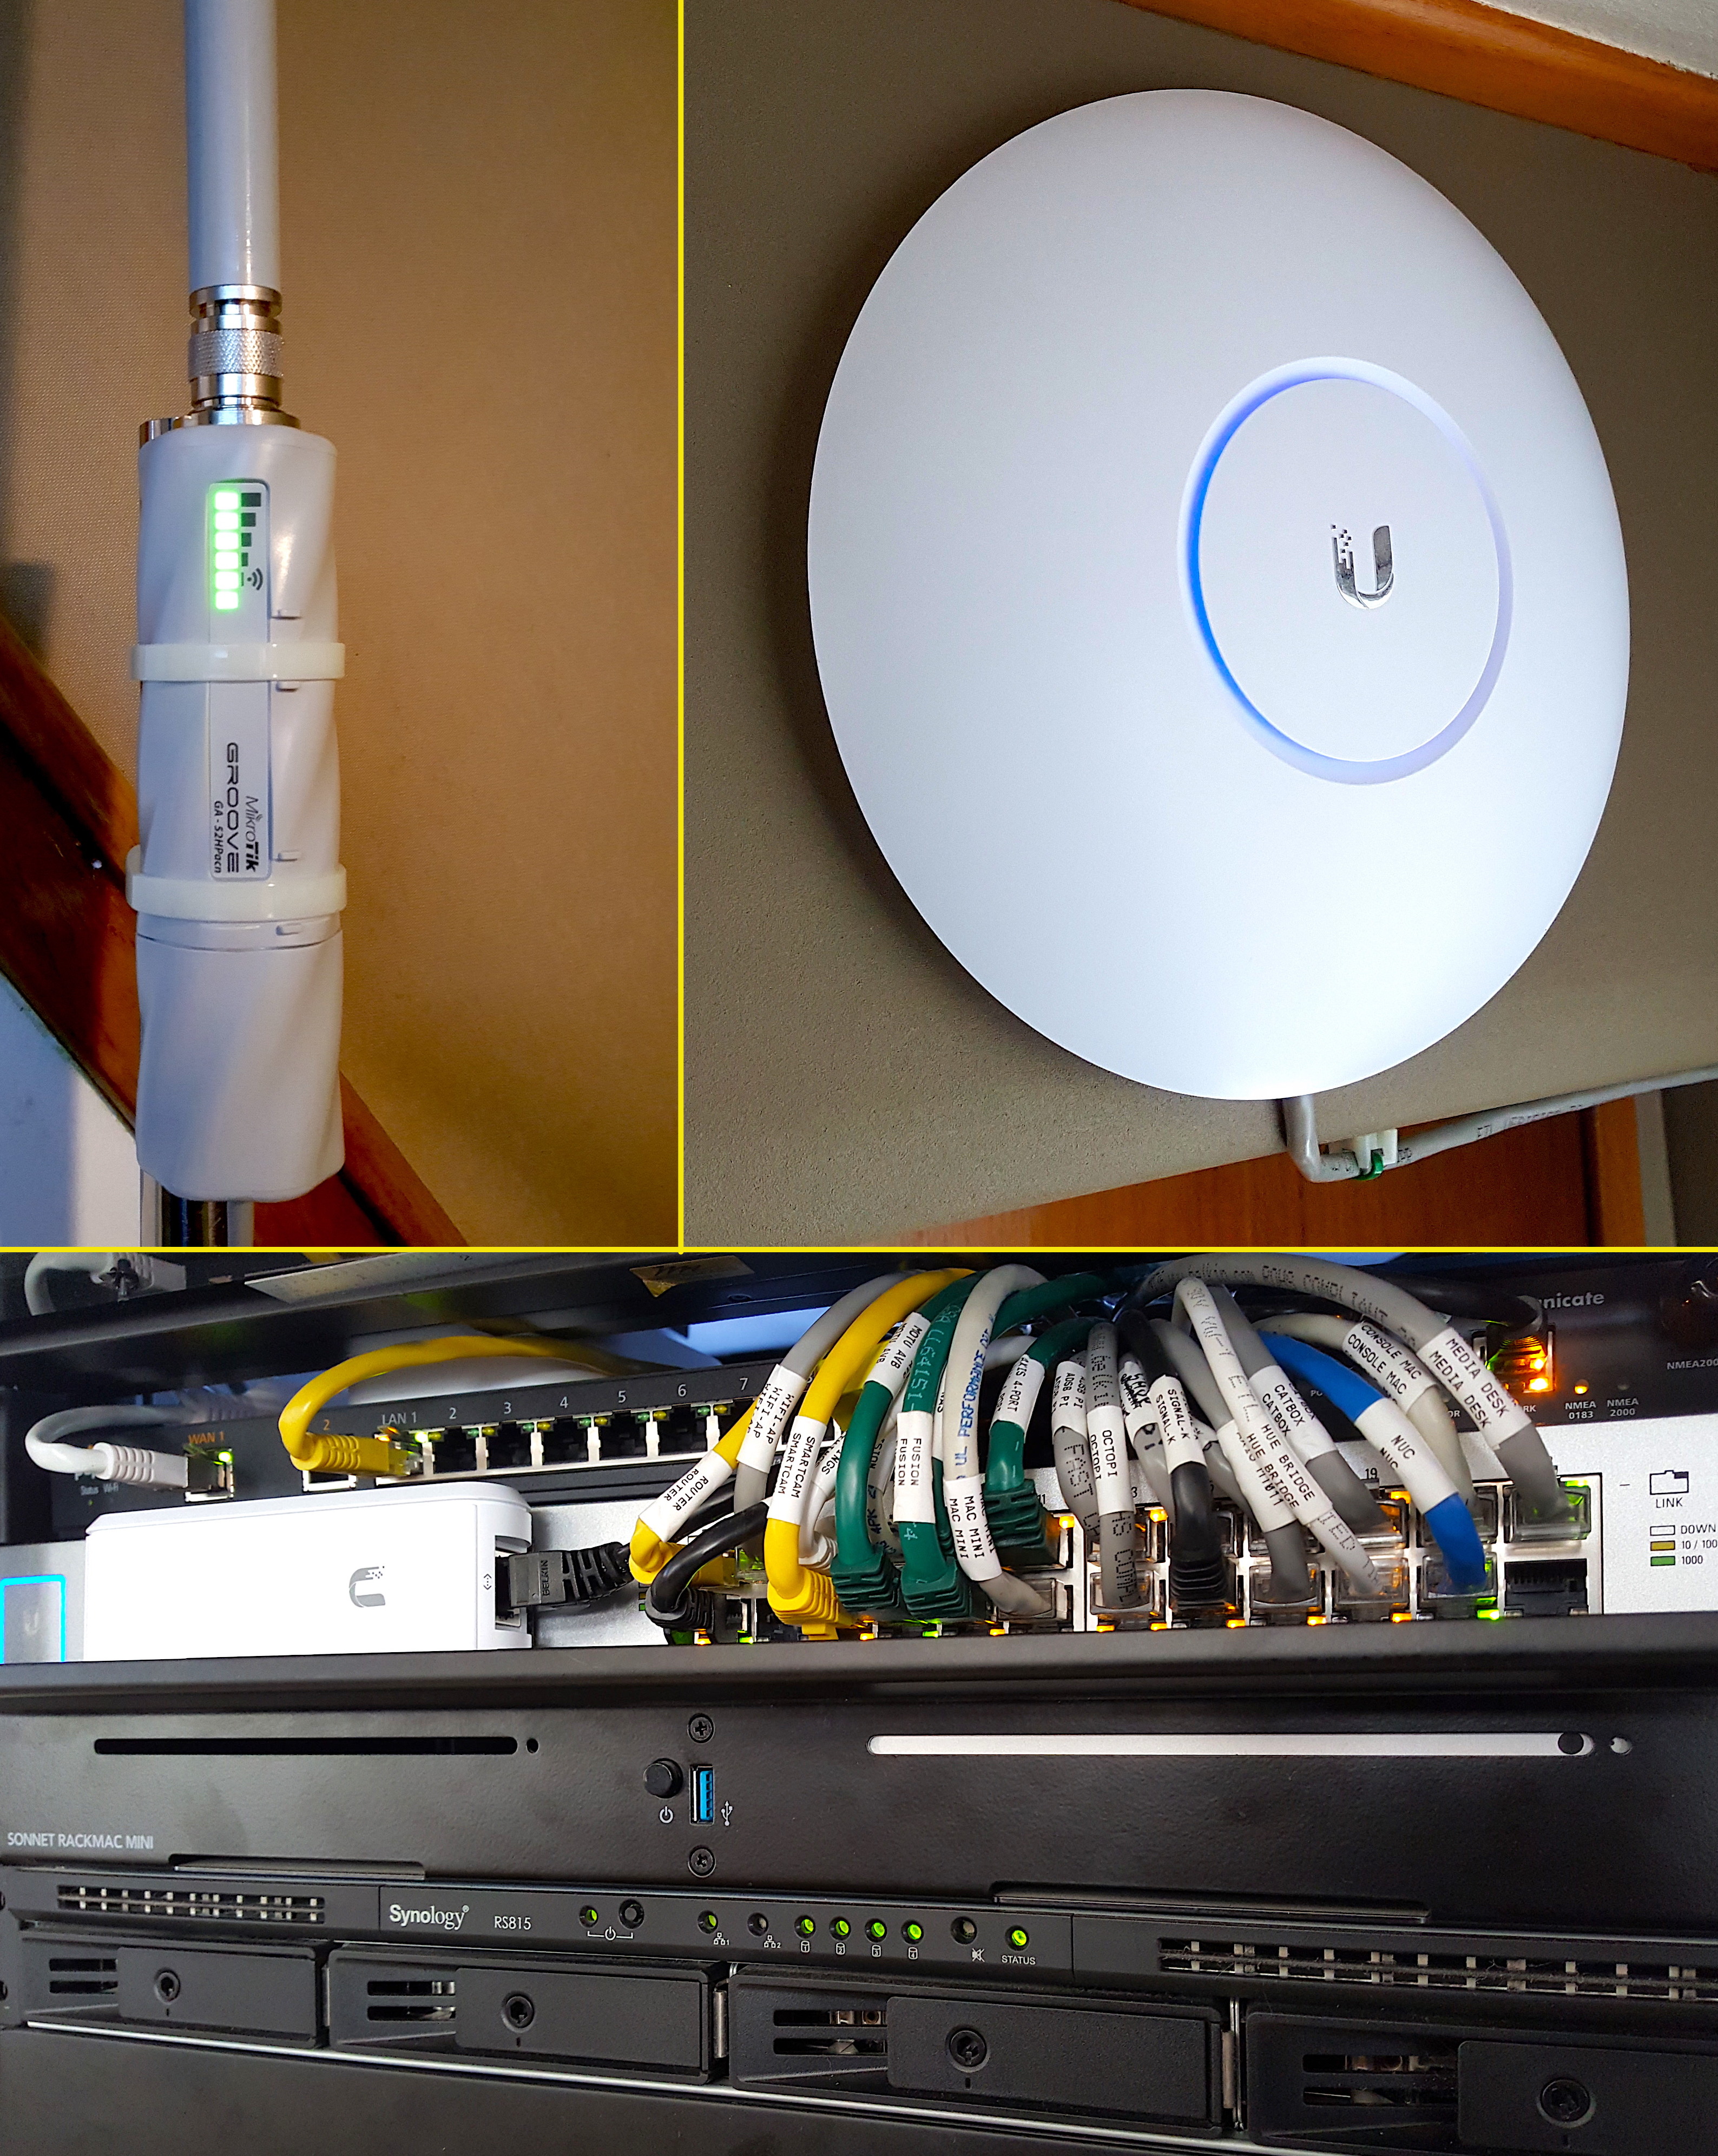
The architecture of this deserves its own post, so I won’t go into detail in a general console tour, but this cabinet is densely packed… challenging my cable-management protocols and requiring active cooling.
As I mentioned in the beta section, the signal generator is parked in this cabinet for the moment, and above it is a locking rack drawer for handheld accessories… mics, cables, gizmos, tube of Tef-Gel for rack screws, and so on.
Finally, this zone has another one of the CyberPower outlet strips like the one in beta. Because of active airflow through the NAS, switch, and overall cabinet, I periodically take the central vacuum to gamma and slurp out dust deposits.
Console zone δ (delta)
This region is devoted to amateur radio equipment. The major part of this is a 6U panel (10.5 inches) that supports four rigs:
- Icom IC-7300 – HF/50 MHz, SDR, bandscope, digital modes
- Icom IC-M802 – Marine SSB (both amateur and channelized)
- Icom ID-5100 – D-Star dual-bander (2m/70cm)
- Yaesu FT-817 – QRP multimode 160m-70cm “Swiss Army Knife” rig
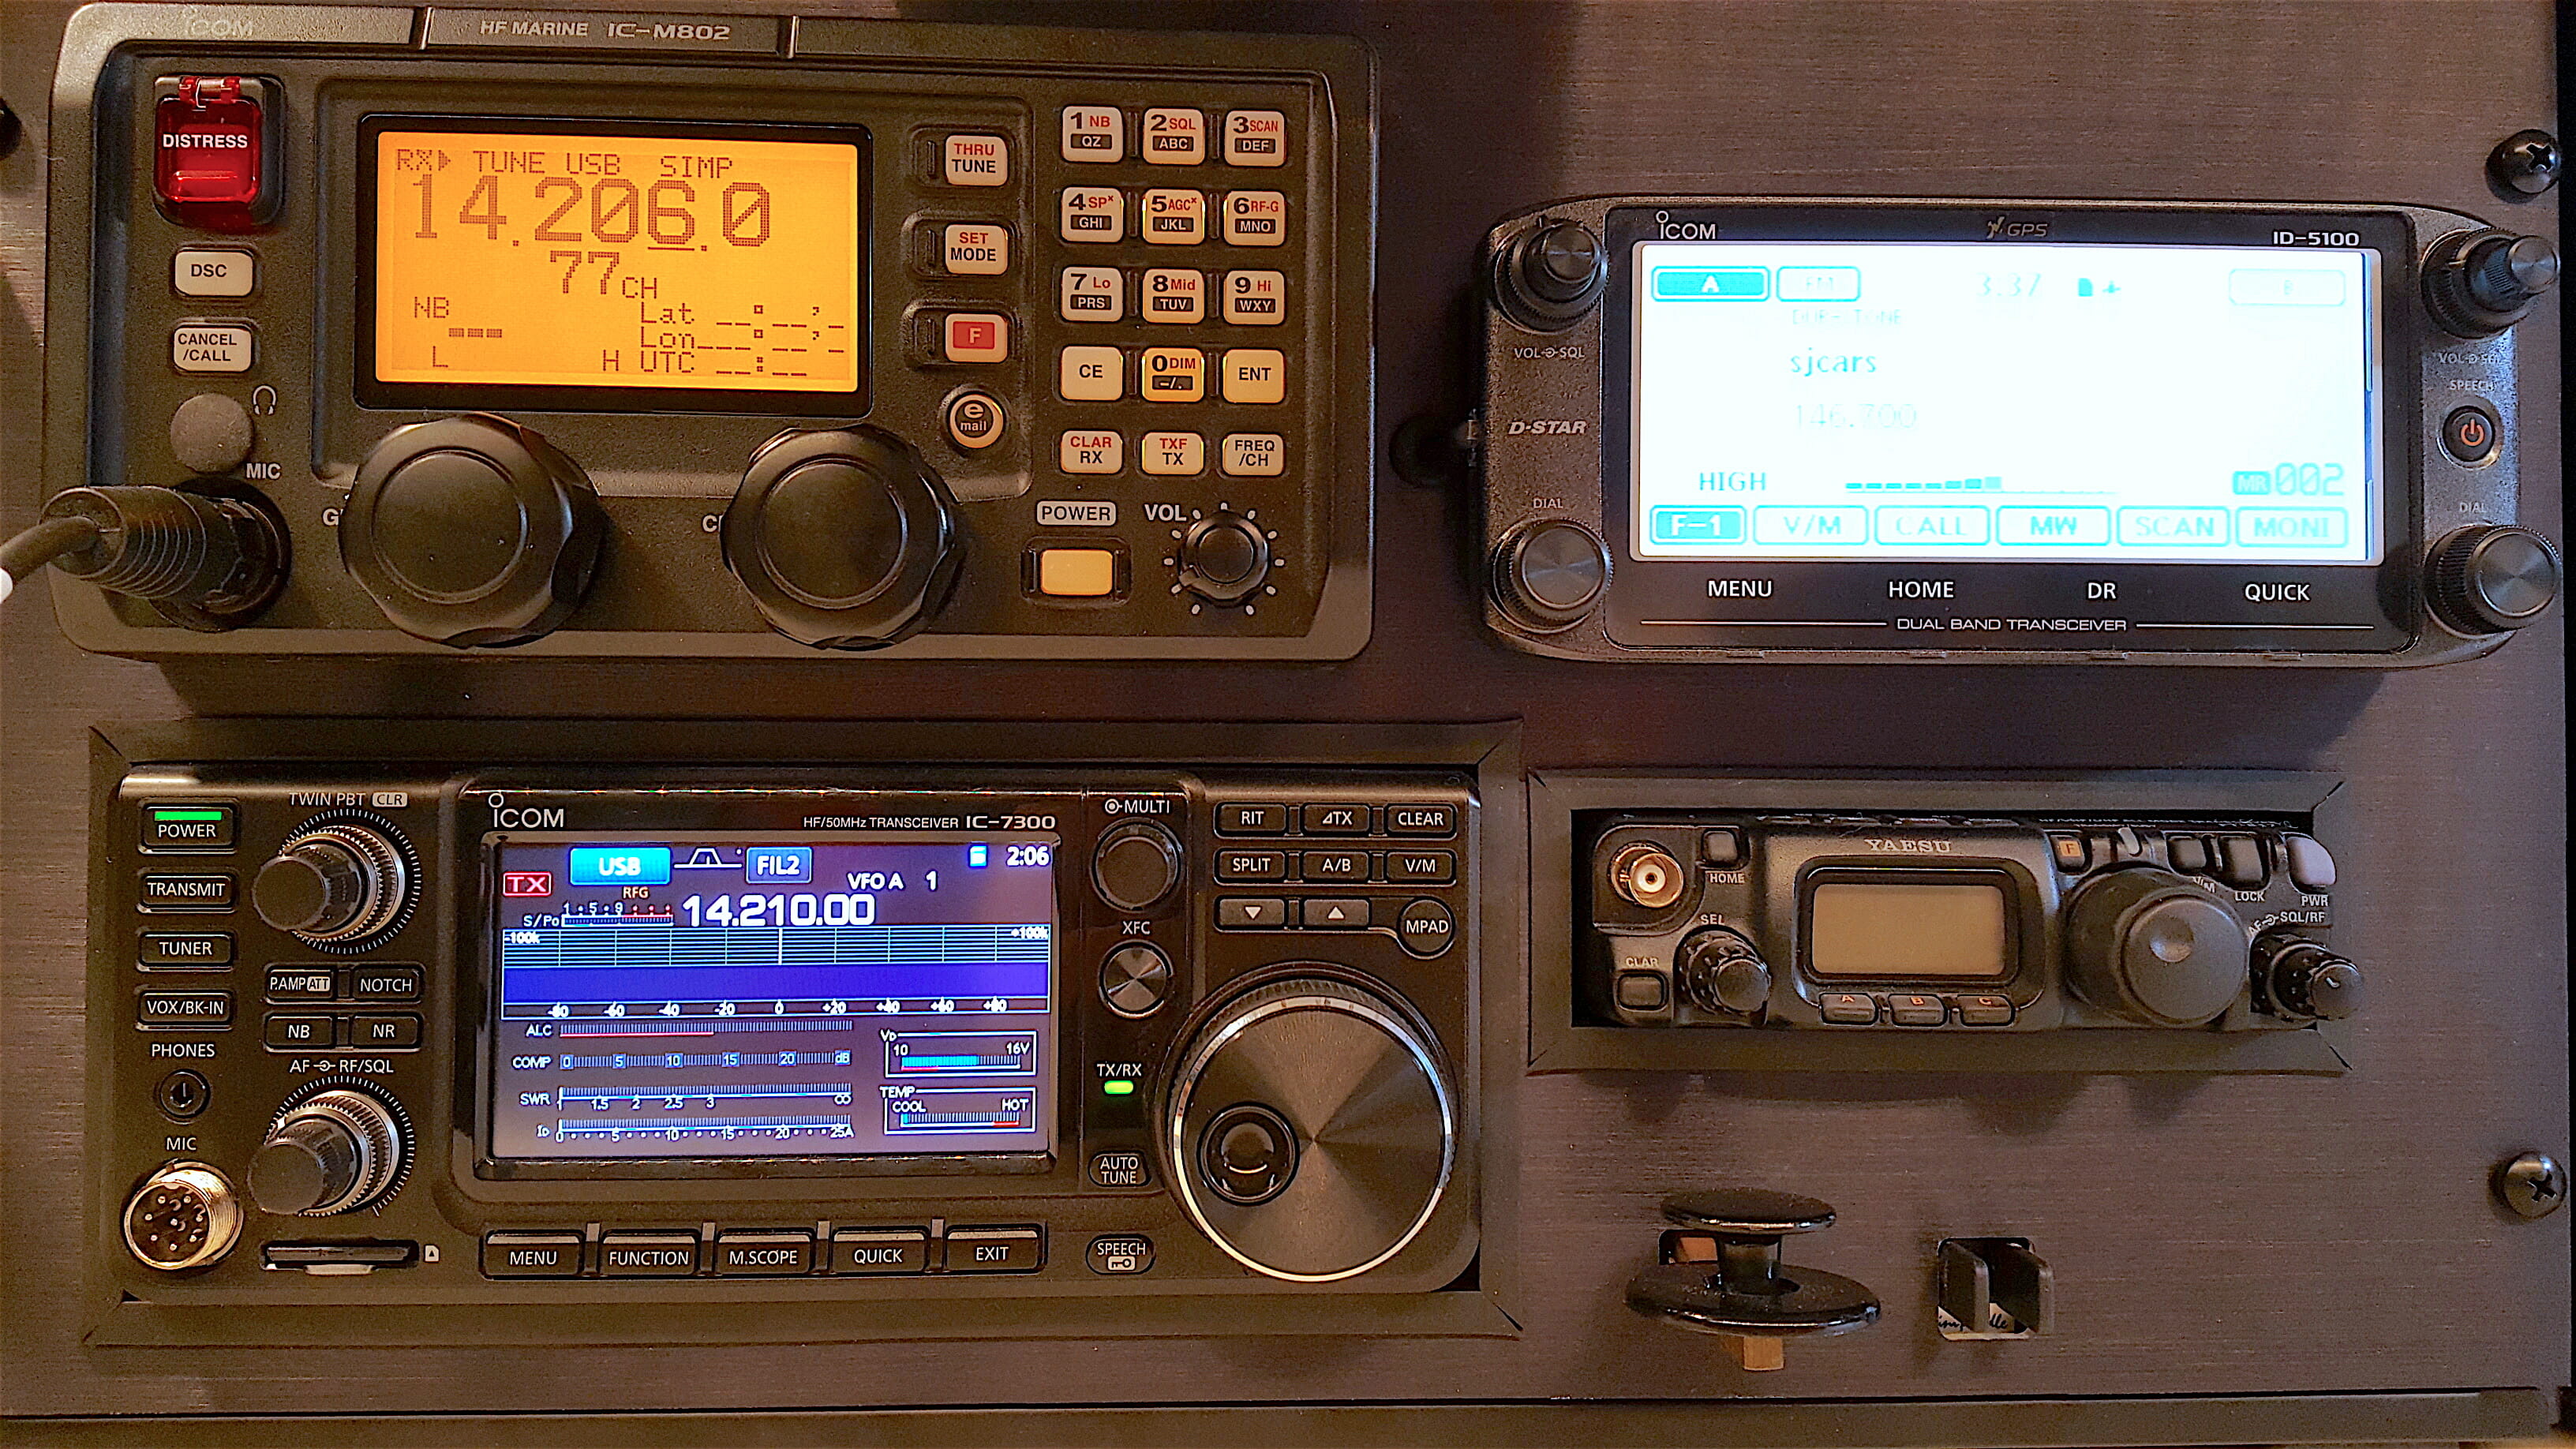
In addition, this panel has to carry both straight and iambic CW keyers, along with a few random controls and connectors. Above this is a smaller panel that is about to get additional comms-related gear, but the photo above was done just after the mounting of the four rigs. I had planned on five, including my venerable Icom 706mkIIg, but that really was getting redundant and crowded… so it is going up in the pilothouse console as a backup.

Both the M802 (orange display) and 5100 (awful display) have associated “black boxes” mounted elsewhere, making those units light and installation easy. But the 7300 is too heavy to cantilever off the panel, and the 817 needs support as well. I installed a plywood floor in this cabinet, machined some big brackets for the large radio, added a polycarbonate shelf for the little QRP rig, milled all the holes including two small ones for keyers, added rubber channel edging including messy manual beveling with a knife, and called it done(ish)… at least until I take it all apart to add the little stuff.
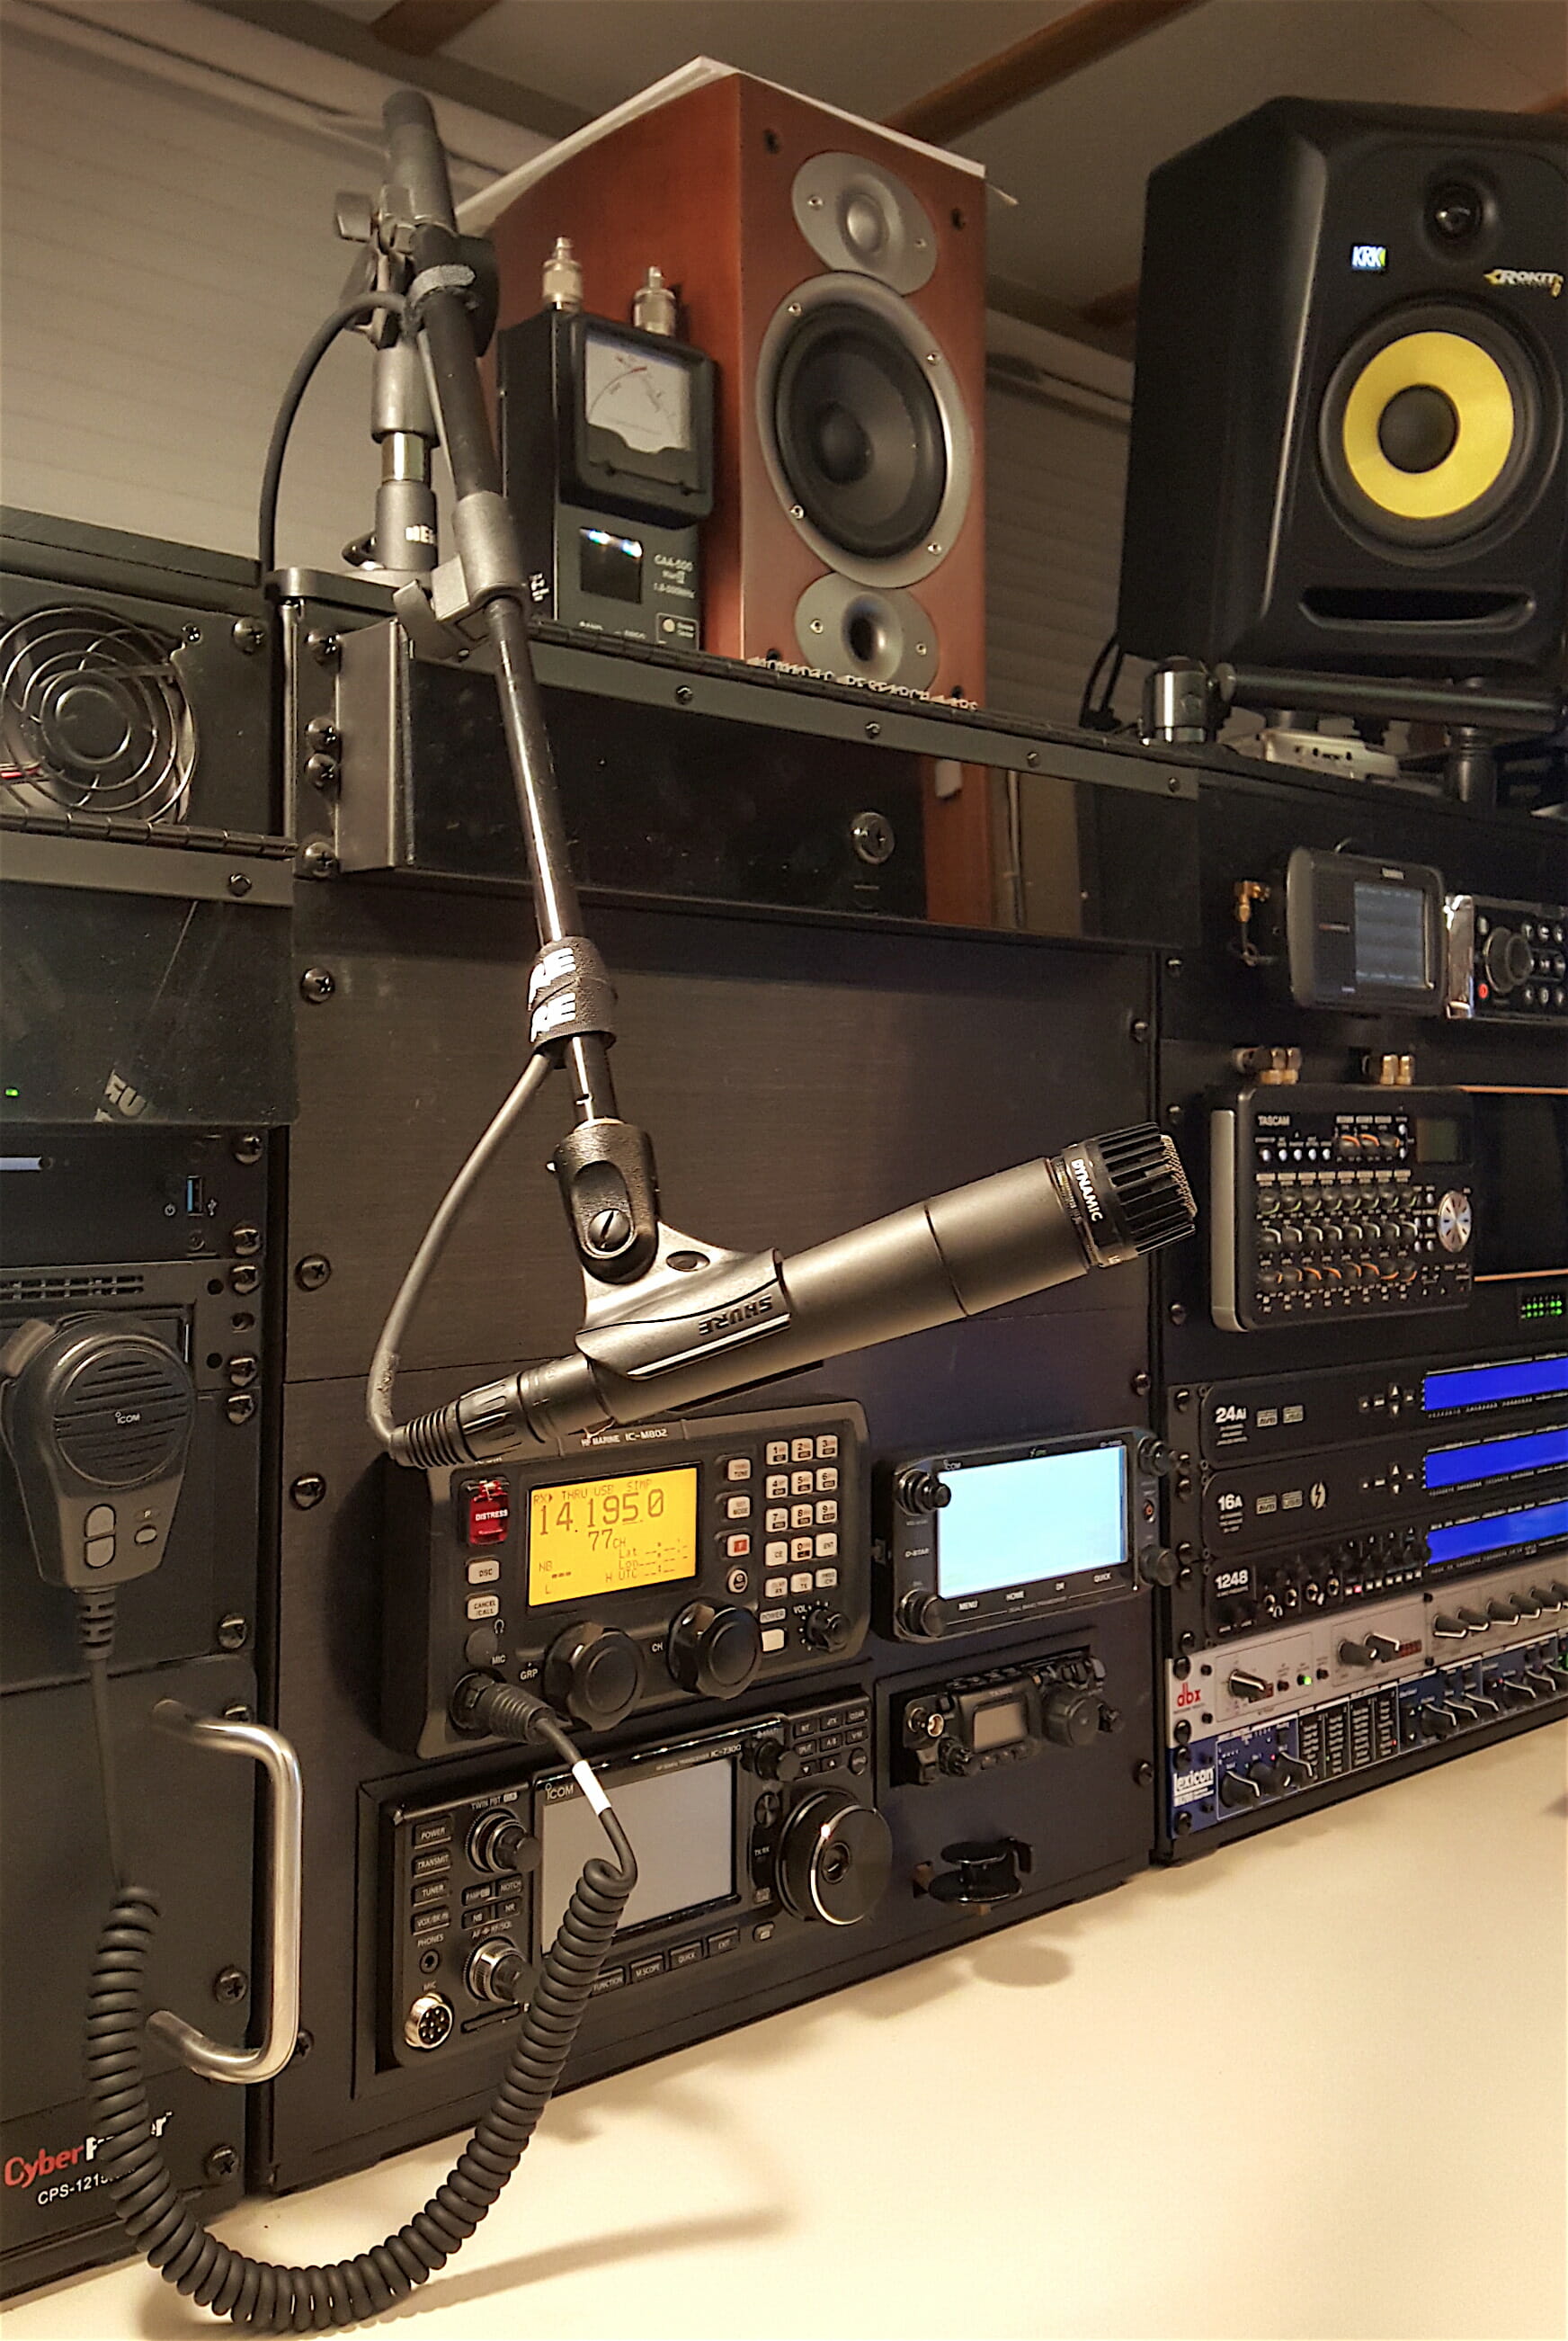
The radios all have hand mics, but that gets messy with multiple rigs. One of the applications for the audio switching system is use of a single quality microphone, routed to any radio via the MOTU network and iBox. In practice, there are two: dynamic at the console, and condenser on a long boom next to the computer where it extends nicely for video conferencing.

At this writing, I’m working on the blank 4U panel above — this gets packet and PACTOR modems, SWR/power monitor, a small speaker, controls for configuration, DSP audio filter, station clock, stand-alone CW decoder, and other accessories. Antenna configuration is done through a 2U coax patch panel in the delta cabinet, and the OpenSPOT for digital voice modes sits on top for best antenna coverage.
Console zone ε (epsilon)
Finally, the fifth zone of the console, at my left hand while seated at the workstation, is completely devoted to audio. This has a few carefully interfaced connections to the radios next door, but it goes a lot further than that; somewhere around 48 sources and half that many sinks are interconnected through the MOTU tools (see tech discussion here).
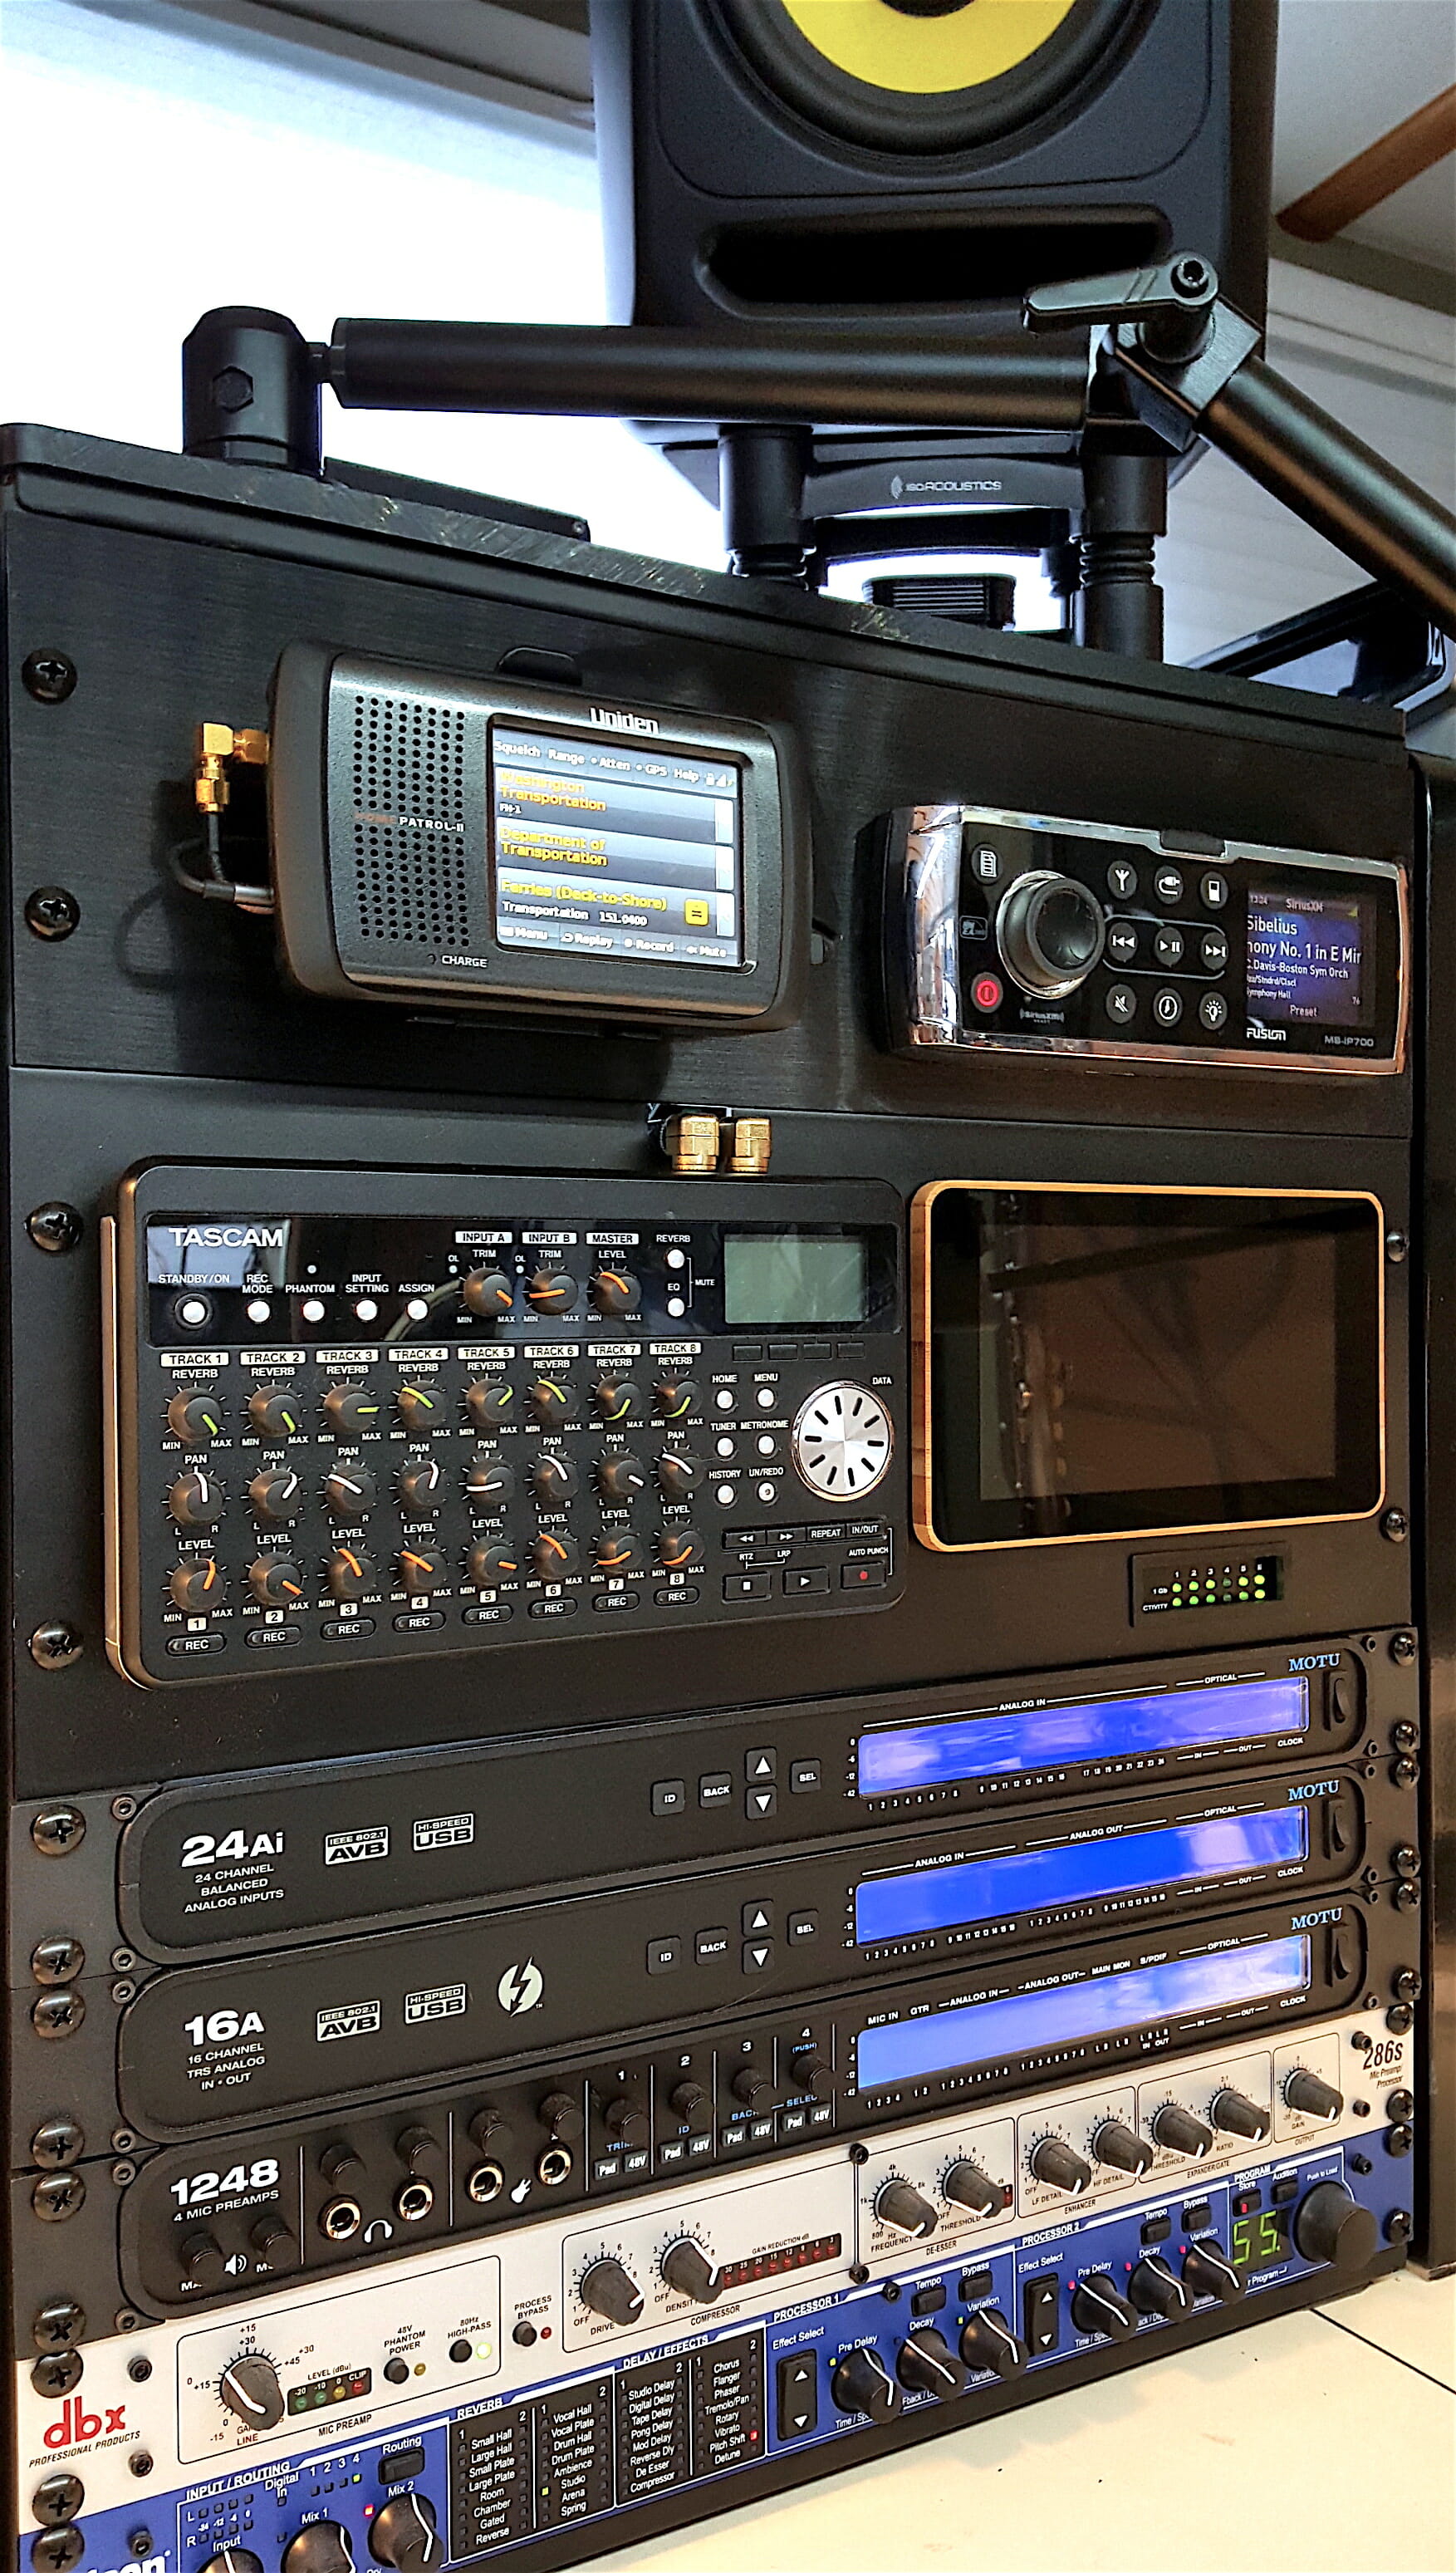
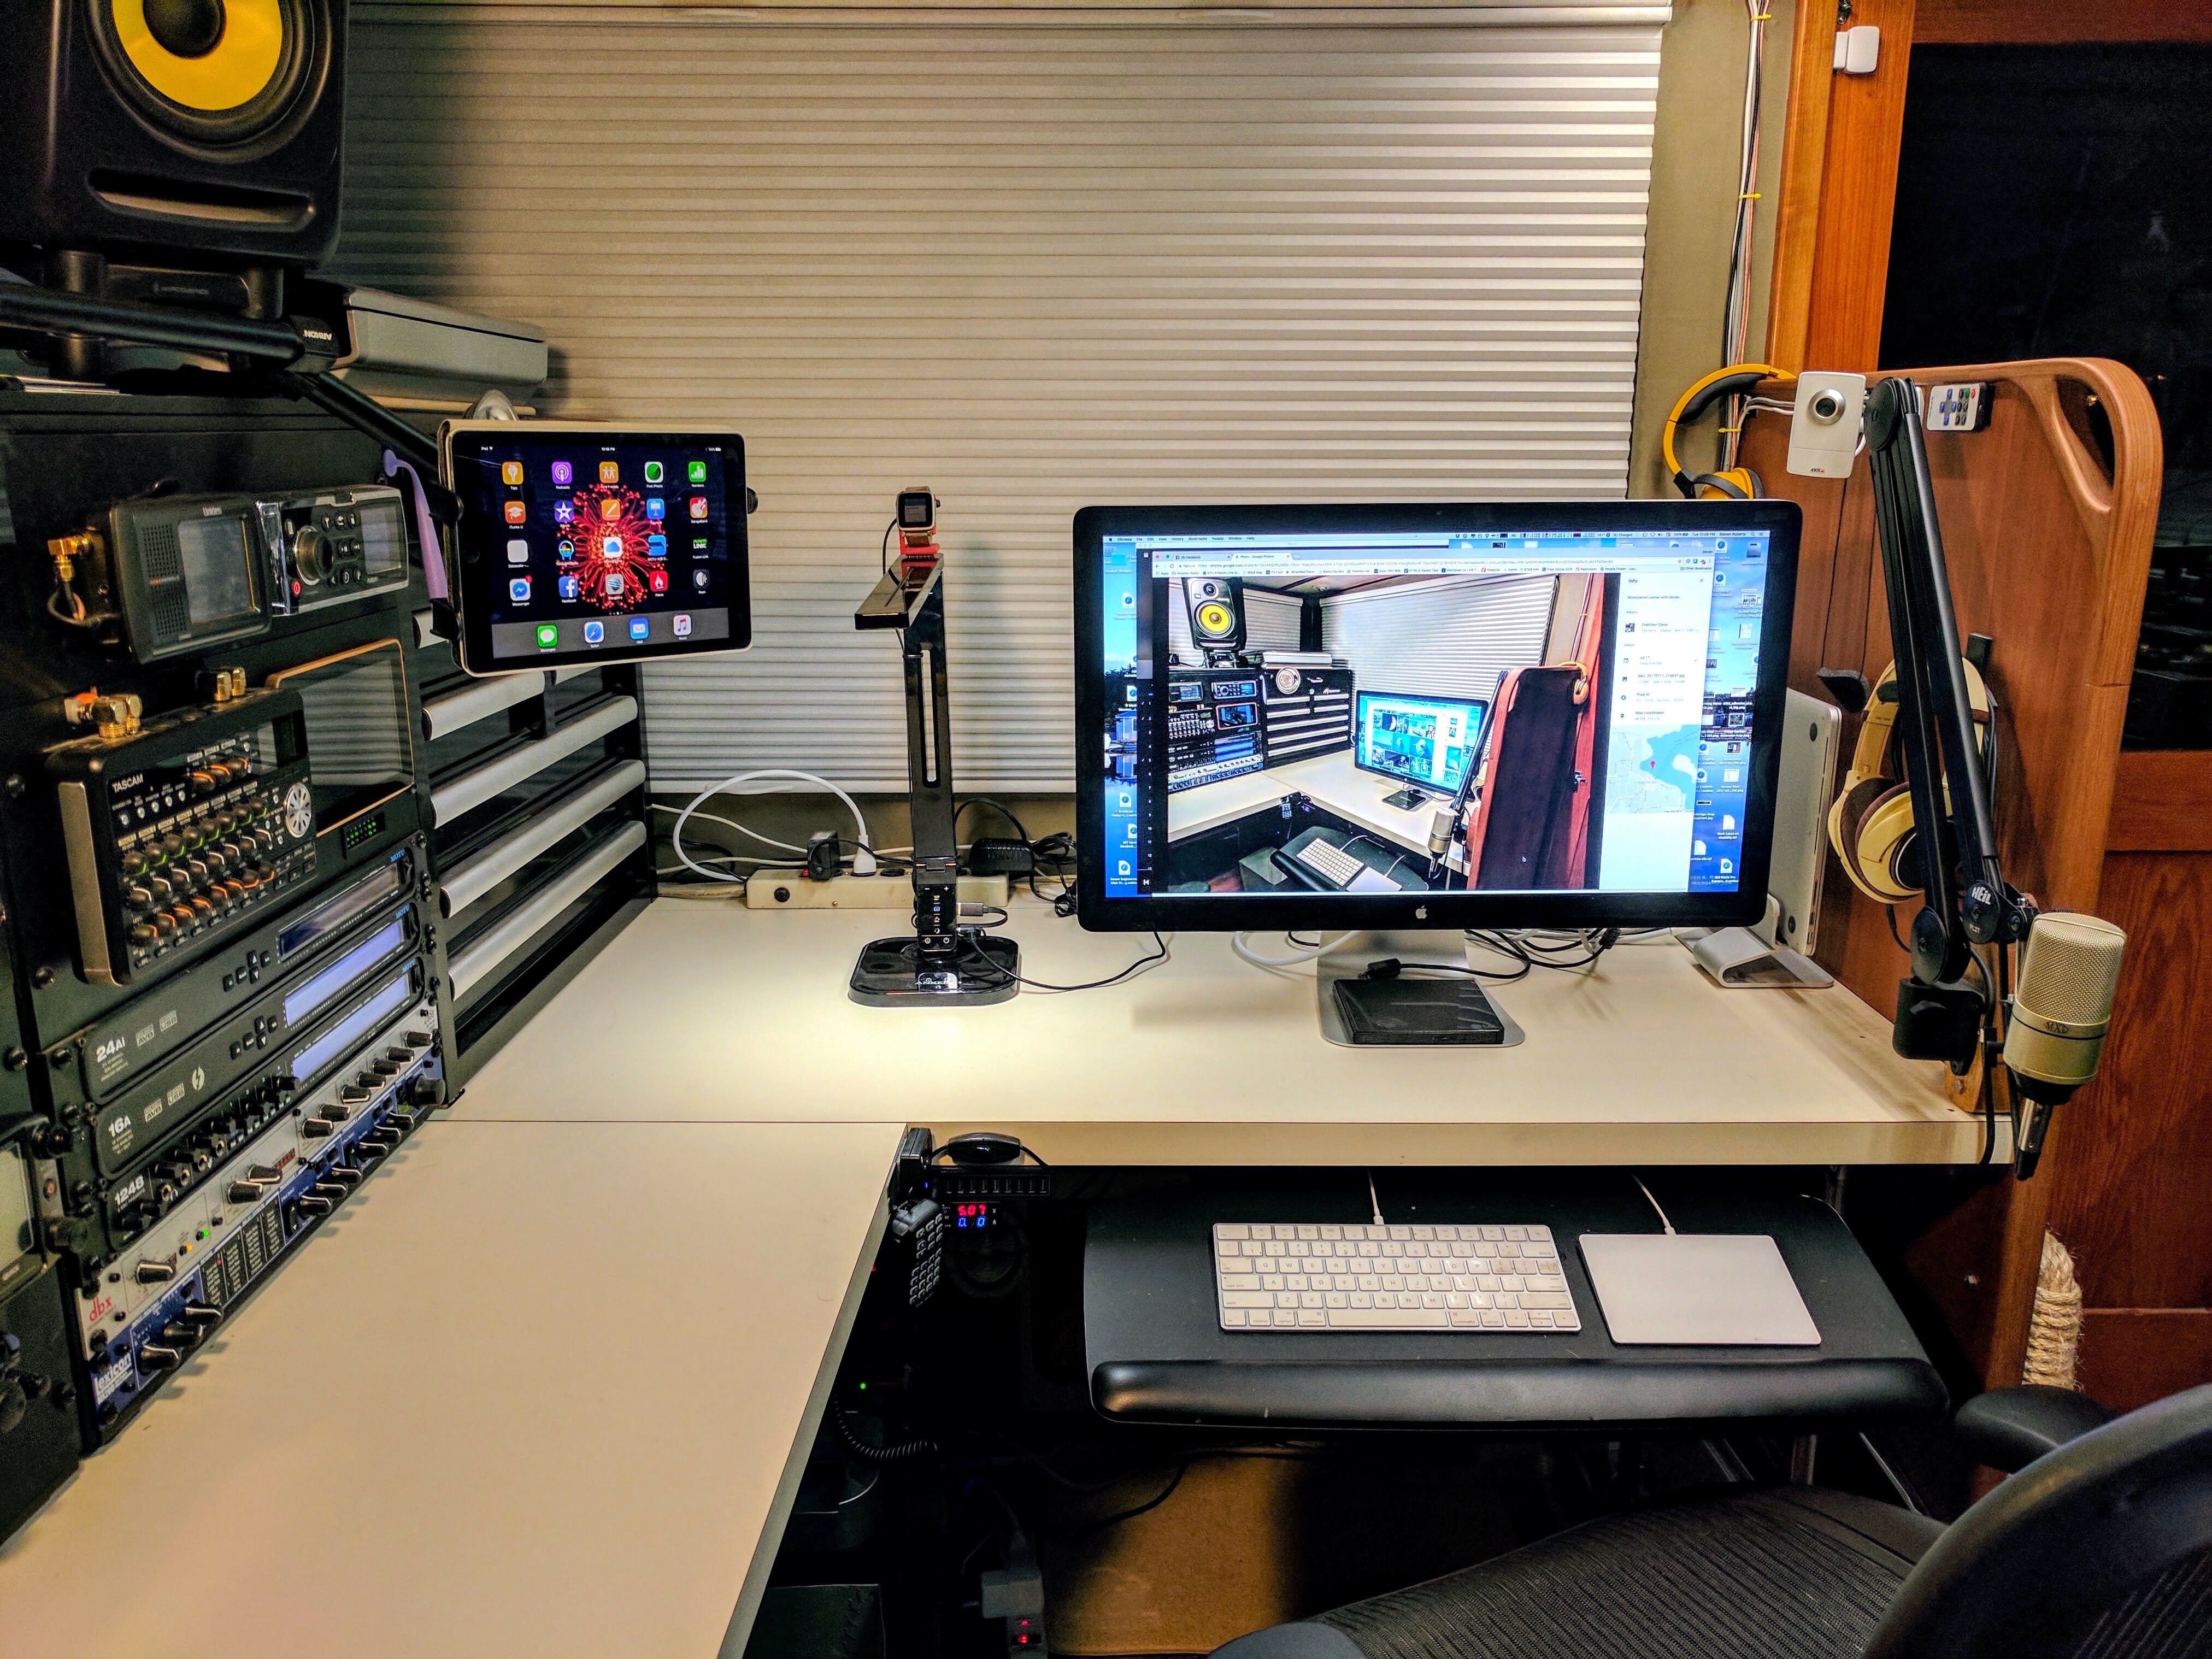
Mechanically, epsilon is a mix of 5 standard units and two custom jobs. The top panel contains a Uniden Home Patrol 2 scanner (installation described here) and a Fusion MS-IP700 marine stereo. The second panel was harder, requiring slots for the right-angle connectors feeding audio in and out of the Tascam PortaStudio as well as a tricky cutout for the 7″ Raspberry Pi touchscreen that will be dedicated to audio streaming and routine display of tools like Zabbix, Unifi, MikroTik, & the ship server.

In the photo above, you can see the rectangular window for the MOTU AVB Switch. The unit is simply Velcro’d to the 24Ai below, positioned to be coplanar with the back of the panel. To cover the sharp shiny milled edge, I printed a little bezel after a few tries (not just to get the dimensions correct, but I was having some adhesion problems with HIPS plastic on the PEI bed). I’m happy with the results… more blinkies!
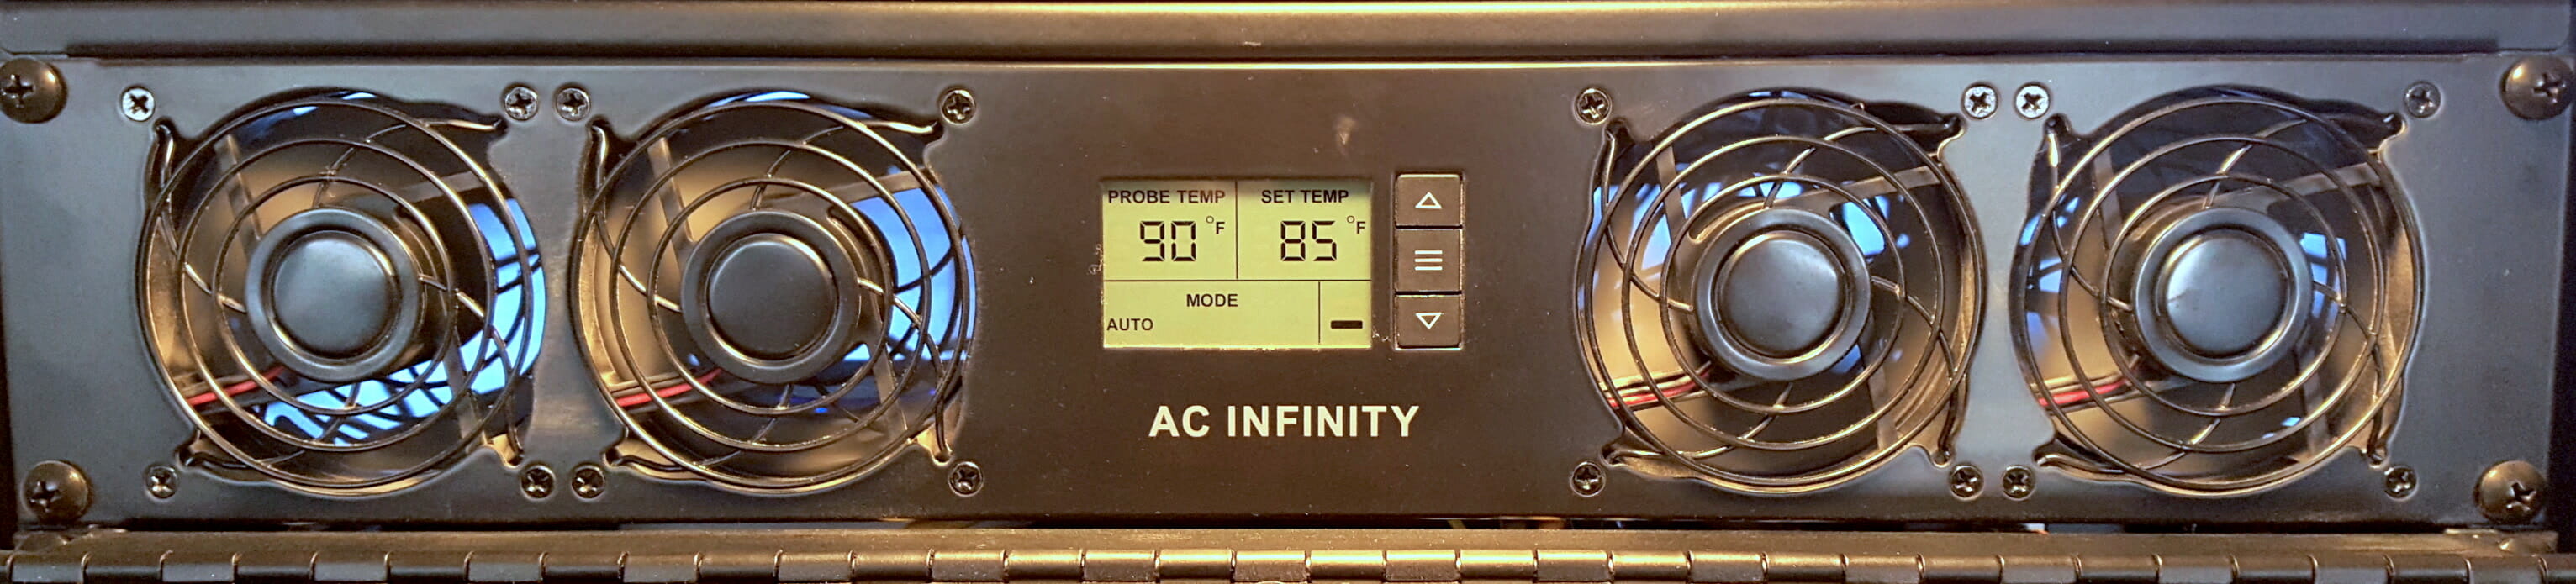
This cabinet, like delta, requires active cooling since the MOTU boxes run hot. I picked up a quiet AC Infinity cabinet fan, printed a mounting bracket, spot-faced some holes to avoid interference with the steel cabinet top, and put it all together. In this photo, you can also see the arm mount for the iPad, as well as one of the monitor stands that has yet to get properly bolted down. That little blue light peeking out is a Bluetooth receiver piped to a stereo pair in the audio network.
This MOTU system, despite a somewhat daunting learning curve, is amazing. The whole boat is getting stitched into it: soundbar in the cabin, microphones ranging from studio-grade to cheap security bugs, ham rigs, speakers and headphones, media tools, computers, marine radio, streaming tools, and so on. It’s overkill, I know, but there are times when it lets me do things that would otherwise be a major pain with mode switching, stray cables, and special cases. I’ve just started using the tools for live interviews, and am working on a YouTube series about my projects, along with an audiobook production of Computing Across America.

Console Integration
Naturally, not everything is tucked neatly in here, so there are cabling challenges… not only from zone-to-zone, but from the console to all corners of the boat (accommodating any cabinet pull-out for service). There are coax runs from antennas, CAT-5 Ethernet going every which way, audio cables, power, N2K, analog video, controls, sensors… it’s a bit of a mess, really, and a challenge to keep up with documentation. Labeling is critical, and when my ten-year-old Brady ID Pal died I bought the compatible BMP21-PLUS and love it. The cost and ongoing effort pays off many times over when you can actually see what goes where.
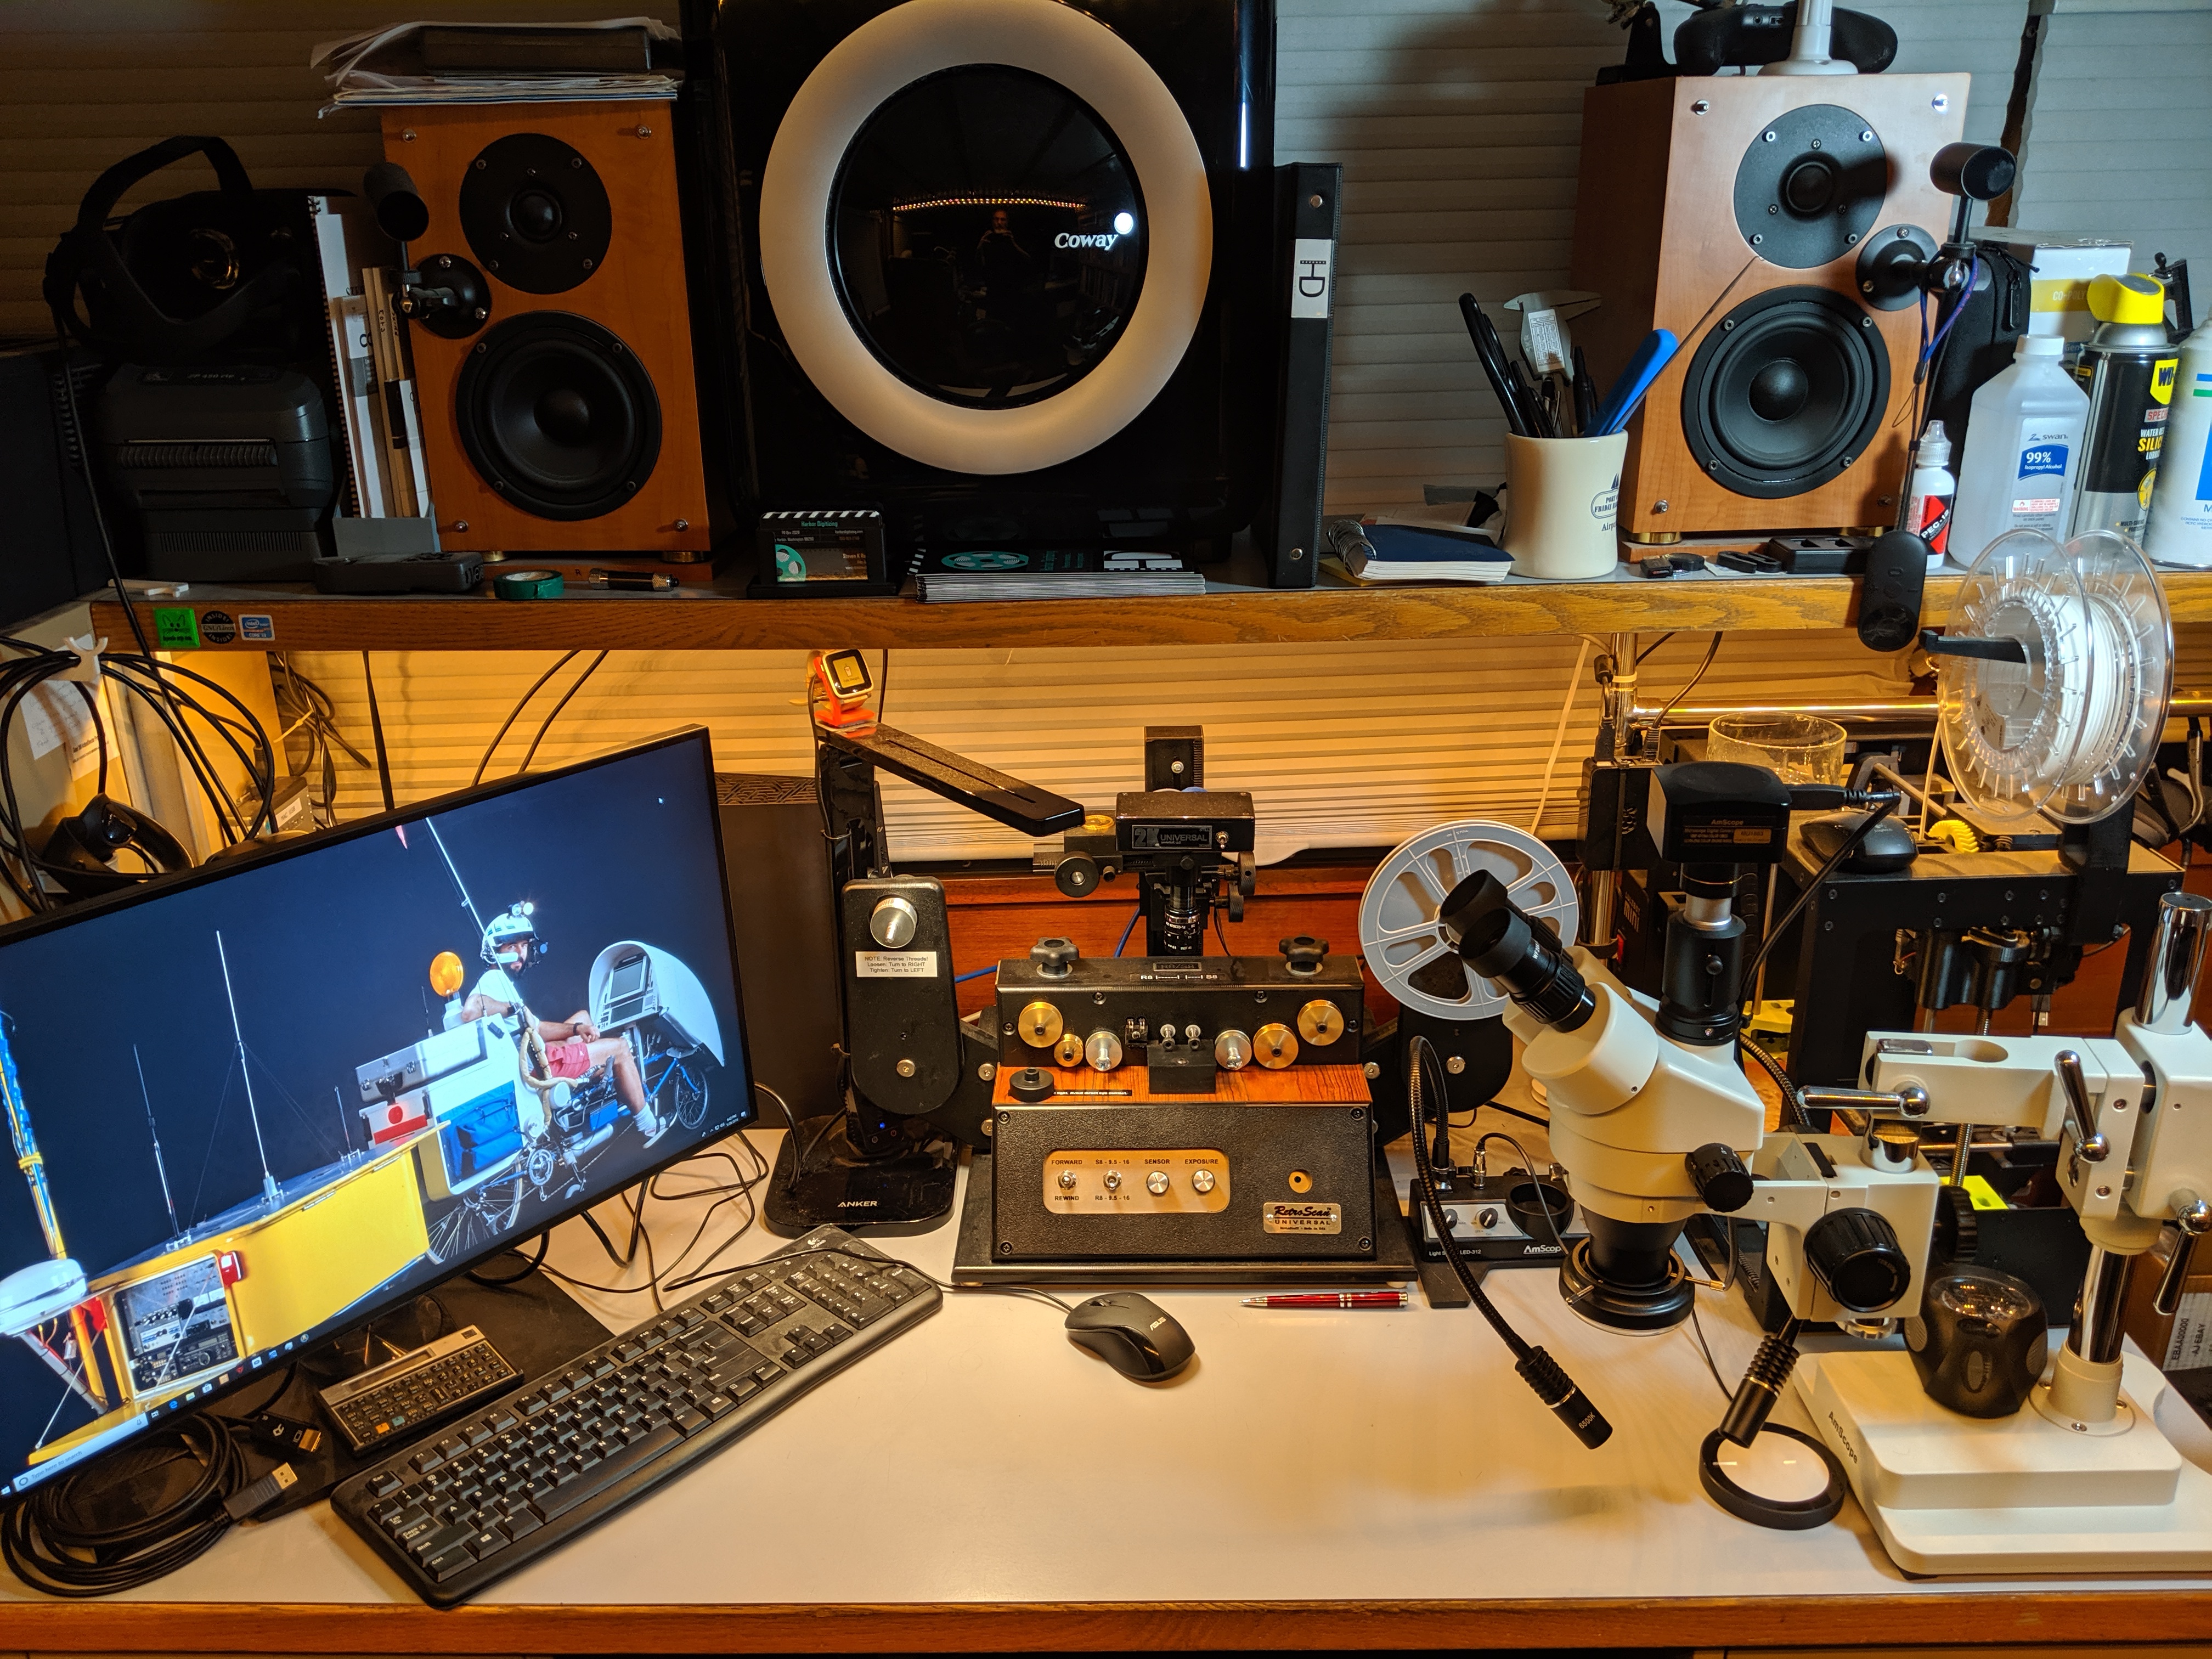
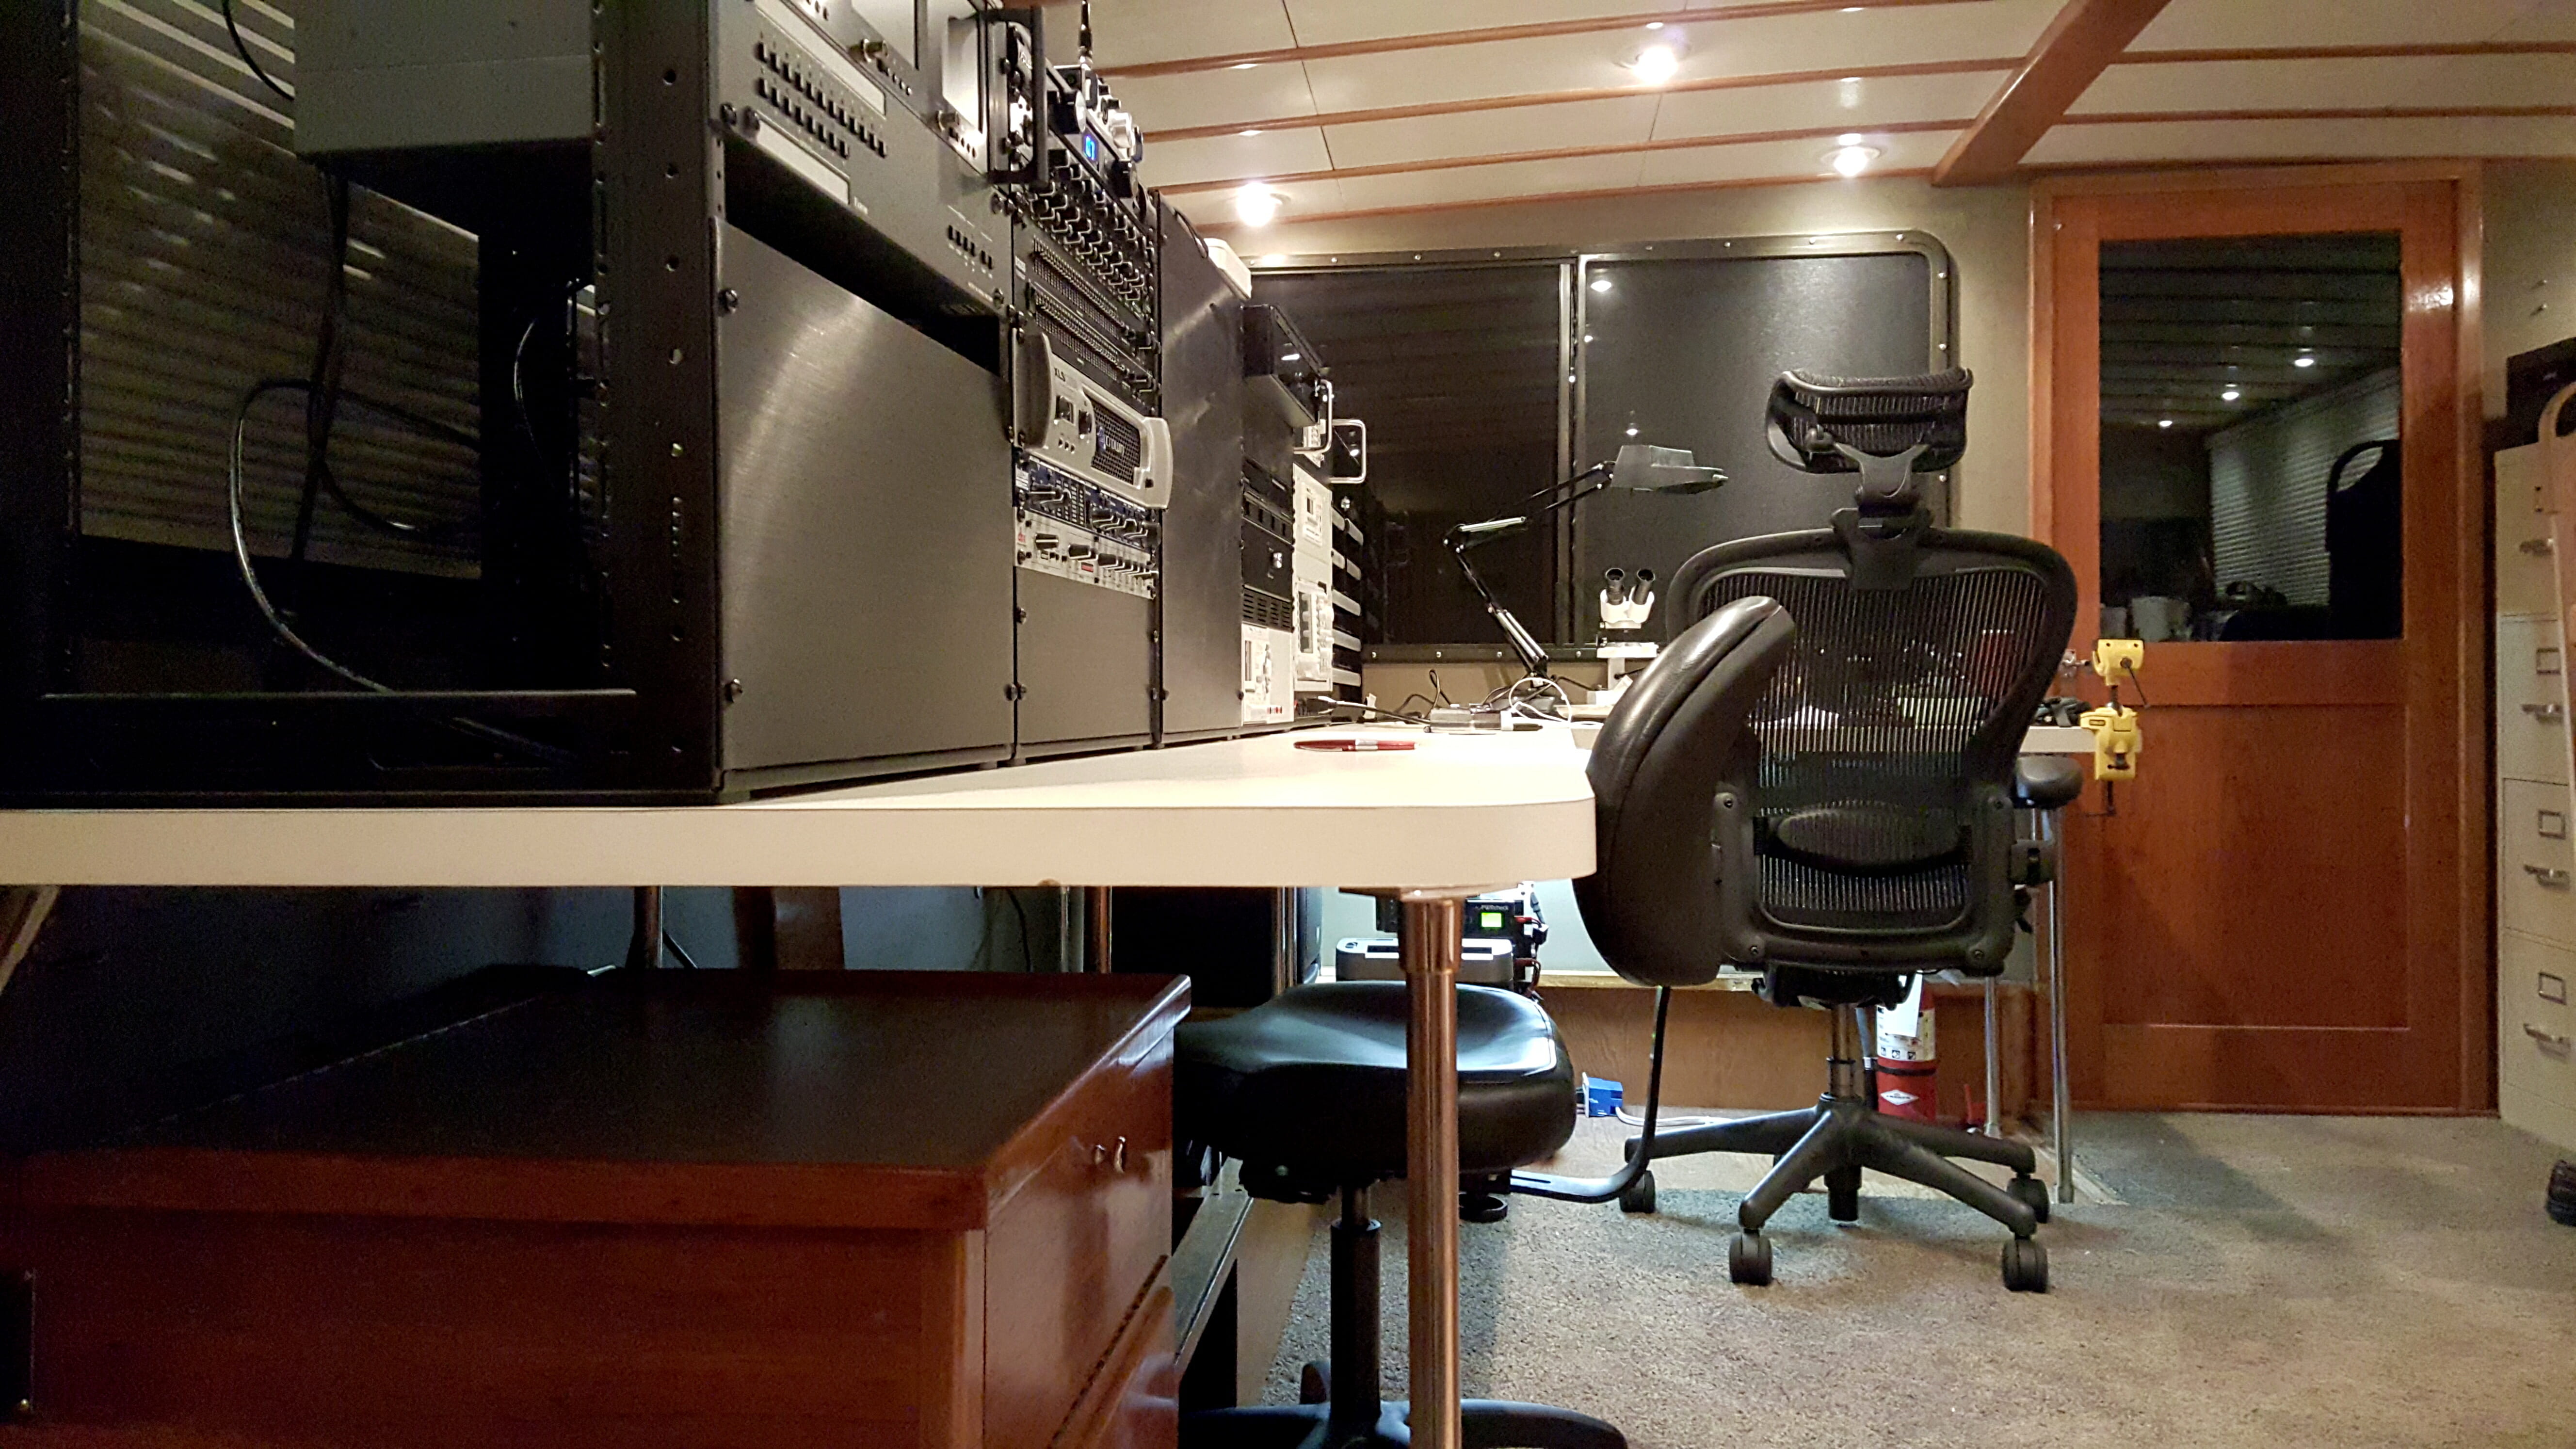
The photo above is a second desk on the other side of the lab/studio/salon, initially intended to be a simple office space that would keep clutter away from the console’s skinny desktop. In true creeping featuritis style, it has become another Zone of Geekery with 3D printer, movie scanner, blazing-fast PC to support film digitizing and virtual reality, printers, studio lighting, NUC console for ham radio digital modes, and… oh yeah… my office (with 8 beige file drawers and an antique letter opener to give it a retro look despite all the blinkies).
But the console remains the heart of this beast. The tool cabinet in the corner at the far end is an important component; the massive clutter of computer-related things is nicely out of sight, and it’s also the home to handheld instruments, drawing tools, chargers, SD cards, cellular bits, and the countless other small objects that would otherwise end up carpeting the desktop. A flatbed scanner is attached to the top with industrial-strength Velcro, and that stainless disk on the front is a magnetic dish for small parts (the console wing has an embedded steel plate under the laminate, just for this sort of thing).
I’ll leave you with a slow sweep, since it’s hard to get a sense of it from still images. Cheers from Datawake!
You must be logged in to post a comment.